
Related Manuals for MaxFoot MF-30

Summary of Contents for MaxFoot MF-30
- Page 1 MF-30 www.maxfoot.bike Support@maxfoot.bike Facebook.com/Maxfoot.bike M A X F O O T B I K E...
- Page 2 B I K E First of all, we would like to thank you for choosing our MaxFoot electric bike. We believe this technology, with the benefits of electric propulsion, provides you with the perfect vehicle to increase your personal mobility.
-
Page 3: Register Your Maxfoot
Register Your MaxFoot Electric Bikes to Join MaxFoot PLEASE REGISTER YOUR MAXFOOT ELECTRIC BIKES AT https://maxfoot.bike/pages/register-your-maxfoot Facebook Maxfoot Owners Group https://www.facebook.com/groups/maxfoot... -
Page 4: Warning
Maxfoot will make every effort to ensure the accuracy of its documentation, but Maxfoot will not be held responsible for any errors or inaccuracies. The assembly of the Maxfoot electric bicycle is very simple, but if difficulties are encountered during the assembly or the bike needs to be debugged, it is recommended that a certified and reputable bicycle mechanic complete it. -
Page 5: Table Of Contents
Index Register Your MaxFoot - - - - - - - - - - - - - - - - - - - - - - - - - - - - - - - - - - - - - - - - - - - - - - - - - - - - 02... -
Page 6: General Info
Mandatory Equipment and Use Locations Before each ride, please make sure you have all the necessary safety equipment and comply with the relevant laws in your area. Maxfoot does not promote any riding behavior that violates the law. Changing Components or Attaching Accessories The use of non-original components or spare parts can jeopardize the safety of your ebike, void your warranty, and, in some cases, cause your ebike to not conform with laws pertaining to your bike. - Page 7 In addition to regular maintenance, you should also check the condition of your bicycle before each ride. Any questions, please contact Maxfoot or seek help from a nearby bicycle shop. For more information, please check the safety checklist before riding.
- Page 8 The height and angle of the handlebars should be adjusted to suit the rider before riding. If the handlebar cannot be fixed, please contact Maxfoot to purchase replacement parts. Before riding, make sure that the saddle and seat post are properly...
- Page 9 General Info M-70 Battery Charged, Secured, and Unplugged Before riding, make sure that the battery is fully charged and can work normally, and corresponds to the data displayed on the LCD display. Before riding, make sure that the input and output ends of the charger are disconnected from the socket and battery, and then place them in a safe place.
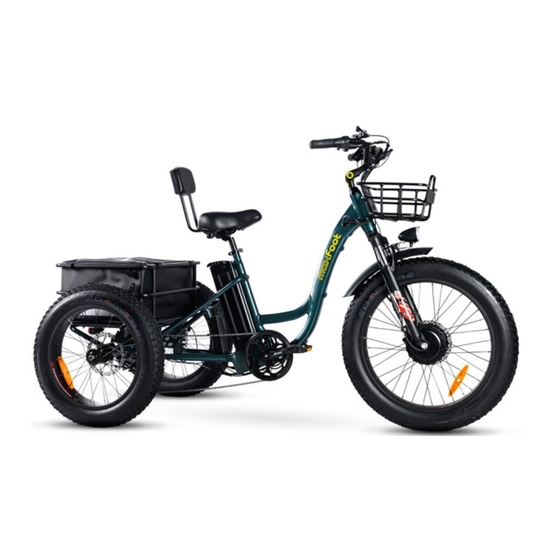
- Page 10 Fully Assembled MF-30 Maxfoot MF-30 Electric Trike...
- Page 11 Fully Assembled MF-30 M-70 Maxfoot MF-30 Electric Trike...
-
Page 12: Assembly Instructions
After cutting the nylon bands, open the bike box and remove the small box and other accessories inside. With the help of another person capable of safely lifting a heavy object, remove the MF-30 cargo trike from the bike box. Carefully remove all of the inside cardboard protection and bubble wrap protecting the bike frame and components. - Page 13 Front Wheel M-70 Step 2:Install the front wheel 1.Loosen the bolts on the front fork protcet bar and remove it. Loosen and remove the nut on the front wheel axle, install the front wheel by lining up the disc brake. The front wheel should be fully seated and centered in the dropouts of the front fork, the brake rotor should be in between the brake pads in the brake caliper.
- Page 14 Handlebar Step 3: Install the handlebar onto the stem 1.Insert the handlebar onto the head tube and align the front fork with the front wheel. 2.Trace the front brake cable directly up from the front brake caliper to the left handlebar and ensure the cables and wires are not twisted.
- Page 15 Pedals M-70 Step 4:Install the pedals. 1.The right pedal (an “R” stuck on the pedal as shown) is threaded to tighten by turning clockwise (toward the trike’s front). Carefully thread the right pedal onto the crank on the right side of the bike slowly and by hand. Do not cross thread or damage the threads.
- Page 16 Fender and Headlight Step 5: Install the front fender and headlight Remove the headlight mounting bolt from the fork arch and set aside. Attach the headlight to the fork arch. Pass the headlight mounting bolt through a washer, the headlight mount, the fork arch mounting point, a second washer, and thread the locknut onto the bolt end.
- Page 17 Other Parts M-70 Step 6: Inflate the tires Use a pump with a pressure gauge to inflate and inflate the tires with the recommended air pressure that is located on the sidewall of every tire. Please note that do not over inflate or under-inflate. Step 7: Set the desired seat height Open the quick release lever by hinging it open fully.
-
Page 18: Adjusting The Seat
Adjusting the Seat A seat at the correct height leads to comfortable, even pedal strokes. Place your heel on the pedal. When your foot is at the lowest point while pedaling, your knee to be slightly bent, not locked out completely straight or curved. If your knee is bent you need to increase the height, adjusting in small increments each time, and if your heel loses contact with the pedal then you need to lower the saddle. - Page 19 Adjusting the Seat M-70 Adjusting the Seat Position and Angle The angle and forward position of a bike seat will affect your riding comfort. The height of your seat isn't the only thing that matters. Seats can be slid forward and backward and angled up or down to get rid of sore spots and make a more comfortable ride.
-
Page 20: Battery Instructions
Battery Instructions Charging Procedure The MaxFoot battery can be charged on the bike or also can be removed and charged at a location away from the E-bike. 1.Plug the charger into an AC outlet. The LED indication light should be green and red showing the charger is working normally. - Page 21 Battery Instructions M-70 When the Battery Is Removed 1.Before the battery is removed from the bike, you need to take out the seat from the bike first. Open the seatpost quick release to remove from the bike. 2.Insert the key into the lock and turn it to the 'Unlock' position. 3.Be careful not to drop or damage the battery when lifting the battery off the frame or while loose from the bike.
- Page 22 Charging Time When the input and output plugs of the charger are connected properly, and the battery is not fully charged, the red charging indicator lights should illuminate; when charging is complete, one red and one green light should illuminate. The time the charger takes to fully charge the battery is dependent on various factors including distance traveled, riding characteristics, terrain, payload, and battery age.
- Page 23 Charge the battery only with the charger originally supplied with the bike from Maxfoot Electric • Bike, or a charger purchased directly from Maxfoot Electric Bike designed for use with your specific bike serial number, as approved by Maxfoot Electric Bike. Never use an aftermarket charger, which can result in damage, serious injury, or death.
- Page 24 Long-Term Battery Storage Properly storing your battery during periods of non-use can greatly affect its longevity. For short-term storage (for example, periods of less than one month) all you need to do is store the battery someplace temperature controlled. For longer-term storage, simply give the battery a full charge, and again keep it in a temperature-controlled environment.
- Page 25 Battery Operation M-70 Battery Key Positions Familiarize yourself with the key port and key positions before riding the TRIKE. The key should be in the “on” position, with the battery locked to the frame, then ready to ride. ON --------- locked to frame and the power is on. •...
-
Page 26: Handlebar Features
Handlebar Features Location on Handlebar Component Bell LCD Display Remote LCD Display Shifter Twist Throttle... -
Page 27: Using Lcd Display
Using LCD Display M-70 Information on Display Battery Charge Indicator • Distance (Odometer, Trip Odometer) • Distance Unit (kilometers (Km), miles (Mile)) • Speed Unit (miles per hour (MPH), kilometers • per hour (Km/h)) • Operation Mode • Watt Meter, Error Code Indicator •... - Page 28 Using LCD Display LCD Display Operations Each LCD Display comes with a USB port attached to the bottom of the meter to charge your mobile devices. After 5 minutes of inactivity, the LCD Meter will automatically turn off to conserve power. When not riding the bike, you can turn off the meter by holding down the power button (M button) for several seconds.
- Page 29 Start-Up Procedure M-70 After the bike has been properly assembled, make sure all components are secured correctly, and you have read this entire manual, please turn the bike on and select a power level following the steps outlined below: 1.Before use the bike, ensure the key port is locked on the OFF position indicating the battery is off and locked onto the frame mount.
-
Page 30: Brak Light
Brak Light 1.The integrated head/ rear light is powered by the battery, which can ensure your riding safety at night. The tail light provides three operation modes: always on, strobe, and brake highlight. Combination of three modes to ensure your riding safety and increased visibility at night, which also can warn at critical times. -
Page 31: Other Considerations
Battery Warranty Best Practices for Extending Range and Battery Life Charging is the only way to use your e-bike and its battery. However, there are ways you can do this without affecting the lifespan of your battery. Here are some tips to make sure you charge and use your battery effectively: Don’t wait until your e-bike battery is dead before recharging it. - Page 32 Battery Warranty The total maximum weight limit, or payload capacity, of the MF-30 trike (350 lb) includes the weight of the rider as well as clothing, safety gear, cargo, accessories, passengers, and anything carried in the front and rear basket total.
- Page 33 Also locking up your bike is recommended to ensure your bike is secure and the chance of theft is reduced. Maxfoot Electric Bike has no claim or recommendation regarding proper lock hardware or procedures to secure your bike, but we do recommend you take appropriate precautions to keep your...
- Page 34 Maintenance Basic Bike Care Properly maintain batteries by keeping them fully charged. Never store the battery in a discharged state. Completely discharging will reduce the numbers of recharging cycles during the battery’s life and limit the capacity. Never immerse or submerge the bike or any components in water or liquid as the electrical system may be damaged.
-
Page 35: Troubleshooting
Troubleshooting Basic Troubleshooting If your MaxFoot bike is not working, check the Quick Disconnect fittings to make sure they did not come loose or unplugged. There are 5 total colored Quick Disconnect fittings to check: Throttle – Yellow (3 PIN) Left Brake Lever –... - Page 36 4. Blown charge fuse 3. Replace 4. Replace charge fuse Please try to adjust the position of the disc Wheel makes strange The disc brake rubs against the brake brake. If noise persists, please contact us noises buckle. via email: support@maxfoot.bike.
- Page 37 Error Detection For any additional troubleshooting help, please contact Support@maxfoot.bike. #21-Abnormal Current: Check if the phase of motor is short circuiting. #22-Abnormal Throttle: Check whether the throttle is functioning properly. #23-No Phase State: Check if the phase wire is normal or check if the cable is firmly connected with controllers.
-
Page 38: Tyre Inflation And Replacement
Failure to remove all air pressure from the inner tube could result in injury. Using aftermarket tires or inner tubes, not provided by Maxfoot Electric Bike may void your warranty, create an unsafe riding condition or damage to your trike. -
Page 39: Warranty And Safety
Be careful at intersections and when preparing to pass other vehicles or other cyclists. • Familiarize yourself with all the features and operations of the trike by Maxfoot. Practice and become • proficient at shifting gears, applying the brakes, using the power assist system, and using the throttle in a controlled setting before riding in riskier conditions. - Page 40 Warranty and Safety Check your local rules and regulations before carrying cargo. • When braking, apply the rear brake first, then the front brake. If brakes are not correctly applied, they • may lock up, you may lose control, and you could fall. Maintain a comfortable stopping distance from all other objects, riders, and vehicles.
- Page 41 E-Bike as sold, operator error, water damage, extreme riding, stunt riding, or improper follow-up maintenance. For the avoidance of doubt, Maxfoot will not be liable and/or responsible for any damage, failure or loss •...
- Page 42 Maxfoot will not be liable and/or responsible for any damage, failure, or loss caused by any unauthorized service or use of unauthorized parts. In no event shall Maxfoot be responsible for any direct, indirect, or consequential damages, including without limitation, damages for personal injury, property damage, or economic losses, whether based on contract, warranty, negligence, or product liability in connection with their products.
-
Page 43: Dispute
M-70 Shipping damage Damage to a Covered Component during shipping is not covered by this Limited Warranty, but Maxfoot will replace such damaged Covered Components if you: Notify Maxfoot of a Covered Component damaged in the shipping process within seven (7) days of •... - Page 44 You will be responsible for shipping costs associated with returning a Covered Component, unless • Maxfoot agrees in writing to pay for such shipping costs. Replacement Covered Components under this Limited Warranty shall only be shipped to the address of the original purchaser.
- Page 45 MAXFOOT’S ENTIRE LIABILITY FOR ANY BREACH OF THIS LIMITED WARRANTY. MAXFOOT’S LIABILITY SHALL UNDER NO CIRCUMSTANCES EXCEED THE ACTUAL AMOUNT PAID BY YOU FOR THE E-BIKE, NOR SHALL MAXFOOT UNDER ANY CIRCUMSTANCES BE LIABLE FOR ANY CONSEQUENTIAL, INCIDENTAL, SPECIAL OR PUNITIVE DAMAGES OR LOSSES, WHETHER DIRECT OR INDIRECT.
-
Page 46: Links To Assembly Video And Online Resources
Links to Assembly Video and Online Resources Assembly Video https://www.youtube.com/watch?v=4IbOSNXkTtg Online Resources For more information on best practices, please visit the Maxfoot website (www.maxfoot.bike) or contact Maxfoot Product Support with any questions. -
Page 47: Writing In Last
Writing in last When Setting up Maxfoot, our main mission was to spark passion in others about the exceptional yet inaccessible automotive technologies. Now, our mission has become our purpose of life which is to bring the best yet affordable e-bike to everyone in the world.
Need help?
Do you have a question about the MF-30 and is the answer not in the manual?
Questions and answers
battery charged but bike doesnt go
The MaxFoot MF-30 bike may not move even though the battery is charged due to the following possible reasons:
1. Loose wiring – Check and reconnect wiring while the bike is powered on.
2. Loose or damaged motor cable – Inspect and reconnect the motor cable.
3. Battery poor contact – Ensure the battery is in full contact with its mount.
4. Blown discharge fuse – Replace the discharge fuse if it is blown.
5. Battery in OFF (locked) position – If the key is in the OFF position, the bike will remain off and not function.
Check these conditions to identify and fix the issue.
This answer is automatically generated
no response from bike after charging 3 hours