
Related Manuals for AVIWEST PRO3 Series


Summary of Contents for AVIWEST PRO3 Series
- Page 1 PRO3 Series Quick Start Guide Document Version: v1.5 Parc Edonia, Bat. X1 Rue de la Terre de Feu 35769 Saint Grégoire Cedex France Tel: +33 2 56 56 50 14 Email: info@aviwest.com...
-
Page 2: Front View
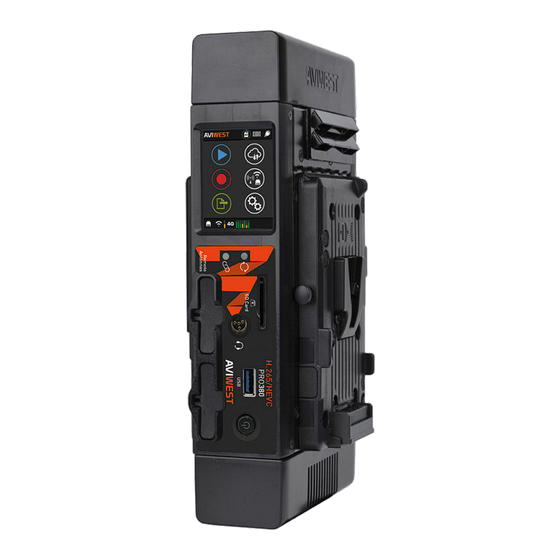
Front View Touchscreen Link Indicator Activity Indicator SD Card slot Remote Antennas Intercom mini XLR (headphone, micro) (MCX connectors) USB 3.0 port Power Button Rear View Analog Audio input/output (right) (channel 2) Ethernet 2 Ethernet 1 Analog Audio input/output (left) (channel 1) HDMI 1.4 Output HDMI 1.4 Input Micro SIM Card Slots... -
Page 3: Left And Right Sides
Left and right sides Battery Mounting plate (Gold Mount, V-mount) Camera Mounting plate (Gold Mount, V-mount) Getting ready 1. Install an external battery onto the unit or connect the AC/DC adapter to the unit. 2. Insert a SD card Class 10 recommended FAT 32 or exFAT... - Page 4 3. Insert SIM cards into slots. Micro SIM cards required. a) Remove the SIM card cover. b) Insert SIM cards according to indications on cover. For PRO340 For PRO360-5G For PRO380 When using the unit in the USA, we recommend inserting SIM cards as follows: SIM slot Number US Operator AT&T...
-
Page 5: Turning On The Unit
4. Connect the video input cable (either HDMI or SDI). HDMI 3G-SDI Turning on the unit Press the power button to turn the unit on. When the unit is ready, the Home screen appears:... -
Page 6: Selecting A Video Source
Selecting a Video Source 1. From the Home menu, click on 2. Click on ⇒ The default source is Auto. 3. Check that video source is Auto. 4. If not (SDI, HDMI or Pattern), click on the Video source Field and select Auto. Configuring a Destination Profile 1. - Page 7 4. Use the keyboard to enter the new profile name. 5. Click on 6. Click on to configure the Profile settings: • StreamHub IP address or Hostname • Input assignment on the StreamHub set to Automatic • Auto-connect function enabled Make sure that Port number, Username or Password fit with settings entered from the StreamHub server.
- Page 8 Starting a Live 1. From the Home menu, click on 2. Click on to go to the LIVE menu. The LIVE menu displays information: Selected Live profile Selected Record profile Auto-record (ON/ OFF) Selected Destination Profile 3. Click on and on to start a Live.
- Page 9 When Auto-record is enabled, additional indications appear: Remaining Recording Time possible on SD card Space used on SD Card Duration of Live Stopping a Live 1. Click on 2. Click on 3. Click on...
- Page 10 Starting a Record 1. From the Home menu, click on 2. Click on to go to the RECORD menu. The RECORD menu displays information: Selected Record Profile Auto-forward (ON/ OFF) Selected Destination Profile 3. Click on and on to start a Record. 4.
- Page 11 In case of a Record and Forward, additional indications appear: Network Bitrate Amount and percentage of data already forwarded Duration of record Stopping a Record 1. Click on 2. Click on 3. Click on...
- Page 12 Starting a Forward 1. From the Home menu, click on The Forward menu appears: 2. Select a type of Forward. To forward the last record: Click on To forward all files: a) Click on b) Click on...
- Page 13 To forward some specific files: a) Click on b) Click on d) Click on c) Click on files to be forwarded. During forward, some indications are displayed: Number of files still to be forwarded Network Bitrate Amount and percentage of data already forwarded Duration of forward...
- Page 14 Stopping a Forward 1. Click on 2. Click on 3. Click on...
-
Page 15: Turning Off The Unit
Turning off the unit Long press the power button to turn the unit off. All technical documents Scan the following QR Code to access the Aviwest portal and get access to all technical documents (user guide, release notes...).
Need help?
Do you have a question about the PRO3 Series and is the answer not in the manual?
Questions and answers