Table of Contents
Advertisement
Quick Links
Advertisement
Table of Contents

Summary of Contents for Hubbel HYDRAWASH EZ2130
- Page 1 INSTALLATION & OPERATING INSTRUCTIONS For Model EZ2130...
-
Page 2: Table Of Contents
TABLE OF CONTENTS 1 SYSTEM SUMMARY ......................3 2 SYSTEM COMPONENTS ....................4 Machine ........................4 Pump ........................4 Soap/ Chemical And temperature Switch ............4 Machine Control Panel ..................5 3 ACCESSIORIES ........................7 Tankless Water Heater ..................7 Hose Reel ......................7 50’ Hose........................7 Spray Wand Assembly ..................7 Floor Scrubber .....................8 4 SAFETY PRECAUTIONS ....................8 machine ........................8... -
Page 3: System Summary
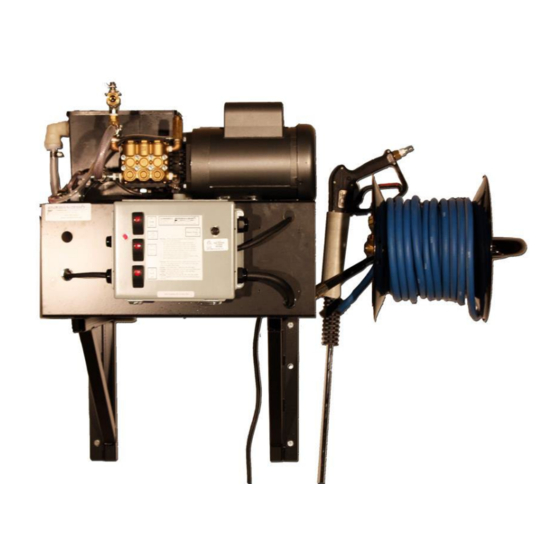
1 SYSTEM SUMMARY • The system consists of a 2hp Baldor motor and shaft driven pump that is capable of producing 1300 psi at 2.1 gallons per minute (gpm). When the gun is not in use, the unloader engages and puts the unit into bypass mode. •... -
Page 4: System Components
2 SYSTEM COMPONENTS MACHINE The motor is a TEFC (Totally Enclosed Fan Cooled) C-faced motor. The model EZ2130 uses a Baldor 2hp motor and requires a 20 Amp GFCI (Ground Fault Interrupter) feed. It operates on 120-volt single phase power. Do not restrict airflow through the fan end of the motor housing. -
Page 5: Machine Control Panel
MACHINE CONTROL PANEL Power enters the control box at 120 volts AC. Within the panel the power is stepped down through transformers to 24 volts AC. All control functions operate at 24 volts AC for safety reasons. The only component which sees 120 volts is the motor starter relay, which is the switch controlling the motor. - Page 6 Hubbell HydraWash O&M Page 6 of 22...
-
Page 7: Accessiories
3 ACCESSIORIES TANKLESS WATER HEATER HOSE REEL 50’ HOSE SPRAY WAND ASSEMBLY Hubbell HydraWash O&M Page 7 of 22... -
Page 8: Floor Scrubber
FLOOR SCRUBBER 4 SAFETY PRECAUTIONS MACHINE WARNING: When using this product, the basic precautions should always be followed, including the following: Read all instructions before using this product. • To reduce the risk of injury, close supervision is necessary when a product is used near children. -
Page 9: Grounding Fault Circuit Interrupter Protection
GROUNDING FAULT CIRCUIT INTERRUPTER PROTECTION To provide additional protection from the risk of electrical shock, this machine should only be connected to a panel breaker that is protected by a Ground Fault Circuit Interrupter (GFCI). TANKLESS WATER HEATER 1. You must read and follow all instructions. Serious bodily injury or death could occur if you ignore this warning. -
Page 10: Installation Instructions: Machine
5 INSTALLATION INSTRUCTIONS: MACHINE MACHINE The main assembly of the cleaning unit is pre-assembled and was tested thoroughly at the factory. The support legs, or wall mounting brackets, are packed separately and will need to be attached to the main assembly. INSTALLATION OF THE MACHINE –... - Page 11 Hubbell HydraWash O&M Page 11 of 22...
-
Page 12: Machine Location And Mounting
MACHINE LOCATION AND MOUNTING WARNING: The main pump unit is heavy. Please do not attempt to do the job alone. Have at least two people lift the unit up on the wall brackets. 1. The machine is to be mounted in a warm dry area. CAUTION: The machine is not intended for installation into an area that is exposed to freezing temperatures or wet conditions. -
Page 13: Installation Instructions: Tankless Water Heater
INSTALLATION INSTRUCTIONS: TANKLESS WATER HEATER Notes • Power distribution blocks are only installed on single phase models. • Magnetic contactors are only installed on 3-phase models. • Transformers are only installed on 3-phase models over 240 volt Mounting the unit: •... - Page 14 Plumbing Installation Instructions: IMPORTANT INFORMATION: • Ensure all fitting installations comply with local plumbing and building codes. • This water heater does not require a temperature and pressure (T&P) relief valve. You may install a T&P relief valve if the county, city or state plumbing code requires it.
- Page 15 • Cut the tube so that the ends are square. WARNING: Ensure that there are no burrs or damage to the cut end. This will prevent any damage to the internal O- ring. • Once the tubing end is cut square and clean, mark the pipe to be installed at a distance of 1 ¾”...
- Page 16 • After inserting both fittings, open the hot water faucet and allow water to run through the water heater for at least three (3) minutes, cycling the flow on and off every minute. This process clears all the air from the lines and must be performed prior to turning on the power at the unit.
-
Page 17: Operating Instructions: Machine
IMPORTANT INFORMATION: • The unit must be wired in accordance with the current version of the National Electrical Code (US) or Canadian Electric Code (Canada). • The unit must have its own independent circuits. • When the heater is not within sight of the electrical circuit breakers, an additional local means of disconnection of all ungrounded conductors must be provided that is within sight of the appliance or a circuit breaker lockout must be used. -
Page 18: Shut Down Procedure
machine is in the on position. Turn the pump switch on at the unit, this will start the motor, pump, and open the cold solenoid providing cold water to the reservoir tank. 3. Grasp gun firmly and squeeze trigger. CAUTION: The gun kicks back, hold on with both hands. 4. -
Page 19: Warranty
Once the water supply is on and air has been purged from the system, power the unit on at the main panel. The unit is now operating automatically. When water flows through the unit, the heating elements turn on to heat the water to the displayed setpoint temperature. -
Page 20: Limitations
are warranted only for the unexpired portion of the original warranty. LIMITATIONS Purchaser will be responsible for the costs of any service call requested to demonstrate or confirm the proper operation of the appliance, to correct an improper installation that the purchaser may have performed, or to correct malfunctions in the appliance created by operation of the appliance in a manner not prescribed by, or cautioned against, in the HyrdaWash Instruction Manuals. - Page 21 PRODUCT WARRANTY: Hubbell warrants the Hubbell Tankless Water Heater and its components as manufactured by Hubbell (the "Product") to be free from defects in materials and workmanship, under normal use and service for the period of time identified below beginning from the date of installation, provided that the Product is (i) installed within sixty (60) days from date of shipment from Hubbell and (ii) installed by a licensed electrician and plumber (specific proof required) and maintained in accordance with Hubbell's written instructions.
- Page 22 manufacturer’s instructions at the time of installation and if additional installation parts are required, the costs will be the responsibility of Buyer. Product nameplate identifying the model and serial number must be affixed to the unit and legible for the warranty to be exercised. Product without the nameplate is excluded from warranty consideration.
Need help?
Do you have a question about the HYDRAWASH EZ2130 and is the answer not in the manual?
Questions and answers