
Subscribe to Our Youtube Channel
Related Manuals for GaleMed MR-100

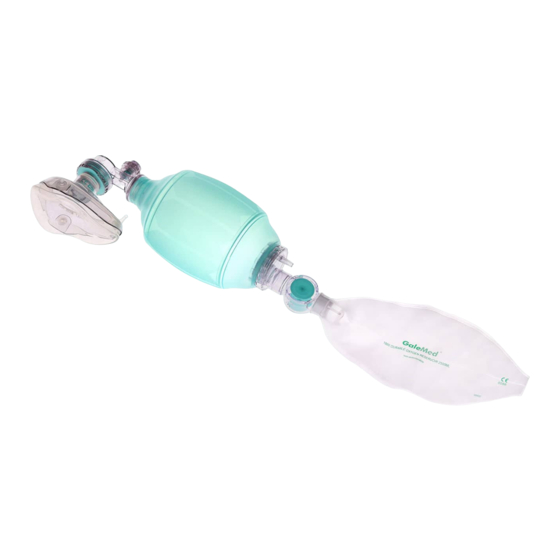
Summary of Contents for GaleMed MR-100
- Page 1 GaleMed TM MR‐100 Resuscitator MR‐100 Silicone Reservoir Bag, 2L AR0097 (21037) Instruction for Use (IFU) ...
-
Page 2: Version History
2. Version History Version # Document No Change Date 1 2020/11/18 ... -
Page 3: Product Description
3. Product Description 3.1 Intended Medical Use 3.1.1 Product name Resuscitator 3.1.2 Intended Use Provide or assist ventilation in patients whose breathing is inadequate. 3.1.3 Indications The different models are indicated for different people according to their weight. 3.1.4 Contraindications 1. Adult resuscitator No existing contraindications for using resuscitator to adult people. 2. Child resuscitator No existing contraindications for using resuscitator to child people. 3. Infant resuscitator a) Meconium‐stained baby depressed at birth b) Congenital diaphragmatic hernia 3.1.5 Patient Group The adult resuscitator is for people with a body weight of more than 30 kg (66 lbs.) The child resuscitator is for children with a body weight between 7 and 30 kg (15‐66 lbs.) The infant resuscitator is for infants with a body weight up to 7 kg (15 lbs.) 3.1.6 Intended User This product is intended for use by qualified medical or emergency personnel trained in pulmonary ... - Page 4 (C) (A) (D) (B) Assembly View (A) Principle Drawing (B) – Inspiration When compressing down the Resuscitator, it create the positive pressure and close the Intake Valve (G), the air inside the bag pushes the Duckbill Valve (E) downward, and block the expiration port (F), and deliver the air into the Silicone Bag then to the patient through the center of the Duckbill Valve, if the Oxygen is in use, it should be connected by (H) part, then the Oxygen will fill up the Reservoir through the Reservoir Valve, and installs in the Silicone Bag through the recovery inhale motion, then send directly into the patient’s body by compressing the silicone bag. (K) X (G) (E) (F) Principle Drawing (C) – Exhalation When releasing the Silicone Bag (B), push upward the Duckbill Valve and keep it in close position, so to release the exhale air through the Exhale Valve (F). (C) (D) (G) (B) (E) (F) (H) (I) ...
- Page 5 At the same time, the Inhale Valve (G) is opened by the expiratory pressure created by releasing the bag, and send the air into the bag through the top of the Reservoir Valve, and at the same time, send the Oxygen into the bag from the Oxygen Reservoir till the bag returns to the original shape before compressing. To avoid excessive Oxygen flow rate and low compressing frequency causing too high pressure inside the bag and the Reservoir, the Reservoir Valve (I) is specially designed to release the excessive air, to keep a low‐rate Oxygen supply and ensure the patient’s safety Principle Drawing (D) GaleMed reusable resuscitators are equipped with pressure relief valves (optional), automatically provide and adjust the pressure in the lung, and keep it within 40 / 60 cmH O, any pressure exceed this standard will cause the pressure relief valve to jump off and push the pressure out to ensure the patient’s safety. Pressure Relief Valve Pressure Relief Valve Motion Should higher inspiratory pressure be required the pressure relief valve may be overridden by placing the thumb ever the valve as show as follows. Pressure Relief Valve Overriding the Pressure Relief Valve 3.1.8 Direction for Use: 3.1.8.1 Reusable‐Resuscitator Operation 1. Place the patient on back, pull his chin upward as possible to keep the airway and the mouth cavity in alliance line, so the patient can breathe smoothly. ...
- Page 6 with the pressing on the Resuscitator). • Check the patients lips and face color through the transparent part of the mask. • Check that the patient valve is working properly through the transparent housing. • During exhalation, check that the interior of the mask is ‐ Testing the Resuscitator GaleMed reusable resuscitator should be tested as follows: • When first using the new Resuscitator • (After cleaning and sterilizing) • After any new parts have been fitted • Monthly, if the Resuscitator is not frequently used. Equipment required: Test lung, 0‐100 cmH2O manometer (for Infant and Child resuscitators only), flow meter, regulated gas supply, gas supply tubing. 3.1.8.2 PEEP valve Operation 1. Fit the Flow Diverter over the downstream housing on the resuscitator as shown in the illustration. Be sure the diverter is fully seated. 2. Position the Flow Diverter as desired to direct exhaled gases away from the rescuer ...
- Page 7 and/or patient. 3. Squeeze the resuscitator bag several times to assure that the unit is functioning properly. 4. Select the Peep Valve with appropriate range (2 ‐10cm H O or 5‐20cm H O) 5. Set the Peep Valve knob to the approximate value shown on the Peep Valve housing. 6. Connect the Peep Valve to the Flow Diverter port as shown in the illustration. Connect the resuscitator to a manometer and test lung. Ventilate the test lung and adjust the Peep Valve as required to obtain the desired end expiratory pressure. 7. Ventilate the patient following ACLS procedures for ventilation. Watch the chest rise during ventilation. Also, during ventilation, periodically check for: ‐ signs of cyanosis; ‐ adequacy of ventilation; ‐ proper airway pressure; ‐ secure connection of Peep valve and diverter. 8. Between patient use or periodically, clean and sterilize the Peep Valve and Flow Diverter. ‐ Testing the Resuscitator 3.2 System Overview 3.2.1 Intended for use together with other devices: Oxygen Tubing, Airway, Silicone Mask, Aircushion Mask, PEEP Valve, Disposable manometer 3.3 Specification/Functions 3.3.1 Operating Environmental Temperature Limits: ‐18°C to +50°C 3.3.2 Storage Environmental Temperature Limits: ‐40°C to 60°C (‐104°F to 140°F) 3.3.3 Range of setting: Adult Resuscitator Child Resuscitator Infant Resuscitator Valve resistance <4.0 cmH O ...
- Page 8 1 pc/pkg, 50 2413 AV0037 Durable PEEP Valve 5~20cmH2O 30F pcs/box Durable PEEP Valve 1 pc/pkg, 50 2001 AR0003 ‐ 30/26mm Diverter pcs/box Disposable Manometer REF SAP REF Description Specification 4524 AP0006 Pressure manometer, 0~60cmH2O 0‐60cmH O 4526 AP0007 Pressure manometer, 0~30cmH2O 0‐30 cmH O 4527 AP0002 Pressure manometer, 0~20cmH2O 0‐20 cmH O 3.3.4 Connectors: – Patient valves: 22/15mm –...
- Page 9 4. Cleaning and Disinfection (Handling) This product is single patient multiple use, please dispose it after using it. 4.1 Instruction for Cleaning before Use/Next Use This product is single patient multiple use, please dispose it after using it. 4.2 Instruction for Disinfection/Sterilization before Use/Next Use This product is single patient multiple use, please dispose it after using it. 4.3 Instruction for Testing before Use/Next Use Testing the silicone bag 1. Remove the non‐rebreathing valve and the oxygen reservoir and valve (if fitted). 2. Compress the silicone bag and occlude (block) the non‐rebreathing valve outlet. 3. Release the bag. The bag should expand immediately and refill. If not, check that the intake valve at the base of the silicone bag is correctly assembled. 4. While keeping the non‐rebreathing valve outlet blocked, compress the bag again. The bag should not compress easily. If this occurs, check that you are blocking the valve sufficiently, and that the intake valve at the base of the silicone bag is correctly assembled. Testing non‐rebreathing valve 1. Connect the non‐rebreathing valve to the silicone bag. Connect the test lung to the outlet on the nonrebreathing valve. 2. Compress and hold the bag. The non‐rebreathing (duckbill) valve inside the non‐rebreathing valve should open and the test lung should fill. If not, check the connection between the Resuscitator and the test lung, and check that the non‐rebreathing valve is correctly assembled. 3. Release the bag. The non‐rebreathing (duckbill) valve should close and as the test lung deflates, gas should flow through the expiratory ports in the non‐rebreathing valve. If not, check that the non‐ rebreathing valve is correctly assembled. 4. Ventilate the test lung for a minimum of 10 cycles to ensure that the Resuscitator is functioning correctly. Inspiration must occur when the silicone bag is compressed and exhalation when the bag is ...
-
Page 10: General Safety Instruction
Testing Oxygen Reservoir / Reservoir Valve 1. Attach the reservoir to the reservoir valve assembly. Attach the silicone bag. 2. Inflate the reservoir and block the reservoir port. 3. Compress the reservoir bag. Gas should escape through the safety outlet valve on the reservoir valve. If not check that the reservoir valve is correctly assembled. 4. Connect the reservoir and reservoir valve assembly to a Resuscitator. 5. Cycle the Resuscitator through several ventilations. The safety inlet valve on the reservoir valve should open during each refill to allow room air to enter the silicone bag. If not, check that the reservoir valve is correctly assembled. Note: If supplemental oxygen is not connected, the compressed bag will refill more slowly if the reservoir is still attached. 5. General Safety Instruction 5.1 Operating Condition 5.1.1 Care during shipping and storage ‐ For compact storage, e.g., in an emergency case, the inlet end can be pushed halfway into the bag. ‐ Never store the resuscitator in a compressed or folded state. ‐ Never excessively squeeze the bag during storage. When the resuscitator is ready for use it should not be kept in direct sunlight or in a heated environment. -40°C to 60°C (-104°F to 140°F) ‐ Storage temperature: ‐ For long‐term storage or transportation, the resuscitator should be kept in closed packing in a cool place away from direct sunlight. 5.2 Possible side‐effect Compressed pressure can increase in transpulmonary pressure, the patient’s blood pressure can be reduced due ... - Page 11 3. Extra pressure or volume can cause gastric insufflation, creating a greater risk of aspiration on certain patient. 5.3.2 Procedure to avoid 1. Always keep peak airway pressure below 30cmH O and tidal volume are based on predicted body weight, not actual body weight. 2. Limit the tidal volume by choosing suitable compressed bag. 5.4 Warning/Precaution A Warning states a condition, hazard, or unsafe practice that can result in serious personal injury or death. A Precaution states a condition, hazard, or unsafe practice that can result in minor personal injury or damage to the manikin. Precautions • precaution: Federal law (US) restricts this device to sale by or on the order of a physician. • The GaleMed reusable resuscitator should only be used by persons who have received adequate training in the use of resuscitators. • Resuscitators should not be used with supplemental oxygen where smoking is permitted or when fire, flame, oil or grease is in close proximity. • Resuscitators should not be used in toxic or hazardous atmospheres. • The use of third‐party products and oxygen delivery devices (e.g. filters and demand valves) with the GaleMed reusable resuscitator may have an effect on performance. Please consult with the manufacturer of the third‐party device to verify compatibility with the GaleMed reusable resuscitator and obtain information on possible GaleMed reusable resuscitator performance changes. A notice to the user and/or patient that any serious incident that has occurred in relation to the device should be reported to the manufacturer and the competent authority of the Member State in which the user and/or patient is established ...
-
Page 12: Symbol Glossary
GaleMed Corporation EMERGO EUROPE B.V. 87, Li-gong 2nd Road, Wu-jia, I-Lan 268, Taiwan Prinsessegracht 20, 2514 AP The Hague The Netherlands www.galemed.com Tel: +886-3-990-8618 EmergoVigilance@ul.com TEL: (31) (0) 70 345-8570 ...
Need help?
Do you have a question about the MR-100 and is the answer not in the manual?
Questions and answers