Table of Contents

Summary of Contents for Costar Video Systems CDC3611IRVA
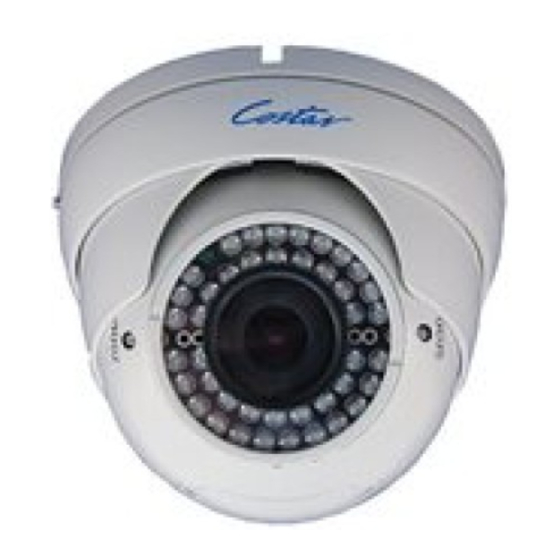
- Page 1 Eye Ball type Camera (osd controller in the case) Owner’s Manual Caution / Feature / Warning Page 03-05 Main Part Page 07-08 Installation Page 09-10 CDC3611IRVA Drawing Page 12-12 OSD Guide Page 13-30 Specification Page 30-31...
-
Page 2: Table Of Contents
Contents Caution Features Warning Components Main Parts Installation Connection Drawing Camera Operation Menu Setting EXPOSURE LENS BACKLIGHT SENSE_UP 3D_DNR WB MODE RED GAIN BLUE GAIN COLOR MODE DAY&NIGHT D&N MODE NIGHT C NIGHT A FUNCTION MIRROR SHARPNESS GAMMA NIGHT UP MOTION PRIVACY TITLE... -
Page 3: Caution
Features We thank you very much for taking our camera. First of all, please read this instruction manual carefully before use in order to avoid any mistake and to use your camera with right manner. Super Natural High Resolution Digital Slow Shutter (SENSE-UP) Using a 410,000 pixel Sony Super HAD II Digital Slow Shutter technology is the primary CAUTION... -
Page 4: Warning
Warning Components 1) Do not install the camera in extreme temperature condition. Only use the camera under conditions where temperatures are between º º º º -10 C and +50 C (if heater have it can operate at : -45 C and +50 C) Be especially careful to provide ventilation when operating under high temperatures. -
Page 5: Main Parts
Main Part 1) Upper Ball and Down Ball The ball can be adjust by 3 Axis , it can easy be install to anyplace. Like wall or ceiling. Also you can adjust the focus and zoom on the upper ball part by the focus-driver . Focus adjustable Zoom adjustable 2) OSD Board... -
Page 6: Installation
Installation Installation Installation Step 1. Make the screw hole and cable hole by the mounting template. 2. Fix the Base Housing to the desired place with screws 1) Make the hole supplied. 3. Power Connect & Monitor Impedance. Made sure which power supply that you selected before you use. - DC12V regulated power supply (DC12V camera only),Make Sure "+"... -
Page 7: Connection
Connection Drawing (mm) 1) Connection to Monitor and Power 1) BNC : Video output VIDEO 2) Power Jack Adaptor - As the connecting method varies with the instruments, refer to the manual supplied with the instrument. - If necessary, you can connect the monitor to the REMOTE jack on the back of your camera. -
Page 8: Camera Operation
■ ■ Camera Operation Camera Operation ■ ■ Menu Setting Settings can be made by using the OSD controller that fixed on the 3. DAY&NIGHT 1. EXPOSURE 2. RGB camera. If joystick osd use , please press it for start the osd menu setting, and if we use the 5buttons osd board, and then please press LENS WB MODE... - Page 9 ■ ■ Camera Operation Camera Operation b) DC/VIDEO : Auto Iris Lens selection ■ EXPOSURE > The DC LEVEL & Shutter level can be adjustment. EXPOSURE Selected EXPOSURE by using the Left/Right,Up/Down buttons so that the arrow indicates EXPOSURE. 1) Lens EXPO R G B D &...
- Page 10 ■ ■ Camera Operation Camera Operation - BLC MODE : MANUAL & SMART MODE ■ EXPOSURE ► SMART : Conventional cameras always have fixed BLC zones. BLC-SMART means that the camera automatically changes EXPOSURE > BLC the BLC zone in various conditions. EXPOSURE by using the Left/Right,Up/Down buttons so that ►...
-
Page 11: 3D_Dnr
■ ■ Camera Operation Camera Operation 5) 3D-DNR (3D Filter reducing noise caused by movement.) ■ EXPOSURE Newly developed 3D filtering enhances Digital Noise Reduction at low light levels. EXPOSURE > AGC EXPOSURE by using the Left/Right,Up/Down buttons so that ►... -
Page 12: Red Gain
■ ■ Camera Operation Camera Operation 2) RED GAIN ( Adjust RED Gain ) ■ DAY & NIGHT If the color so so on the monitor, we can increase/ decrease the red and blue color values and monitor the color changes of the object. Pictures can be displayed in either color or black and white. -
Page 13: Night C
■ ■ Camera Operation Camera Operation 2) SHARPNESS ■ DAY & NIGHT Please more carefully use this Function for your camera adjust. And don't increase the SHARPNESS lever too high, the picture may become distorted or noise may appear. 2) NIGHT C. (NIGHT COLOR ) We can change the value of night color suppress setting that you wish. -
Page 14: Night Up
■ ■ Camera Operation Camera Operation 5) NIGHT - UP 2) SENSITIVE (SENSITIVITY LEVEL SETTING) This function is very sensitivity adjustment Please adjust sensitivity when using motion detection. As the sensitivity level by SET UP. It increases the brightness increases, even the smaller movements are detected. FUNCTION at the low light condition by raising the 3) SHOW INDI SETTING... -
Page 15: Privacy
■ ■ Camera Operation Camera Operation NOTE : If the cursor is moved to CLR and the SET button pressed, all letters ■ PRIVACY are deleted. To edit a letter, change the cursor to the bottom left arrow and press the SET button. -
Page 16: Osd Color
■ ■ Camera Operation Camera Operation 5) OSD COLOR : ■ EXIT You can change the letter color of OSD. SETUP 1) SAVE & EXIT : Exit the osd menu after saving current setting. EXPO R G B D & N FUNC P R I Y S E T... -
Page 17: Specification
■ Specification TYPE NTSC 1/3 SONY Super HAD Ⅱ COLOR CCD Image Sensor Effective Pixels 768(H) x 494(V) 752(H) x 582(V), Scanning System 525 Lines 2:1 Interlace 625 Lines 2:1 Interlace Scanning requency(V) 59.94Hz 50Hz Resolution (Color) 620 TV Lines Resolution (B/W) 670 TV Lines Illumination...
Need help?
Do you have a question about the CDC3611IRVA and is the answer not in the manual?
Questions and answers