Table of Contents
Advertisement
Quick Links
EN
Hereby, [Thousandshores Deutschland GmbH] declares that the radio equipment type [Exercise Bike
DY110] is in compliance with Directive 2014/53/EU.
The full text of the EU declaration conformity is available at the following internet address:
http://files.sportneer.com/s28-2399a-01-doc-en.pdf
EXERCISE BIKE
Model: DY110
User Manual
Thank you for choosing the Sportneer.
Please read this user manual carefully before assembly and use and keep it on hand for future reference.
Advertisement
Table of Contents

Summary of Contents for Sportneer DY110
- Page 1 EXERCISE BIKE Model: DY110 User Manual Hereby, [Thousandshores Deutschland GmbH] declares that the radio equipment type [Exercise Bike DY110] is in compliance with Directive 2014/53/EU. The full text of the EU declaration conformity is available at the following internet address: Thank you for choosing the Sportneer. http://files.sportneer.com/s28-2399a-01-doc-en.pdf Please read this user manual carefully before assembly and use and keep it on hand for future reference.
-
Page 2: Safety Precautions
6. This exercise bike must only be used for the purposes described in this user manual. DO NOT use accessories about assembly, safety, fitness and use of the machine. Please read ALL the safety information contained on the that are not recommended by Sportneer Fitness. Read the user manual prior to use and follow all warnings and following page. -
Page 3: Exercise Instructions
Exercise Instructions • Promoting body metabolism, e.g. losing weight • Delaying the physiological effects of age There are various benefits to use this exercise bike: It can improve fitness and muscle tone. When used in • Reduction in stress, increase in self-confidence, etc. conjunction with a calorie controlled diet, it can also help you lose weight. - Page 4 OVERLOAD Age target heart rate This is where you exercise above your comfort level. The intensity, duration and frequency of exercise should be above the training threshold and should be gradually increased as the body adapts to the increasing demands. 10 second count As your fitness level improves, the training threshold should rise.
- Page 5 ④ QUADRICEPS STRETCH BREATHING DURING EXERCISE With one hand against a wall for balance, reach behind you and pull your left foot up. Bring your heel as close to Do not hold your breath while exercising. Breathe normally as much as possible. Remember, breathing involves your buttocks as possible.
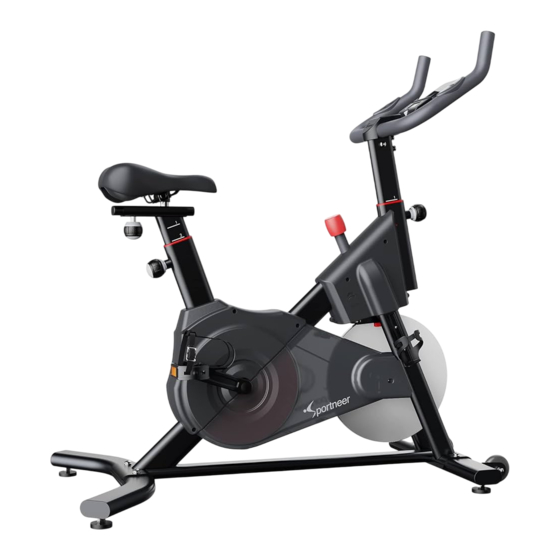
- Page 6 Part Name Specification Quantity Main frame set Support tube of handlebar Handlebar set Rear stabilizer set Front stabilizer set Seat Pedal set Bottle holder Schematic Diagram of Blister Board Set Blister board set Instruction manual 4PCS 4PCS 2PCS AAA Battery Quick release knob Flat inner hexagon screw M10x55 thread 15...
-
Page 7: Exploded View Drawing
Exploded View Drawing Part Name Part Name Main frame set Spring washer Support tube of handlebar Flat washer Handlebar set Flat hexagon screw Rear stabilizer set Spring washer Front stabilizer set Flat washer Seat Philip flat screw Pedal set Hexagon socket wrench Bottle holder Outer hexagon wrench Quick release knob... -
Page 8: Assembly Process
1. Front Stabilizer Installation As shown in the figure, put the main frame set on the floor, take the front stabilizer set which has the roller (E), and prepare the screw (I1), the spring washer (I2), the flat washer (I3). Then place the screw washers in the order of 0.6m/24"... - Page 9 2. Rear Stabilizer Installation 3. Support Tube of Handlebar Installation As shown in the figure, take the rear stabilizer set (D), and prepare the screw (I1), the spring washer (I2), the flat As shown in the figure, there is an electronic connection line on the main frame set, and the support tube of washer (I3).
-
Page 10: Seat Installation
4. Handlebar Set Installation 5. Seat Installation As shown in the figure, take the handlebar set (C), prepare the screw (I4), the spring washer (I5) and the flat washer As shown in the figure, prepare the seat (F). After adjusting to the correct direction, tighten the nut (Fa) on the seat (E4). - Page 11 6. Left & Right Pedal Installation 7. Bottle Holder Installation The pedal assembly instructions must be strictly followed. If installed improperly, the threads on the pedal or As shown in the figure, prepare the bottle holder (H), Philip flat screw (I6) and hexagon socket wrench (I7). Then crank may be damaged.
- Page 12 8. Console Battery Installation Instructions for Use As shown in the figure, take out the battery (J1) from the manual bag, remove the electronic cover on the back of 1. Height Adjustment of Handlebar Set the console, install the prepared battery, and then close the battery cover. 1.1.
-
Page 13: Resistance Adjustment
2. Resistance Adjustment 3. Height Adjustment of Saddle Support Tube 2.1. As shown in the figure, the resistance is adjustable regardless of the grade. Counterclockwise rotation of the 3.1. As shown in Figure STEP1, first loosen the quick release knob for 2~3 turns, and then lightly hold the saddle support tube. - Page 14 4. Pedal Positioning Tightness Adjustment 5.Leveling the Exercise Bike The exercise bike needs to be leveled if your workout area is uneven. Levelers are found on each side of the 4.1. Before using the exercise bike, you need to adjust the tightness of the pedal rope. stabilizers.
-
Page 15: Parts List
Parts List 6. Moving and Storing the Exercise Bike To move the exercise bike, carefully pull the Handlebars toward you while pushing the front of the bike downward. Then push the bike to the desired location. NOTE: Be careful when you move the exercise bike. Abrupt motions can affect the operation of the console. For safe storage of the exercise bike, remove the batteries. - Page 16 Part Name Specification Quantity Remarks Part Name Specification Quantity Remarks Main frame set Magnet bracket Frame welding Magnet Idle wheel axel Leather plastic idle wheel Magnet fixing seat Bearing 608Z Knob bolt C-Clip Φ8 Domed nut Wave washer Φ8.2XΦ12XT0.3 Outer hexagon nut 580J belt/6 grooves 6grooves/580J Plastic-coated nut of knob...
- Page 17 Part Name Specification Quantity Remarks Part Name Specification Quantity Remarks Nylon nut Handlebar welding Flat hexagon screw M8X55 Decor cover of handlebar Nylon nut Foam of handle-R Flywheel bracket -L Foam of handle-L Flat washer Φ20XΦ24XT1.0 Round tube cap Φ31.8 Outer hexagon thin nut Pulse pad Plunge...
-
Page 18: Console Operations
Console Operations Part Name Specification Quantity Remarks Flat washer Φ8.5XΦ16XT1.5 Φ8.5XΦ16XT1.5 Domed nut Seat Pedal set Pedal-L Pedal-R Bottle holder 788E006xP0QR000 Blister board set Flat inner hexagon screw M10X55 thread 15 When the triangle indicator at the SCAN position flashes, When the triangle indicator at the SCAN position flashes, Spring washer Φ10... - Page 19 HEARTBEAT MEASUREMENT: WARNING: Heart rate monitoring systems may be inaccurate. Over exercise may result in serious injury or death. If you feel faint, stop exercising immediately. When the pulse pad detects the user's heartbeat, the triangle indicator on the console flashes at the PULSE position.
-
Page 20: App Usage
C. Equipment Connection & Course Training 1. Select "Training course" in the Tab bar at the bottom of the Sportneer APP homepage to enter the homepage. 2.1 Select "My" in the APP menu bar, open "My Devices", and select "+".
Need help?
Do you have a question about the DY110 and is the answer not in the manual?
Questions and answers