
Subscribe to Our Youtube Channel
Related Manuals for Pessl Instruments CropVIEW

Summary of Contents for Pessl Instruments CropVIEW
- Page 1 CropVIEW ® extended user manual December 2022 Pessl Instruments GmbH Werksweg 107, 8160 Weiz, Austria office@metos.at +43 317 255 21 CropVIEW extended user manual ®...
-
Page 2: Table Of Contents
UNIT BEFORE FIELD INSTALLATIO 14 ® 4.1 CHECK THE COMMUNICATION 4.1.1 FINAL TEST BEFORE FIELD INSTALLATION 4.1.1 FINAL TEST BEFORE FIELD INSTALLATION 5. FIELD INSTALLATION OF YOUR CropVIEW DEVICE ® 5.1 CAMERA LOCATION 5.2 FOCUS THE CAMERAS 5.3 CHECK THE FULL FRAME IMAGES USING THE FOCUS APPLICATION 5.3.1 FINAL SETUP OF THE SYSTEM... -
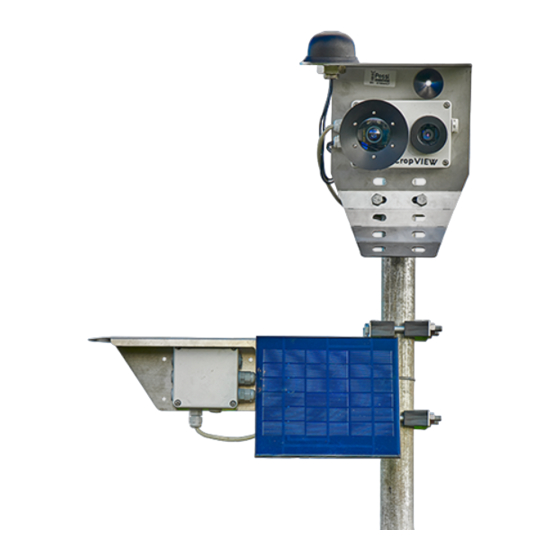
Page 3: Introduction To Cropview
1. INTRODUCTION TO CropVIEW ® The CropVIEW system is composed of three parts: ® 1. The main unit; including: • Cameras and optics (wide/narrow angle) • Processor, modem, USB port • SIM card holder, • UMTS/GPS antenna, • Holder with pitch angle selector (0°,11°,22°,33, 44°) •... -
Page 4: Sim Card
Important: CropVIEW field device needs 3G (UMTS) coverage, and will not be operational under 2G (GPRS) services. ® Several versions of CropVIEW are available with different levels of output offer. Please contact us for further ® information at support@metos.at. The CropVIEW camera uses a set of lenses that should be focused manually. -
Page 5: Using Unusual Sim Cards
Monthy data plan= 12(MB per picture) *number of cameras * shootings per day * 30(days per month) Example: CropVIEW with 2 cameras 2 shootings per day will need minimum monthly data plan: ® 12MB * 2 cameras* 2 shoots per day *31 days per month = 1.5GB/month... -
Page 6: Focusing The Cameras
• Installation window will open; click on Next and select appropriate Installation Folder or leave default value • Confirm installation • Find the application on the Desktop or in Start > Programs > Pessl Instruments > PI CropVIEW® Focus test and run it •... -
Page 7: Cropview ® Focus Application: Configuration Tab
3.2 CropVIEW FOCUS APPLICATION: CONFIGURATION TAB ® This tab has 5 sections: • Image selection • Brightness squares • Delay between photos • Camera selection • Serial com port 3.2.1 IMAGE SELECTION To speed up the process of focusing, here you can select the resolution and part of the image to use during the focusing process. -
Page 8: Part Of The Picture
5 different parts as shown in the image below. Picture 6: Focus app: Select part of the picture Tip: It is recommended to start with the “Zoom Center” Picture 7: Focus app: part of the picture – Zoom center CropVIEW extended user manual ®... -
Page 9: Brightness Squares
FOCUS APPLICATION: FOCUS TAB ® To assist you during the focusing, in this mode PI CropVIEW® Focus filters the edges of the image and con- verts the total amount of edges into a figure that we call “detail level”. An image with a higher number of edges is sharper or more focused. -
Page 10: Cropview ® Focus Application: Image Tab
“detail level increases”. If the “detail level” decreases change the direction of rotation (see next page). 3.5 FOCUS PROCESS 3.5.1 CONNECT THE CropVIEW TO THE PC ® 1. Unplug control unit from CropVIEW unit ® Picture 10: Connect to PC CropVIEW extended user manual... -
Page 11: Focusing Process Using The Focus Application
3.5.2 FOCUSING PROCESS USING THE FOCUS APPLICATION 3.5.2.1 CONNECTING TO THE CAMERA After selecting the correct port for the CropVIEW , the image size and location required for your installation, ®... - Page 12 Below is a sequence of images of a common focus process: Picture: Focus process CropVIEW extended user manual ®...
- Page 13 Procced as follows: ® • In the Focus window click on Stop • Wait until the status change to CropVIEW® Ready • In the Configuration windowselect the camera you want to focus then repeat the process described in the previous section 3.5.2.5 ENDING THE FOCUS PROCESS...
-
Page 14: Preparation Of Your Cropview ® Unit Before Field Installatio
Select SYSTEM (press nr. 1 on your keyboard), and in the next menu select QUICK VIEW (again nr. 1). Now you will see station info and its serial number (0700xxxx), where the 07 indicates that it is a CropVIEW® product. -
Page 15: Final Test Before Field Installation
• Unplug the battery and the solar panel from the control unit • Unplug the USB cable from CropVIEW unit ® • Connect the cable from control unit to the CropVIEW unit – make sure it is connected in the right way – as ® shown on the picture below... -
Page 16: Field Installation Of Your Cropview ® Device
Look for the scene that you want to take pictures of. Identify the best location for the camera – take into consideration the sun position. We recommend the use of a sun position application for your mobile phone (Sun Surveyor or something similar), in order to be sure that your CropVIEW unit will not be facing sun light ®... -
Page 17: Check The Full Frame Images Using The Focus Application
Now you should see the red LED in the control unit turning off and approximately 2 seconds later, you should see the three LEDs in the CropVIEW® unit turning on and off. At this point we are sure that the system is run- ning. -
Page 18: Register Yourself As A User On Fieldclimate.com
Picture: Register yourself 6.3 ADD THE CropVIEW TO YOUR ACCOUNT ® After you have activated your account you can enter thedocs.metos.at/FieldClimate. To add your CropVIEW ® device, open user menu and then press the “Add/Remove station” button. Picture: Add/remove station... - Page 19 This sticker contains two keys. Key 1 gives the power to change all the ® settings on the CropVIEW whereas key 2 is only valid to use the data of the system. To be able to set up ®...
-
Page 20: Settings For Your Cropview
6.5.2 TRANSFER SETTINGS Setup how your CropVIEW station is sending data. ® In Scheduler please select the hours at which you wish your CropVIEW station to take a picture and send it to ® the server. CropVIEW extended user manual... -
Page 21: Camera Settings
(you can deselect measuring point at very bright part to have better brightness on the rest of a picture). When you finish with configuration, do not forget to save new settings that you made (click on „Save CropVIEW settings“ button)! ®...
Need help?
Do you have a question about the CropVIEW and is the answer not in the manual?
Questions and answers