
Related Manuals for Samsung SM-S766C


Summary of Contents for Samsung SM-S766C
- Page 1 S M - S 7 6 6 C S M A R T P H O N E User Manual Please read this manual before operating your device and keep it for future reference.
- Page 2 State of California to cause cancer and reproductive toxicity. Intellectual Property All Intellectual Property, as defined below, owned by or which is otherwise the property of Samsung or its respective suppliers relating to the SAMSUNG Phone, including but not limited to, accessories, parts, or software relating there to (the “Phone System”), is...
- Page 3 Property is transferred to you. All applicable rights of the Intellectual Property shall remain with SAMSUNG and its suppliers. Open Source Software Some software components of this product incorporate source code covered under GNU General Public License (GPL), GNU Lesser General Public License (LGPL), OpenSSL License, BSD License and other open source licenses.
- Page 4 CONTAINED IN THE INSTRUCTION MANUAL SHALL BE CONSTRUED TO CREATE AN EXPRESS OR IMPLIED WARRANTY OF ANY KIND WHATSOEVER WITH RESPECT TO THE PRODUCT. IN ADDITION, SAMSUNG SHALL NOT BE LIABLE FOR ANY DAMAGES OF ANY KIND RESULTING FROM THE PURCHASE OR USE OF...
- Page 5 ” (Samsung for Enterprise) is a mark ™ ™ for a Samsung device which has been tested against Samsung’s own internal criteria for interoperability with certain third party security-related solutions for MDM and VPN. The testing includes field testing with local...
- Page 6 TECHNOLOGY SECURITY PROTECTION, SAFE ™ DEVICES AND APPLICATIONS TESTED WITH SAFE ™ DEVICES. IN NO EVENT SHALL THE SAMSUNG ENTITIES BE LIABLE FOR ANY DIRECT, INDIRECT, INCIDENTAL, PUNITIVE, OR CONSEQUENTIAL DAMAGES OF ANY KIND WHATSOEVER WITH RESPECT TO INFORMATION TECHNOLOGY SECURITY...
- Page 7 For complete statement of limited warranty, please refer to www.samsung.com/us/safe, available on the web and where Samsung smartphones and mobile devices are sold. [091714] Samsung Telecommunications America (STA), LLC Headquarters: 1301 E.
- Page 8 Do you have questions about your Samsung Mobile Phone? For 24 hour information and assistance, we offer a new FAQ/ARS System (Automated Response System) at: www.samsung.com/us/support The actual available capacity of the internal memory is less than the specified capacity because the operating system and default applications occupy part of the memory.
- Page 9 Online Legal Information The online version of the Health/Safety and Warranty guide for your device can be found at: English www.samsung.com/us/Legal/Phone-HSGuide Spanish www.samsung.com/us/Legal/Phone-HSGuide-SP The online version of the End User Licensing Agreement for your device can be found online at: www.samsung.com/us/Legal/SamsungLegal-EULA1.
- Page 10 Table of Contents Getting Started ..............1 Front View ................2 Back View ................4 Assemble Your Device ............6 Set Up Your Device ............13 Set Up Accounts ...............15 Know Your Device ............17 Home Screen ..............18 Status Bar ................25 Navigation and Motions ...........
- Page 11 Camera and Video ............65 Clock ...................71 Contacts ................74 Email ..................85 Gallery .................88 Internet ................93 Memo ..................98 Messages .................100 Music Player ..............109 My Files ................111 Video .................113 Voice Recorder ..............115 Settings ..................117 Wi-Fi and Wi-Fi Direct .............119 Bluetooth ................126 Data Usage ..............131 Airplane Mode ..............133 Mobile Networks ..............134 Virtual Private Networks (VPN) ........135...
- Page 12 Accessibility ..............159 Language and Input Settings ........163 Motions ................168 Accounts ................169 Backup and Reset ............173 Location Services ............175 Security ................177 Application Manager ............181 Battery ................186 Storage ................187 Date and Time Settings ..........192 About Your Device ............193 Table of Contents...
- Page 13 Getting Started Learn about your mobile device hardware, assembly procedures, and how to get started using your new device.
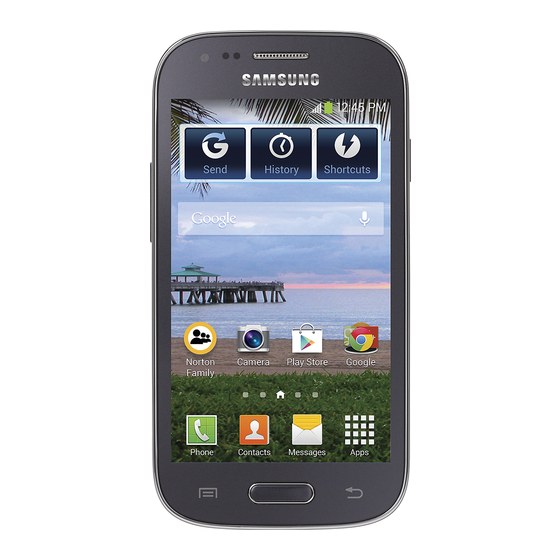
- Page 14 Front View Earpiece Headset jack Proximity sensor Front camera Power/Lock Volume Back key Menu key Home Getting Started Front View...
- Page 15 • Back key: Tap to return to the previous screen, or to close a dialog box, menu, or keyboard. • Earpiece: Listen to a call. • Front camera: Take self-portraits and record videos of yourself. • Headset jack: Connect an optional headset (not included).
- Page 16 Back View Microphone Speaker Back camera Microphone USB charger/Accessory port Getting Started Back View...
- Page 17 • Back camera: Take pictures and record videos. • Microphone: Records audio and detects voice commands. • Speaker: Plays music and other sounds. • USB charger/Accessory port: Connect the Charger/ USB cable (included), and other optional accessories (not included). Getting Started Back View...
- Page 18 Assemble Your Device This section helps you to assemble your device. Remove the Back Cover 1. Remove the back cover using the slot on the side of your device. 2. Lift the cover up and to the bottom of the device. Getting Started Assemble Your Device...
- Page 19 Warning: Do not bend or twist the back cover excessively. Doing so may damage the cover. Install a Memory Card You can install an optional microSD or microSDHC memory card (not included) to expand available memory space. Note: A memory card can be installed at any time; it is not necessary to install it prior to using the device.
- Page 20 Install the Battery 1. Insert the battery into the opening on the back of the device, making sure the connectors align. 2. Gently press down to secure the battery. Getting Started Assemble Your Device...
Need help?
Do you have a question about the SM-S766C and is the answer not in the manual?
Questions and answers