Chapters
Table of Contents

Related Manuals for LDG RC-100

Summary of Contents for LDG RC-100
- Page 1 RC-100 OPERATIONS MANUAL MANUAL REV A LDG RC-100 100-Watt Remote Tuner Controller LDG Electronics 1445 Parran Road St. Leonard MD 20685-2903 USA Phone: 410-586-2177 Fax: 410-586-8475 ldg@ldgelectronics.com www.ldgelectronics.com PAGE 1...
-
Page 2: Table Of Contents
Table Of Contents Introduction Jumpstart, or “Real hams don’t read manuals!” Specifications An Important Word About Power Levels Important Safety Warning Getting to know your RC-100 RC-100 Front Panel RC-100 Rear Panel Installation Basic Installation Operation Power-up Basic Tuning Operation... -
Page 3: Introduction
1. Turn off power to your radio. 2. Connect the antenna jack on the transceiver to the “Radio” jack on the RC-100. 3. Connect the “Tuner” jack of the RC-100 to the “Radio” jack on the RT-100, via your antenna’s existing feedline. -
Page 4: Specifications
• Weight: 7.5 oz AN IMPORTANT WORD ABOUT POWER LEVELS The RC-100 is rated at 125 watts maximum power input at most. Many ham transmitters and transceivers, and virtually all amplifiers, are capable of transmitting well over 125 watts. Power levels that significantly exceed specifications will definitely damage or destroy your RC-100. -
Page 5: Getting To Know Your Rc-100
RT-100 Tuner contains the tuning hardware that performs the real work, and is intended to be placed nearest to the antenna. The RC-100 contains a bias tee, which injects DC power onto the coax feedline. The RC-100 also features a Tune button, which is used to request a full tuning sequence, a Power switch and indicator LED. -
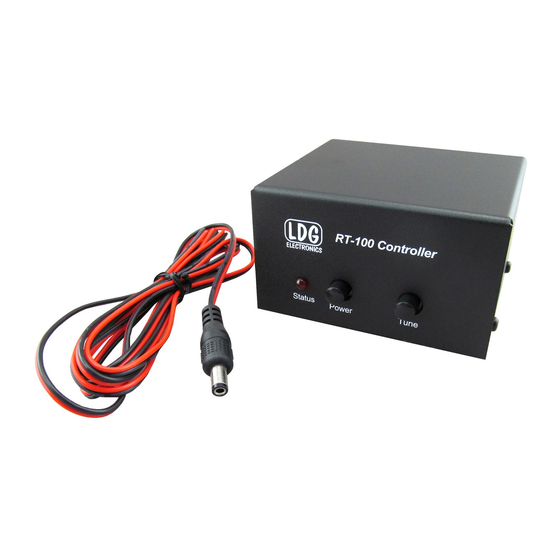
Page 6: Rc-100 Front Panel
RC-100 Front Panel On the front panel of the RC-100, there is one LED and two pushbuttons. • Status LED: Indicates 12VDC power is applied and Power is ON. • Power Switch: Turns the tuner on or off. • Tune Button: Momentarily interrupts power to the RT-100. If pushed and released while transmitting RF, a full tune is requested. -
Page 7: Installation
100 Tuner via the wingnut marked GND. Connect the RC-100 to a source of 12VDC power, 500 mA, via the supplied DC power cable. Connect the DC power cable to the POWER jack on the rear of the RC-100. The center pin is positive. -
Page 8: Operation
OPERATION Power-up With DC power applied, push the Power button on the front of the RC-100 to turn the system on. The red Status LED should light. To turn the system off, push the Power button again. Basic Tuning Operation Two types of tuning cycles are available;... -
Page 9: Fully Automatic Memory Tuning
In order to do this, begin transmitting a carrier, and while still keying the radio, push the Tune button on the RC-100 for one second and release. Continue transmitting the tuning carrier until the SWR settles to a low value. -
Page 10: Technical Support
Ask your shipper for a tracking number or a delivery verification receipt. This way you know the product arrived safely at LDG. Be sure to give us your email address so our shipper can alert PAGE 10... -
Page 11: Product Feedback
(preferred) tell us how you used the product and how well it worked in your application. Send along a photo or even a schematic or drawing to illustrate your narrative. We like to share your comments with our staff, our dealers, and even other customers at the LDG website: http://www.ldgelectronics.com/... - Page 12 RC-100 OPERATIONS MANUAL MANUAL REV A LDG RC-100 Automatic Tuner Remote Controller LDG Electronics 1445 Parran Road St. Leonard MD 20685-2903 USA Phone: 410-586-2177 Fax: 410-586-8475 ldg@ldgelectronics.com www.ldgelectronics.com PAGE 1...
- Page 13 Table Of Contents Introduction! Jumpstart, or “Real hams don’t read manuals!”! Specifications! Important Safety Warning! Getting to know your RC-100! Installation! Operation! The LDG RC-100! A Word About Tuning Etiquette! Care and Maintenance ! Technical Support! Two-Year Transferrable Warranty! Out Of Warranty Service !
-
Page 14: Introduction
1. Turn off your radio. 2. Connect the antenna jack on the transceiver to the Radio jack on the RC-100. 3. Connect the Tuner jack on the RC-100 to the Radio jack on the RT-100 via a suitable length of coax feedline. -
Page 15: Specifications
SPECIFICATIONS • DC power input: 12VDC, 500mA • Operating temperature range: 0ºF-110ºF (-18ºC - +43ºC) • Provides DC power injection, On/Off switch, Tune button, and Status indication. • Dimensions: 3.5”L x 3.5”W x 2”H. • Weight: 7 oz. IMPORTANT SAFETY WARNING Never install antennas or transmission lines over or near power lines. -
Page 16: Getting To Know Your Rc-100
RT-100 tuner via the coax cable; no separate power cable is required. The RC-100 has two controls: Power and Tune. Power turns DC power to the RT-100 on and off. The RT-100 features latching relays, so the tuned state is retained indefinitely even when the power is turned off. -
Page 17: Installation
RT-100 outdoors (Field Day, for example) you must protect it from rain or other sources of water. The RC-100 is designed to feed the RT-100 with coax cable; ladder line or other types of transmission line should not be used between the RC-100 and the RT-100. However, the RT-100 can feed the antenna via ladder line with the use of a suitable balun. -
Page 18: Operation
Your will probably use your RT-100 remote tuner in fully automatic memory mode most of the time. Simply press the Power button on the RC-100 to provide DC power to the tuner; the RT-100 “wakes up” in automatic memory mode. Operate normally, and the RT-100 will maintain an SWR of about 1.7 or less on all frequencies within its specifications without your... -
Page 19: The Ldg Rc-100
The relays in the RT-100 remote tuner are powered by the 12VDC supplied over the coax cable via a Bias Tee curcuit included in the RC-100. The Bias Tee allows both RF and DC to be carried over the same conductor. This arrangement is virtually lossless and has no effect on SWR. -
Page 20: Out Of Warranty Service
OUT OF WARRANTY SERVICE If a product fails after the warranty period, LDG is here to help you get it fixed. Send the product to us for repair any time you like. We will determine what needs to be done and based on your instructions, either contact you with an estimate or fix it and contact you with a request to pay any repair charges. -
Page 21: Product Feedback
(preferred) tell us how you used the product and how well it worked in your application. Send along a photo or even a schematic or drawing to illustrate your narrative. We like to share your comments with our staff, our dealers, and even other customers at the LDG website: http://www.ldgelectronics.com... - Page 22 RF BEAD .01uf RF BEAD 78L05-SOT89 .01uf RT-100 Title: B82422H1223K B82422H1223K .01uf 1.0uF .1uf 1N4001 Date: LDG Electronics .01uf .01uf .01uf 15-Jul-2013 1445 Parran Road HiLoZ Version: St. Leonard MD 20685 .01uf .01uf 661-MKA25VC101M (100uF 25V) www.ldgelectronics.com 661-MKA10VC33RM (33 uF 10V)
- Page 23 RF BEAD 1N4001 .1uf 100pF .1uf .01uf 1.0uf Power Jack .01uf .01uF 661-MKA25VC101M (100uF 25V) .01uf Title RT-100 Front Panel v1.2 Switch to 4 inductors, remove balance R/Cs Size Number Revision v1.2 Date: 15-Aug-2012 Sheet of N3WDZ File: C:\Contracting\LDG\RT-100\rt100.Ddb Drawn By:...
Need help?
Do you have a question about the RC-100 and is the answer not in the manual?
Questions and answers