
Summary of Contents for Heston Blumenthal everdure HBPK
- Page 1 ASSEMBLY & MAINTENANCE INSTRUCTIONS for everdure by heston blumenthal Prep Kitchen Model Number: HBPK...
-
Page 2: Maintenance
MAINTENANCE Prep Kitchen LENGTH WIDTH HEIGHT (in) (in) (in) HBKP 40.2 21.7 CLEANING: Using a soft cloth thoroughly wipe down all surfaces with a mild detergent and warm water DO NOT use scourers or harsh detergents DO NOT put cutting boards or wooden lids in the dishwasher DO NOT put seasoning boxes in a microwave or oven to reheat food STORAGE: When the prep kitchen is not in use, it can be stored outdoors, but MUST be under cover and covered (preferably with... -
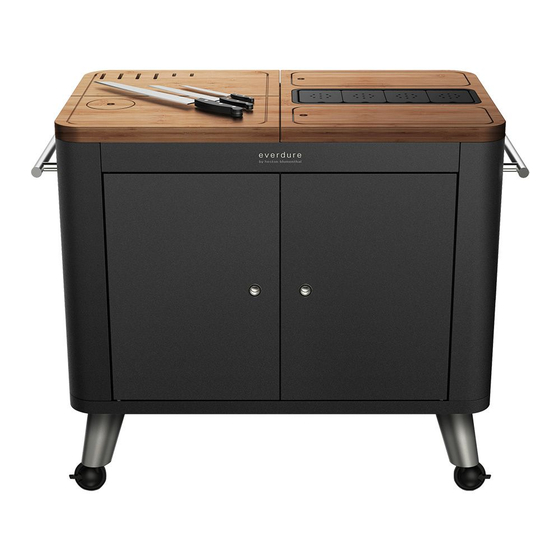
Page 3: Main Parts
ASSEMBLY 2 people required for assembly NOTE: Main Parts (P1) Body ×1 (P2) Handle ×2 (P3) Leg ×4 (P4) Cutting Board LU×1pc (P5) Cutting Board LB×1 (P6) Cover×1 (P7) Top Panel×1 (P8) Lid ×2 (P9) Storage Tray×3 (P10) Seasoning Box ×4 (P11) Divider ×1 (P12) Waste Bin ×1 (P13)/ knife holder×1pc... - Page 4 ASSEMBLY Step 01 /Rotate (P1) upside-down onto a clean and flat surface, ensuring the body is protected using a sheet or cardboard. Assemble (P3 x 4) to the bottom plate using (H5 x 16, H6 x 16, H7 x 16) Ensure the legs are angled outwards (see final image for reference) and rotate the body to the upright position.
- Page 5 ASSEMBLY Step 03 /Slide (P11 x 1) into (P12 x 1) Step 04 / Assemble (P13 x 1) to the bottom of the Cutting Board LU (P4 x 1) using (H8 x 3). *Note, please remove the plastic protection from all wooden boards before assembly. There are 3 reserved small holes at the bottom of the Cutting Board LU, corresponding to the installation screws...
- Page 6 ASSEMBLY Step 05 /Fix and fully tighten (H9 x 3) onto both sides at the top of main body (H10 x 3). Step 06 /Place (P4 x 1, P5 x 1, P6 x 1, P7 x 1, P8 x 2, P9 x 3, P10 x 4) into positon. See final image for reference *Note, ignore this section if product arrived with parts pre-assembled...
Need help?
Do you have a question about the everdure HBPK and is the answer not in the manual?
Questions and answers