Table of Contents
Advertisement
Available languages
Available languages
Quick Links
Advertisement
Table of Contents

Related Manuals for Taurus Supra Turbo 654

Summary of Contents for Taurus Supra Turbo 654
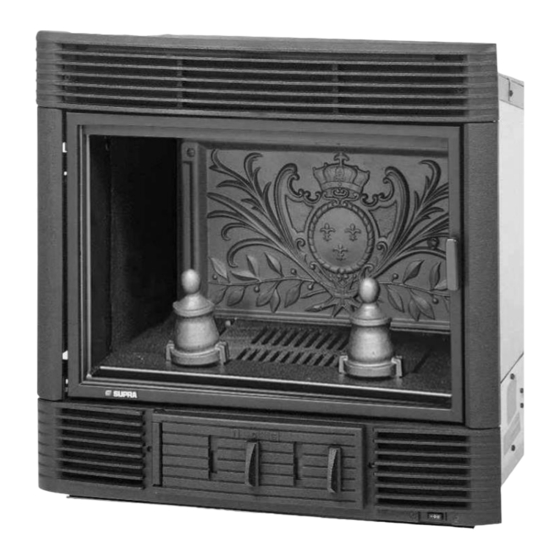
- Page 1 INSERTS FONTE FRANÇAIS 654, 644, 634 TURBO NOTICE D’INSTALLATION ET D’UTILISATION 05-21 40320 1. CARACTÉRISTIQUES TECHNIQUES 2. ENCOMBREMENT 3. INSTALLATION 4. UTILISATION 5. ENTRETIEN 6. SERVICE APRÈS-VENTE Illustrations non contractuelles...
-
Page 2: Caractéristiques Techniques
-IMPORTANT- Vous venez d’acquérir un appareil de notre gamme. Nous vous félicitons de votre choix. Cet appareil a été étudié avec soin. Pour en tirer tous les avantages que vous êtes en droit d’en attendre, faites appel à un spécialiste de notre marque. Il réalisera l’installation dans les règles de l’art et assurera les meilleures conditions de fonctionnement, de sécurité... - Page 3 2. ENCOBREMENT DTU 24.1 traitant des conduits de fumées ; DTU 24.2 traitant des travaux d'âtrerie ; NF EN 13229 foyers ouverts et inserts à combustible solide. (Disponibles à l’AFNOR). DIMENSIONS INSERT (mm) Façade de l’insert Hauteur du fond Cadre Gabarit (int) - MISES EN GARDE - •...
-
Page 4: Installation
3. INSTALLATION Passage du câble d'alimentation Cadre gabarit Patte de fixation Câble d'alimentation Trappe d'accès aux composants électriques Interrupteur 3 positions Porte de cendrier Réglage air de combustion Grille entrée air frais 10. Porte de chargement 11. Grille sortie air chaud 12. - Page 5 JOINT D’ÉTANCHÉITÉ Appliquer le joint autocollant sur le cadre-gabarit. Renforcer l’adhérence du joint par un filet de silicone. FINITIONS Obturer l’espace compris entre l’ouverture de la cheminée et le cadre- gabarit. En fonction du style et de la nature des pierres de la cheminée, la finition, étanche, peut être réalisée : En pierres, tuiles, briques réfractaires maçonnés directement entre le cadre- gabarit et la cheminée,...
- Page 6 COMBUSTIBLES POUTRE EN BOIS Bois Aucune partie de la poutre en bois (C) ne doit être soumise à la Cet appareil à hautes performances nécessite un combustible de chaleur de l’insert. Poser le kit de protection de poutre (D) qualité. Brûler exclusivement du bois de chauffage, en bûches, disponible chez votre revendeur (Fig.
-
Page 7: Service Après-Vente
5. ENTRETIEN – RECOMMANDATIONS - Mettre 1 ou 2 allumes feu sur le bois d'allumage et allumer les allumes feu. - Refermer la porte DÉCENDRAGE Pour allez plus loin, vous pouvez consultez la vidéo Supra sur Attendre que l’appareil soit refroidi. youtube à... - Page 8 CAST INSERTS ENGLISH 654, 644, 634 TURBO INSTALLATION INSTRUCTIONS AND USER MANUAL 05-21 40320 1. TECHNICAL DATA 2. DIMENSIONS 3. INSTALLATION: 4. USE 5. MAINTENANCE 6. AFTER-SALES SERVICE Non-binding illustrations...
-
Page 9: Important Assembly Information
- IMPORTANT - You have just purchased an appliance from our range. We would like to congratulate you on your choice. This appliance has been carefully designed. In order to get the very best out of it, we would advise you to request the services of one of our specialists. They will carry out the installation in accordance with good practices and guarantee the best operating and safety conditions, taking full responsibility for the final installation. -
Page 10: Overall Dimensions
2. OVERALL DIMENSIONS DTU 24.1 covering flue ducting; DTU 24.2 covering drilling work; NF EN 13229 open hearths and solid fuel inserts. (Available at AFNOR). INSERT DIMENSIONS (mm) Front of insert Back height Surround frame (int.) - WARNINGS - This appliance is designed to burn wood, it must not be used as an incinerator or to burn liquid fuels, coal or coal derivatives. When installing and using the hearth, observe local and national regulations, as well as European standards (1). -
Page 11: Preparing The Existing Fireplace
3. INSTALLATION: Power cable gland Surround frame Fixing plate Power cable Access hatch to electrical components 3 position switch Ash box door Combustion air regulator Fresh air intake grille 10. Hearth door 11. Hot air outlet grille 12. Heat-exchanger pipes 13. - Page 12 SEALING GASKET Apply the self-adhesive sealant to the surround frame. Use a silicone cord joint to strengthen adhesion. FINISHES Seal the gap between the fireplace opening and the surround frame. Depending on the style and nature of the stones in the fireplace, a smoke-tight finish can be made with: Stones, tiles, firebricks directly between the surround frame and the fireplace,...
-
Page 13: Operation
FUEL WOODEN BEAM Wood This high-performance appliance requires quality fuel. Only burn No part of the wooden beam (C) should be subjected to heat from air-dried logs (2 to 3 years, stored in a sheltered and well- the insert. Use the beam protection kit (D) available from your ventilated place) with a maximum moisture content of 15 to 20%. -
Page 14: Maintenance Recommendations
Refuel 5. MAINTENANCE - RECOMMENDATIONS Refuel the appliance once there is a good bed of embers and the flames have gone out. Open the door gently to prevent smoke ASH REMOVAL from escaping (if opening while lit) or embers from falling. Once Wait until the appliance is cold. - Page 15 INSERTS FUNDICIÓN CASTELLANO 654, 644, 634 TURBO MANUAL DE INSTALACIÓN Y FUNCIONAMIENTO 05-21 40320 1. CARACTERÍSTICAS TÉCNICAS 2. DIMENSIONES 3. INSTALACIÓN 4. UTILIZACIÓN 5. MANTENIMIENTO 6. SERVICIO POSTVENTA Ilustraciones no contractuales...
-
Page 16: Características Técnicas
- IMPORTANTE- Acaba de adquirir un aparato de nuestra gama. Le felicitamos por su elección. Este aparato ha sido cuidadosamente diseñado. Para obtener todas las ventajas que espera, le aconsejamos que recurra a uno de nuestros especialistas. Realizará la instalación conforme a las buenas prácticas y garantizará... -
Page 17: Dimensiones Totales
2. DIMENSIONES TOTALES DTU 24.1 que trata de los conductos de humos; DTU 24.2 que trata de los trabajos de perforación; NF EN 13229 chimeneas abiertas e inserts de combustible sólido. (Disponibles en AFNOR). DIMENSIONES INSERT (mm) Frente del insert Altura del fondo Marco Estructura de encastre (int) -ADVERTENCIAS-... -
Page 18: Instalación
3. INSTALACIÓN Paso del cable de alimentación Marco estructura de encastre Patilla de fijación Cable de alimentación Trampilla de acceso a los componentes eléctricos Interruptor 3 posiciones Puerta cenicero Ajuste del aire de combustión Rejilla de entrada aire fresco 10. Puerta de carga 11. - Page 19 JUNTA DE ESTANQUEIDAD Aplique el sellador autoadhesivo al marco-estructura. Refuerce la adherencia de la junta con un cordón de silicona. ACABADOS Selle el espacio entre la abertura de la chimenea y el marco- estructura de encastre. En función del estilo y la naturaleza de las piedras de la chimenea, el acabado estanco se puede realizar con: Piedras, azulejos, ladrillos refractarios de albañilería directamente...
- Page 20 COMBUSTIBLES VIGA DE MADERA Madera Este aparato de alto rendimiento requiere un combustible de Ninguna parte de la viga de madera (C) puede estar sometida al calidad. Quemar sólo leña, en troncos, secada al aire (2 a 3 años calor del insert. Instale el kit de protección de vigas (D) disponible almacenada en un lugar abrigado y ventilado) con una humedad en su distribuidor (Fig.
-
Page 21: Servicio Postventa
ATENCIÓN: Nunca utilice gasolina, alcohol o fueloil... 5. MANTENIMIENTO - RECOMENDACIONES RETIRADA DE LA CENIZA Espere hasta que el aparato se enfríe. Recarga - Limpie la rejilla extraíble del hogar Recargue el aparato cuando haya un buen lecho de brasas y las -Vacíe regularmente el cenicero. - Page 22 LAREIRA DE FUNDIÇÃO EMBUTIDA PORTUGUÊS 654, 644, 634 TURBO MANUAL DE INSTALAÇÃO E FUNCIONAMENTO 05-21 40320 1. CARACTERÍSTICAS TÉCNICAS 2. DIMENSÕES 3. INSTALAÇÃO 4. UTILIZAÇÃO 5. MANUTENÇÃO 6. SERVIÇO DE PÓS-VENDA Ilustrações não contratuais...
- Page 23 - IMPORTANTE- Acaba de adquirir uma salamandra a lenha da nossa marca. Obrigada pela sua escolha. Este aparelho foi cuidadosamente projetado. Para obter todas as vantagens esperadas, aconselhamos a que recorra a um dos nossos especialistas. Este irá efetuar a instalação em conformidade com as boas práticas e garantir as melhores condições de funcionamento e segurança, assumindo toda a responsabilidade da instalação final.
- Page 24 2. DIMENSÕES TOTAIS Norma DTU 24.1 sobre as condutas de fumos; norma DTU 24.2 sobre os trabalhos de perforação; norma NF EN 13229 sobre lareiras abertas e inserts de combustível sólido. (Disponíveis em AFNOR). DIMENSÕES DO INSERT (mm) Frente do insert Altura do fundo Quadro da estrutura de encastre (int.) -ADVERTÊNCIAS-...
- Page 25 3. INSTALAÇÃO Percurso do cabo de alimentação Quadro da estrutura de encastre Patilha de fixação Cabo de alimentação Portilha de acesso aos componentes elétricos Interruptor 3 posições Porta do cinzeiro Regulação do ar de combustão Grelha entrada de ar fresco 10.
- Page 26 JUNTA DE SELAGEM Aplique a junta de selagem autoadesiva ao quadro-estrutura. Reforce a aderência da junta com um cordão de silicone. ACABAMENTOS Sele o espaço entre a abertura da lareira e o quadro-estrutura de encastre. Em função do estilo e da naturaleza das pedras da chaminé, o acabamento estanque pode ser feito com: Pedra, azulejos, ladrilhos refratários de alvenaria diretamente entre o marco-estrutura e a lareira,...
- Page 27 COMBUSTÍVEIS VIGA DE MADEIRA Madeira Este aparelho de alto rendimento requer um combustível de Nenhuma parte da viga de madeira (C) pode estar submetida ao qualidade. Queime somente lenha, em troncos, seca ao ar (2 a 3 calor do insert. Instale o kit de proteção de vigas (D) disponível no anos armazenada num local abrigado e ventilado) com um grau seu distribuidor (Fig.
- Page 28 ATENÇÃO: Nunca utilize gasolina, álcool ou óleos 5. MANUTENÇÃO - RECOMENDAÇÕES combustíveis, etc. RETIRAR A CINZA Espere até que o aparelho arrefeça. Carregamento - Limpe a grelha amovível da lareira. Faça a recarga do aparelho quando as brasas estiverem bem - Esvazie regularmente o cinzeiro.
- Page 29 INSERT FUSIONE ITALIANO 654, 644, 634 TURBO MANUALE DI INSTALLAZIONE E FUNZIONAMENTO 05-21 40320 1. CARATTERISTICHE TECNICHE 2. DIMENSIONI 3. INSTALLAZIONE 4. UTILIZZO 5. MANUTENZIONE 6. SERVIZIO DI POSTVENDITA Illustrazioni non contrattuali...
-
Page 30: Caratteristiche Tecniche
- IMPORTANTE- Ha appena acquistato un apparecchio della nostra gamma. Ci congratuliamo per la sua scelta. Questo apparecchio è stato progettato accuratamente. Per sfruttare tutti i vantaggi previsti, le consigliamo di rivolgersi a uno dei nostri specialisti, che eseguirà l’installazione conformemente alle buone prassi e garantirà... - Page 31 2. DIMENSIONI TOTALI DTU 24.1, riguardante i condotti per i fumi; DTU 24.2, riguardante i lavori di perforazione; NF EN 13229, caminetti aperti e insert a combustibile solido. (Disponibile in AFNOR). DIMENSIONI INSERT (mm) Parte frontale insert Altezza del fondo Telaio struttura ad incastro (int) - AVVERTIMENTI - Questo apparecchio è...
-
Page 32: Installazione
3. INSTALLAZIONE Passaggio del cavo di alimentazione Telaio struttura ad incastro Piedino di fissaggio Cavo di alimentazione Portello di accesso ai componenti elettrici Interruttore 3 posizioni Porta portacenere Regolazione dell’aria di combustione Griglia entrata aria fresca 10. Porta di carica 11. - Page 33 GIUNTO A TENUTA STAGNA Applicare il sigillante autoadesivo sul telaio-struttura. Rinforzare l'aderenza del giunto con un cordone di silicone. FINITURE Sigillare lo spazio tra l’apertura del caminetto e il telaio-struttura ad incastro. In base allo stile e alla natura delle pietre del caminetto, la finitura ermetica si può...
-
Page 34: Funzionamento
COMBUSTIBILI TRAVE DI LEGNO Legno Questo apparecchio ad elevate prestazioni necessita un Nessuna parte della trave in legno (C) deve essere esposta al calore dell’insert. Installare il kit di protezione della trave (D), combustibile di qualità. Bruciare solamente legna in tronchi asciugata all’aria (da 2 a 3 anni, stoccata in un luogo protetto e disponibile presso il proprio distributore (Fig. - Page 35 ATTENZIONE: Non usare benzina, alcol o gasolio 5. MANUTENZIONE - RACCOMANDAZIONI COME ELIMINARE LA CENERE Lasciare che si raffreddi. Ricarica - Pulire la griglia smontabile del focolare. Ricaricare l’apparecchio quando si sia formato un buon letto di - Svuotare regolarmente il portacenere. L’accumulo di ceneri braci e le fiamme siano sparite.
- Page 36 GUSSKAMINEINSÄTZE DEUTSCH 654, 644, 634 TURBO INSTALLATIONS- UND BEDIENUNGSHANDBUCH 05-21 40320 1. TECHNISCHE DATEN 2. ABMESSUNGEN 3. INSTALLATION 4. VERWENDUNG 5. INSTANDHALTUNG 6. KUNDENDIENST Nicht vertragliche Bilder...
-
Page 37: Technische Daten
-WICHTIG- Sie haben soeben einen Kaminofen aus unserem Sortiment erworben. Glückwunsch zu Ihrer Wahl! Dieser Kaminofen wurde mit großer Sorgfalt entworfen. Um in den Genuss aller Vorteile zu bekommen, die Sie erwarten, raten wir Ihnen, einen unserer Spezialisten zu Rate zu ziehen. Er wird den Einbau gemäss der Herstellerangaben vornehmen, die besten Funktions- und Sicherheitsbedingungen garantieren und die gesamte Verantwortung für die endgültige Installation übernehmen. - Page 38 2. GESAMTABMESSUNGEN DTU 24.1 für Abzugsrohre; DTU 24.2 für Bohrarbeiten; NF EN 13229 für offene Kamine und Kamineinsätze mit festen Brennstoffen. (Bei AFNOR verfügbar) ABMESSUNGEN KAMINEINSATZ (mm) Vorderseite des Kamineinsatzes Höhe der Rückwand Einsetzstrukturrahmen (int) -WARNUNGEN- Dieses Gerät ist zum Verbrennen von Holz gedacht, es darf nicht als Verbrennungsofen oder zum Verbrennen von Flüssigbrennstoffen, Kohle oder deren Nebenprodukten verwendet werden.
- Page 39 3. INSTALLATION Netzkabelführung Einsetzstrukturrahmen Fixierstift Netzkabel Zugangsklappe zu elektrischen Komponenten Schalter mit 3 Positionen Tür Aschebehälter Regulierung der Verbrennungsluft Lufteintrittsgitter 10. Nachfülltür 11. Heißluftauslassgitter 12. Wärmetauscherrohre 13. Balkenschutz (Option) Steinwolle Haube Balken Schutz-Kit Feuerfeste Vorderseite Rauchabzugskammer Steinwolle VORBEREITUNG EINES VORHANDENEN KAMINS ACHTUNG! Die Verteilung von Heißluft ist verboten.
- Page 40 DICHTUNGSRING Tragen Sie die selbstklebende Dichtungsmasse auf die Rahmenstruktur auf. Verstärken Sie die Verklebung der Dichtung mit einer Silikonwulst. OBERFLÄCHENBEARBEITUNG Dichten Sie den Raum zwischen der Kaminöffnung und dem Einsetzstrukturrahmen ab. Je nach Stil und Beschaffenheit der Kaminsteine kann der dichte Abschluss erfolgen mit:: Steine, Fliesen, feuerfesten Mauersteinen direkt zwischen der Rahmenkonstruktion und dem Kamin, Vorgefertigte Elemente aus der Werkstatt oder...
- Page 41 4. VERWENDUNG ACHTUNG: Wenn Sie eine Nische unter dem Ofen als Ablagefläche für Brennholz verwenden, dürfen Sie diese nie ganz verschließen (ein vorderer Öffnungsbereich von mindestens 600 cm² muss immer frei bleiben). Lassen Sie mindestens 5 cm zwischen dem Boden dem Ofen und der Oberseite der Holzscheite.
-
Page 42: Funktionsweise
Wenn die Außentemperatur sehr niedrig ist, kann es zu einer nicht verändert werden. Wenn das Gerät heiß ist, schalten die thermischen "Blockade" im Rauchabzug kommen, so dass der Turbinen auf Stufe II. Rauchabzug schrittweise aufgeheizt werden muss, bis er den Schalten Sie die Lüfter nicht aus, wenn das Gerät aufheizt, da sie normalen Zug erreicht.
Need help?
Do you have a question about the Supra Turbo 654 and is the answer not in the manual?
Questions and answers