Table of Contents
Advertisement
Quick Links
Advertisement
Table of Contents

Related Manuals for NITO N1e

Summary of Contents for NITO N1e
- Page 1 NITO ELECTRIC KICK SCOOTER...
- Page 2 THANKS FOR CHOOSING NITO We believe in urban mobility. It means transportation that’s efficient, eco-friendly and fun. Your new N1 electric kick scooter will make your life easier. The comfortable and fast ride will help you tackle your day with ease.
- Page 3 MANUAL PURPOSE The aim of this manual is to allow you to fully appreciate the qualities of your N1 electric kick scooter. Contained here are information, warnings and advice on how to use and maintain the vehicle correctly for maximum safety. It is essential to read this manual completely before attempting to ride the vehicle for the first time.
-
Page 5: Table Of Contents
INDEX GENERAL GUIDELINES ......................7 PRODUCT AND PARTS ......................8 ASSEMBLY INSTRUCTIONS ....................10 FOLDING YOUR N1 ......................12 USE OF THE BATTERY ......................13 HOW TO CHARGE N1 ......................14 WARNING ...........................15 USING YOUR N1 ........................16 MULTIFUNCTION DISPLAY ....................17 SAFETY INSTRUCTIONS ....................24 WARNING AND CAUTIONS ....................27 SPECIFICATIONS ........................28... -
Page 7: General Guidelines
In case of doubts or questions, please contact your local reseller or the after-sales NITO on the phone number +39 011 6496683 or sending an email to support@nitobikes.it. Failing to observe these instructions, wholly or in part, could result in serious damage to persons, the vehicle or the environment. -
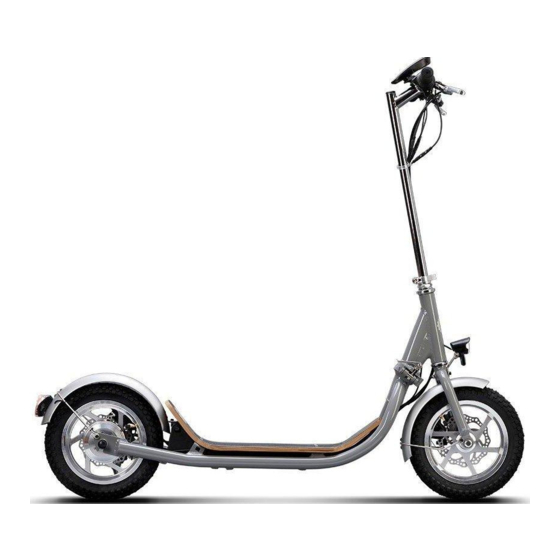
Page 8: Product And Parts
PRODUCT AND PARTS Display Handlebar height Rear mudguard adjustment/closure Throttle License plate Front led light Right direction indicator Rear led light Front mudguard Rear brake lever Brushless motor wheel Front wheel Front brake lever Rear disk brake Front disc brake Left direction indicator Stand Folding hinge... -
Page 10: Assembly Instructions
ASSEMBLY INSTRUCTIONS Assemble the scooter by following the instructions on the next page. The following tools are required for assembly and are not included in the package: cross screwdriver, 8mm wrench and 5 mm allen key... - Page 11 Insert the bottom of the steering column into Adjust the handlebars up to the mark Do not exceed the maximum height mark. the frame. Tighten the quick release to secure that indicates the maximum height. the steering column. Fix the special cable collector to the steering Use the supplied screws to attach the display Attach the wooden board to the frame.
-
Page 12: Folding Your N1
FOLDING YOUR N1 Loosen the folding hinge on the frame. This can be done by lifting the lever on the hinge until the pin no longer holds the hinge in place. Slowly rotate the handlebar to the right and fold the handlebar of the scooter towards the frame on the ground. -
Page 13: Use Of The Battery
USE OF THE BATTERY The N1 scooter is equipped with a lithium-ion battery with a range of 20-25 km, which allows approximately 1000 charging cycles. Several factors may influence the battery's autonomy: use on suburban or urban roads where continuous handling of the accelerator is necessary use of the scooter outside normal conditions of use use on steeply sloping roads and on particularly uneven surfaces... -
Page 14: How To Charge N1 E
HOW TO CHARGE THE N1 The battery is charged using the specific battery charger provided, which has a charging status indicator and is designed to be plugged into a 230 V CA power outlet. Connect the battery charger provided to the charging port (right side, near the rear wheel). Red LED lit up indicates charging in progress, and green LED indicates 100% completed charging. -
Page 15: Warning
WARNING All charging operations must necessarily take place by first connecting the charging socket to the inlet of the scooter and then to the power socket. Do not attempt to charge your kick scooter if it, the charger or the power outlet is wet. As with any electronic device, use a surge protector when charging. -
Page 16: Using Your N1
USING YOUR N1 To turn on/off the scooter, first press the power button on the battery. ON/OFF BUTTON Then, hold the power button on the handlebar (to turn on/off the display). Press and hold the" ” button for 3 seconds to turn the scooter lights on/off. -
Page 17: Multifunction Display
DISPLAY USER MANUAL... - Page 18 UP button Distance (standard) POWER button Trip distance DOWN button Total distance Battery charge indicator Battery voltage Single trip time Headlight and tail light Total trip time Brake display KM/H Riding speed (standard) CRUISE Cruise control display Riding speed (imperial) PAS starting display MAX speed THROTTLE...
- Page 19 Operation 1. Turning scooter on/off Hold button to turn the scooter power on/off. The power will automatically turn off if the motor is not in use for 5 minutes. 2. Display Hold button to turn on the device and view display 1. 2.1 Turn on headlight and tail light Hold button for 3 seconds to turn the headlight and tail light on/off.
- Page 20 2.3 Speed limiter 6 km/h Hold button for 4 seconds and will begin flashing. This means the scooter will be limited to a maximum speed of 6 km/h. Hold button for 4 seconds again to turn off the speed limiter function.
- Page 21 2.7 Brake status display When using the brakes, the brake status will be displayed. 2.8 Battery charge indicator When charge is above 70%, four battery bars (full battery) will appear. Bars will reduce as battery charge reduces. When charge is below 15%, zero bars will appear. If the motor shuts off because of a low battery (0% battery charge), the battery indicator will flash.
- Page 22 3. Automatically prompt interface. 3.1 Error Code Display error code meaning 01_info Throttle issue 03_info Motor hall signal issue 05_info Axis speed sensor issue (only applies to torque sensor) 06_info Motor or controller has short circuit issue Electronic control system failure will display a (flashing) fault code. Once the fault has been removed, the fault code display interface will automatically be removed.
- Page 23 General Setting 1. Set units Units is the third settings screen (after wheel diameter). KM/H and KM will flash. Press button to select the desired units of speed, mileage and temperature. Units will stop flashing once the selection has been made. Display Metric Standard...
-
Page 24: Safety Instructions
SAFETY INSTRUCTIONS kick scooters are recreational vehicles. Upon purchasing the vehicle, you choose to ride it at your own risk. NITO, dealers, importers, and manufacturers are not responsible for any injuries or damage caused by a rider's inexperience or failure to follow the instructions in this document. - Page 25 In places without scooter laws, comply with the safety guidelines outlined in this manual. Neither NITO nor the manufacturer are responsible for any property damage, personal injury/death, accidents, or legal disputes caused by violations of the safety instructions.
- Page 26 DO NOT ride over obstacles (sand, loose gravel, or sticks). Doing so could result in loss of balance/traction and could cause a fall. Use only NITO approved parts and accessories on your scooter. Do not modify your scooter. Modifications to your scooter could interfere with its operation and result in...
- Page 27 PERFORMANCE TOP SPEED 20 km/h Specifications SPEED CONTROL 6 km/h RANGE 20 km POWER 250 W BASIC INFORMATION MOTOR Brushless DIMENSIONS 1.220 x 510 x 1.070 mm FOLDED 1.270 x 300 x 480 mm WEIGHT 13 kg PERSONALIZATION 4 options HANDLEBAR Height adjustable LOCK...
-
Page 28: Warning And Cautions
WARNINGS AND CAUTIONS Apply brakes Be sure to read this user when travelling at manual and follow safety high speeds. instructions carefully. DO NOT rotate Maximum weight: the handlebars 100 kg. suddenly while driving at high speeds. DO NOT press Always keep both hands on the handlebar when riding. - Page 29 Watch your speed when DO NOT ride the travelling downhill. scooter in the rain or on wet ground. DO NOT ride over speed bumps, thresholds, or other bumps at high speed. DO NOT jump over obstacles. DO NOT allow 2 years guarantee more than one rider.
- Page 32 Exclusively distributed by ElectricBrands nitobikes.com...
Need help?
Do you have a question about the N1e and is the answer not in the manual?
Questions and answers
please help For Nito N1e
Assistance for the NITO N1e is available through your local reseller or the NITO after-sales service. You can contact them by phone at +39 011 6496683 or by email at support@nitobikes.it.
This answer is automatically generated
Where can i get another charger?
The NITO N1e comes with a specific battery charger provided in the package. Use this charger to charge the battery by connecting it to the charging port on the right side near the rear wheel.
This answer is automatically generated