Table of Contents
Advertisement
Quick Links
Advertisement
Table of Contents

Summary of Contents for AGILE Home Theatre Master Touch Screen
- Page 1 HOME THEATRE MASTER Universal Touch Screen Remote Control Owner’s Manual...
-
Page 2: Key Features
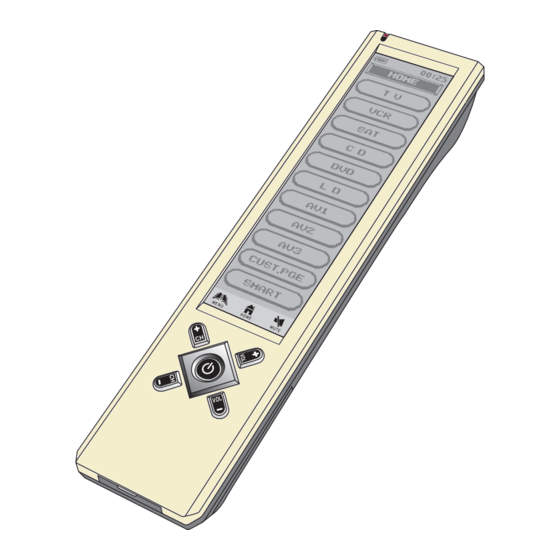
Introduction Congratulations! Your Home Theatre Master Touch Screen remote is a state-of-the-art electronic device which integrates different Infra- red remote controls to deliver instant A/V action to your fingertips. We hope you love this remote and treat it as your Personal Digital Assistant (PDA) for your Home Theatre system. - Page 3 1.2 Getting to know your Home Theatre Master Remote 1. Infra-red lens 6. Touch Screen panel 2. Green LED indicator 7. Short cut keys 3. Battery level meter 8. Hard keys 4. Current time 9. Connection jack 5. Current mode 10.
-
Page 4: Specifications
1.3 Specifications Operation System: Integrated preprogrammed & learning infra- red remote control system Compatibility: Preprogrammed with code library of Televis- ions (TVs), Video Cassette Recorders (VCRs), Satellite/Digital Satellite Receivers (SATs), Cable Converters (CTVs), Laser Disc Players (LDs), Compact Disc Players (CDs), Digital Video Disc Players (DVDs)and Integrated Amplifiers (AMPs) Memory Capacity:... -
Page 5: Getting Start
Getting Start After insert batteries, it prompts at the main page which show all devices and function for selection. Tap “ HOME ” at any time will jump to this page. If the remote is inactive for about 60 seconds, it goes to power saving (sleep) mode and shut down the display. -
Page 6: Ir Codes Library
2.4 Key Tone When you tap any key, there is a short beep sound. User can enable/disable this function from main menu setting. (For details, please refer to Remote Setting section in this manual.) 2.5 Backlit There are two separated EL backlits for LCD screen and hard keys, and will be turned ON separately. - Page 7 • Edit the keyname or just tap “ OK ” to confirm. • Tap the same key on the Home Theatre Master. • Again aim the original remote to the front of the Home Theatre Master. Press and hold the same key of the original remote until Home Theatre Master responds a successful message.
-
Page 8: Advanced Setup
Auto Search – setup the pre-programmed code by searching through the library. • Turn on your device before starting this setup procedure. (e.g. TV) • Tap “ Auto Search ” from Setup menu. • Select a device. (e.g. TV) • Tap “ ”... - Page 9 3.1.3. Move Key – move key location (exchange keys position) • Tap “ Move Key ” from Edit menu. • Select a device. • Select a key to be moved, tap “ OK ” to confirm. • Select a destination, tap “ OK ” to confirm. The position of 2 seleced keys will then be exchanged.
-
Page 10: Remote Setting
3.3 Remote Setting Tap “ MENU ”, then tap “ Remote Setting ” and choose any one of the following items: 3.3.1. Clock – adjust clock Current Time – adjust current time • Tap “ Clock ” from Remote Setting menu. •... - Page 11 One Device – clear learned command of all keys of a device • Tap to select a device. • Tap “ Yes ” to confirm or tap “ No ” to abort. All Devices – clear all learned commands of all devices •...
- Page 12 All to Default – restore all user settings to factory default • Tap “ Yes ” to confirm or tap “ No ” to abort. Note: 1. All user settings will be lost (except clock and password). 2. Reset default function do not clear clock setting and password.
- Page 13 Note: 1. When a smart is executed, you can press a hard key (e.g. , CH+, CH–, VOL+, VOL– ) to stop the signal transmission. 2. User can set max. 32 steps (including delay) for each smart program. 3. Maximum delay time is 20 seconds. 3.5 Clone —...
-
Page 14: Troubleshooting
3.6 PC Link — connect with computer for download/upload data Tap “ MENU ”, then choose “ PC Link ”. PC-to-remote data upload/download function, you have to purchase the Home Theatre Master Docking package. You cannot perform this function without the original docking station. 3.7 Interactive Help Screen In menu mode, there is a help icon ( ) on the top right corner... - Page 15 Q : How can I prevent someone to edit/change the setting of my Home Theatre Master? You can simply activate the “Password ” function to lock your remote. For details, please refer to section “ 3.3.4. Password ”. Q : I have forgot my password. There is a factory preloaded magic password, “...
-
Page 16: Device Code List
Device Code List TV Device Model Code A.R. Systems 1021 Accent 1021 Admiral 1001 Agef 1001 Aiko 1021 1021 Akai 0331 0841 1021 Akiba 1021 Akito 1021 Akura 1021 Alba 0431 1021 1041 Allstar 1021 Amplivision 1041 Amstrad 0481 1021 Anam 0251 1021 Anam National... - Page 17 Decca 0271 0671 1021 Deitron 1021 Desmet 1021 Diamant 1021 Digiline 1021 Dixi 0331 1021 Drean 1021 Dual 0891 1021 Dual-TEC 0901 Dumont 0841 1001 1021 Dynatron 1021 Elbe 1021 1031 1041 Elcit 1001 1021 Elin 1021 Elite 1021 Elta 0331 Emerson 0021 0061 0071 0081 0091 0101 0111...
- Page 18 Inno Hit 0671 0851 0861 1021 Innovation 0951 0961 Interfunk 0841 1001 1011 1021 1041 Internal 1021 Intervision 1021 1041 Irradio 0851 0861 1021 Isukai 1021 1021 0751 0841 0931 ITT Nokia 0751 0841 0931 1021 Jensen 0311 0001 0261 0281 0751 Kaisui 1021 Karcher...
- Page 19 0241 0351 0361 1021 Neckermann 0821 0841 1001 1021 1041 1021 Netsat 1021 Neufunk 1021 New Tech 1021 Nikkai 0271 0431 0861 1021 Nikko 0031 Noblex 1021 Nokia 0751 0841 0931 0941 0971 Nordmende 1021 Novatronic 1021 Oceanic 0841 Okano 1021 1041 Opera 1021...
- Page 20 Saba 0671 1001 Saisho 0331 Salora 0821 0841 Sambers 0671 Sampo 0361 Samsung 0331 0341 0351 0361 0711 0861 1021 1041 Sansui 1021 Sanyo 0171 0231 0271 0751 1021 1031 1041 Save 1021 1021 Schneider 0891 0901 1021 Sears 0161 0171 0351 0481 0521 1021 0841 1001 1021 Seleco...
- Page 21 Tokai 1021 Toshiba 0351 0521 0751 0801 Trans Continens 1021 Transonic 1011 1021 Triumph 0671 1021 Uher 1021 1041 Ultravox 0841 1001 1021 Unic Line 1021 United 1021 Universum 0711 1011 1021 1041 Univox 1001 1021 Vector Research 0361 Vestel 1021 Vexa 1021...
- Page 22 Goldstar 0082 0782 Goodmans 0402 0642 0692 Graetz 0612 Granada 0622 0652 0702 0722 0732 0782 Grundig 0622 0632 0652 0682 0812 0822 0832 Hanseatic 0622 0782 Hinari 0712 Hitachi 0102 0562 0572 0582 0592 0602 0612 0782 Imperial 0642 Inno Hit 0622 0642 Interfunk...
- Page 23 Saisho 0212 0582 0712 Salora 0732 0782 Samsung 0212 0312 0622 0642 Sanky 0472 0512 Sansui 0292 0542 0612 Sanyo 0242 0722 0732 0282 0622 0672 Schaub Lorenz 0612 Schneider 0622 0642 Scott 0342 Sears 0302 0342 0592 0602 0642 Seleco 0612 Sentra...
- Page 24 Cyrus 0923 D-Box 1073 1213 1253 0923 Dual 1113 Eagle Comtronics 0273 Eastern 0063 Echostar 0783 0943 Electricord 0203 Electus 0263 Ferguson 1113 Finlandia 0963 1053 Finlux 0963 Flint 0963 0113 0123 GEC Cable System 0193 General Instrument 0793 0803 Gold Box 0943 0953 Gooding...
- Page 25 Realistic 0133 Regency/Eastern 0683 0923 Runco 0383 Saba 1033 1113 Sabre 0963 Sagem 0963 1183 Salora 1053 Samsung 0273 Schneider 0983 1113 Scientific Atlanta 0363 0563 0573 0583 Sedea 0863 0873 0883 Signal 0273 0893 SL Marx 0273 Sony 0843 1143 Spectavision 0233 Standard Components...
- Page 26 Genexxa 0356 0376 1156 Goldstar 1186 1276 1316 1386 0156 0226 0516 1046 Hitachi 0246 0256 0556 0866 Inkel 0166 0446 0366 Kenwood 0096 0146 0456 0636 0776 0786 0796 0806 0946 Kyocera 0076 Luxman 0126 0476 0726 0756 0766 1036 Magnavox 0216 0266 0696 1006 Marantz...
- Page 27 Hitachi 0037 Kenwood 0107 0127 Magnavox 0047 Marantz 0047 Mitsubishi 0157 0157 Panasonic 0097 0197 Philips 0047 Pioneer 0037 0057 0157 0187 Realistic 0177 Rotel 0007 0017 Sharp 0147 Sony 0067 0077 0137 Victor 0117 Yamaha 0027 0087 DVD Device Model Code Akai...
Need help?
Do you have a question about the Home Theatre Master Touch Screen and is the answer not in the manual?
Questions and answers