Table of Contents
Advertisement
Quick Links
READ AND SAVE
THESE INSTRUCTIONS
Installer: leave this guide with homeowner.
Register your product online at
www.nutone.ca/register.
Easy installation in both
new construction and retrofit
© 2014 Broan-NuTone LLC
RN80C
RN110C
ULTRA Pro
TM
| Ventilation Fan
with ULTRAQuick
TM
INSTALLATION GUIDE
Table of Contents
Installation Technology
2
2
3
7
12
12
12
13
13
Advertisement
Table of Contents

Subscribe to Our Youtube Channel
Related Manuals for Broan NuTone ULTRA Pro RN80C


Summary of Contents for Broan NuTone ULTRA Pro RN80C
-
Page 1: Table Of Contents
Register your product online at INSTALLATION GUIDE www.nutone.ca/register. Table of Contents Warnings and Cautions Typical Installation New Construction Installation Easy installation in both Retrofit Installation Operation new construction and retrofit Cleaning and Maintenance Troubleshooting Service Parts © 2014 Broan-NuTone LLC Warranty... -
Page 2: Warnings And Cautions
Page 2 RN80C RN110C Installation Guide WARNING CAUTION TO REDUCE THE RISK OF FIRE, ELECTRIC SHOCK, OR . For general ventilating use only. Do not use to exhaust INJURY TO PERSONS, OBSERVE THE FOLLOWING: hazardous or explosive materials and vapors. 1. -
Page 3: New Construction Installation
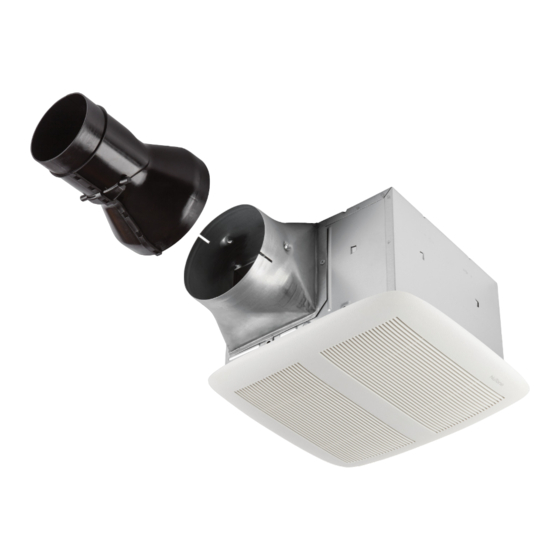
Page 3 RN80C RN110C Installation Guide New Construction Installation Tools needed Materials needed • Power screwdriver with a Phillips bit • 4" round metal ducting recommended for best performance Use of other ducting is acceptable but may impact performance •... - Page 4 Page 4 RN80C RN110C Installation Guide New Construction Installation Snap-in and Secure Housing and Muffler Position Housing between joists and crimp channel on both sides of Mounting Frame to lock Housing in place. Do not crimp Housing. Screws from Parts Bag Attach Muffler Attach Flange, Transition and Ducting Top and bottom flanges...
- Page 5 Page 5 RN80C RN110C Installation Guide New Construction Installation Connect Wires and Install Knockout Plate • Run 120VAC electrical wiring to the installation location. • Use proper UL-approved connectors to secure wiring to the Knockout Plate provided in Parts Bag. •...
- Page 6 Page 6 RN80C RN110C Installation Guide New Construction Installation Insert Mask and Finish Ceiling • Tape Mask into Housing. • Install ceiling material. • Cut out around Housing. Mask protects unit during construction. Remove before installing Grille. Install Grille See Page 12 for Operation, Cleaning and Maintenance, and Troubleshooting.
-
Page 7: Retrofit Installation
Page 7 RN80C RN110C Installation Guide Retrofit Installation Tools needed Materials needed • Power screwdriver with a Phillips bit • Ruler • Tape to seal duct connections • Phillips screwdriver • Pencil • Existing rigid duct will require the addition of a short length of flexible duct •... - Page 8 Page 8 RN80C RN110C Installation Guide Retrofit Installation Remove Blower Assembly Set aside Blower Assembly Both sides Remove Wiring Panel Set aside Wiring Panel Set aside screw Insert Mounting Frame Remove screws from Mounting Frame Bend up and set aside four tabs...
- Page 9 Page 9 RN80C RN110C Installation Guide Retrofit Installation Secure Mounting Frame Screws set aside in Step 7 Snap-in Housing Pull existing wiring into Housing as it is inserted into Mounting Frame Attach Flange, Transition and Ducting Screw from Parts Bag Pull existing 4"...
- Page 10 Page 10 RN80C RN110C Installation Guide Retrofit Installation Install Knockout Plate, Connect Wires and Install Wiring Panel • Use proper UL-approved connectors to secure wiring to the Knockout Plate provided in Parts Bag. • Connect wires as shown in wiring diagram. Attach cable clamp to Knockout Plate.
- Page 11 Page 11 RN80C RN110C Installation Guide Retrofit Installation Insert and Secure Blower Assembly and Muffler Screws from Parts Bag If ceiling repairs are needed, tape Mask into Housing. Attach Muffler See New Construction Installation, Step 6. Remove Mask before installing Grille.
-
Page 12: Operation
Page 12 RN80C RN110C Installation Guide WARNING Troubleshooting Before servicing or cleaning unit, switch power off at service panel and lock the service Symptom: The fan does not run. disconnecting means to prevent power from being • Check for an open fuse or circuit breaker in the switched on accidentally. -
Page 13: Service Parts
At the time of requesting warranty service, you must present evidence of the original purchase date. 99140208 Grille Spring (2 req’d) Broan-NuTone Canada Inc., 1140 Tristar Drive, Mississauga, Ontario, L5T 1H9 (1-877-896-1119) www.NuTone.ca If you must send the Fan or part to NuTone, as instructed by NuTone, you must properly pack the Fan or part—NuTone is not responsible for damage... - Page 14 Page 14 RN80C RN110C Installation Guide 99045231B...
Need help?
Do you have a question about the NuTone ULTRA Pro RN80C and is the answer not in the manual?
Questions and answers