
Related Manuals for Hidrotermal HT-SAV01

Summary of Contents for Hidrotermal HT-SAV01
- Page 1 Multi-functional Flow Control Valve for Water Treatment System HT-SAV01 HT-SAV01T USER MANUAL Please read this manual in details before using valve and keep it properly in order to consult in the future.
- Page 2 Before the valve put into use, please fill in the below content so as to help us to refer in the future. The Program Type Setting (Operation by professional) When all symbols light on,press and hold buttons for 5 seconds to enter the menu of valve model selection.
-
Page 3: Table Of Contents
Catalogue Notice........................3 1.Product Overview....................3 1.1.Main Application & Applicability..............3 1.2.Product Characteristics.................. 4 1.3.Service Condition................... 6 1.4.Product Structure and Technical Parameters..........6 1.5.Installation...................... 7 2.Basic Setting & Usage..................9 2.1.The Function of PC Board................9 2.2.Basic Setting & Usage..................10 3.Applications.......................13 3.1.Softener Flow Chart..................13 3.2.The Function and Connection of PC Board............ -
Page 4: Notice
Notice ●To ensure normal operation of the valve, please consult with professional installatior or repairing personnel before use it. ●If there are any of pipeline engineering and electric works, there must be finished by professional at the time of installation. ●Do not use the control valve with the water that is unsafe or unknown quality. -
Page 5: Product Characteristics
Residential softening system Ion exchange equipment Boiler softening water system RO pretreatment softening system, etc. 1.2. The Product Characteristics ●Simple structure and reliable sealing It adopts hermetic head faces with high degree pottery and corrosion resistance for opening and closing. It combines with Service, Backwash, Brine & Slow Rinse, Brine Refill and Fast Rinse. - Page 6 ●There are two kinds of regeneration mode for time clock type When the program is set to time clock type by days, it can be changed to be by hours by dialing the red switch on main control board to "1" (Refer to the figure in 18). Pointing to "ON"...
-
Page 7: Service Condition
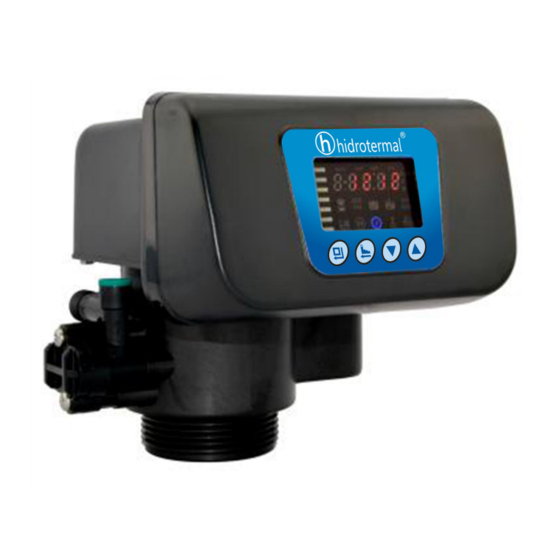
1.4.Product Structure and Technical Parameters Product dimension(The appearance is just for reference. It is subject to the real products. Brine Line Connector-G3 Inlet-G1 2.5”-8NPSM Outlet-G1 Drain-G1/2 Riser Pipe-1.05” OD A(mm) Bmm) H(mm) Regeneration Flow Rate m Model Mode @0.3MPa HT-SAV01 Down-flow HT-SAV01T Down-flow... -
Page 8: Installation
Note: 1.OD-Outer Diameter, 1.05OD-26.7mm 2. Transformer Outout: DC12V/1.5A 1.5.Installation notice A.Installation notice Before installation, read all those instruction completely. Then obtain all materials and tools needed for installation. The installation of product, pipes and circuits, should be accomplished by professional to ensure the product can operate normally. Perform installation according to the relative pipeline regulations and the specification of Water Inlet. - Page 9 ②Install animated connector As Figure 1-2 shows, put the sealing Inlet ring into nut of animated connector, Outlet and screw in water inlet. Flow Sealing Ring Meter ③Install fow meter Animmated Probe Wire Connector As Figurel-2 shows, put the sealing ring into nut of flow meter, screw in Figurel 1-2 water outlet;...
-
Page 10: Basic Setting & Usage
Note: ●Control valve should be higher than drain outlet, and be better not far from the drain hose. ●Be sure not connect drain with sewer directly, and leave a certain space between them, avoid wastewater be absorbing to the water treatment equipment, such as showed in the Figure1-4. -
Page 11: Basic Setting & Usage
Time of day indicator ● Light on, display the time of day. ●"12. 12" flash. remind you to reset the time of day if electrical service interrupted 3 days more(If electrical service interrupted within 3 days, it doesn't need to reset the time. - Page 12 Intelligent Meter Delayed: By setting resin volume, feed water hardness, A-03 regeneration factor, the controller will calculate the system capacity. Regenration mode same as A-01. Control A-01 A-01 Mode Intellizent Meter Inmediate: By setting resin volume, feed water hardness, A-04 regeneration factor,the controller will calculate the system capacity.Regeneration mode same as A-02 Unit Mode...
- Page 13 B. Process Display Ilustration: ●In Service status, the fiqure shows A/B/C/D: In Backwash status. it shows fiaure E/I; In Brine& Slow Rinse status, it shows F/I; In Brine Refil status, it shows figure G/I; fast Rinse status,it shows fiqure H/I.In each status,every figure shows 15 seconds. ●...
-
Page 14: Applications
② Test the hardness of outlet water and raw water at regular time. When the outlet water hardness is unqualified, please press the and the valve will temporarily regenerate again (It will not affect the original set operation cycle) ③ When the feed water hardness change a lot, you can adjust the water treatment capacity as follow: Press and hold both for 5 seconds to unlock the buttons. -
Page 15: The Function And Connection Of Pc Board
3.2. The Function and Connection of PC Board Open the front cover of control valve, you will see the main control board and connections as below: On:Day Conversion I:Hour Flow Meter Connector Locating Board Connector Interlock Connector Interlock Connector Display Board Motor Connector Connector... - Page 16 Instruction: If system requires no hard water flowing from outlet in regeneration cycle (Mainly for no hard water flow out when valve is switching or valve in backwash or brine drawing status), a solenoid valve could be installed on outlet, the wiring refer to Figure 3-1.
- Page 17 Brine Refill and Fast Rinse, solenoid valve is open. When valve is switching, solenoid valve is closed, no water flow into valve to ensure valve switching properly. It could prevent the problem of mixing water and water hammer. Use interlock cable to realize valves in parallel and series in same system which is suited for RO pretreatment system or second grade Na+ system.
-
Page 18: B.interlock
3) Liquid Level Controller in Water Tank Controls Inlet pump (Three-phase) (Set b-01) Signal Output Control Valve Connector Liquid Water Level Switch Tank (Connect to Control Protection Case) Liquiol Level Switch Figure3-6 Wiring of Liquid Level Switch Well in Water Tank Controls Inlet Pump 4) Control Inlet Booster Pump( Set b-01 or b-02) Instruction:If inlet water pressure is less than 0.15MPa, which makes rinse drawing difficult, a booster pump is suggested to be installed on inlet. -
Page 19: C.pressure Relief Output
Interlock Cable Interlock Cable Plug Cable in Socket of Same Color Figure3-9 Network System Writing with Interlock Cable Note: Use Interlock Cable to connect the black socket of one valve with the blue socket of another valve in series. One svstem with several valves. if interlock cable is disconnected. the system is divided into two individual system. -
Page 20: F.series System
Output Signal Connector Meter Type Valve 1# Outlet Interlock Outlet Interlock Cable Remote Handing Connector Signal 2# Outlet Output Outlet Connector Interlock Interlock Cable Cable Remote Handing Connector 3# Outlet Inlet Inlet Outlet Figuer 3-12 Interlock system Figuer 3-13 Series system F. - Page 21 B. Flow Rate characteristic 1). Pressure-flow rate curve 2). Injector Parameter Table Inlet Draw Rate(L/M) Pressure 6301 6302 6303 6304 6305 6306 6307 6308 6309 6310 Coffee Pink Yellow Blue White Black Purple Green Orange 0.15 0.81 1.12 1.58 2.21 2.45 3.30 3.44...
-
Page 22: Parameter Settlement
3.4. Parameter settlement ①Service timeT1 Water treatment capacity: x K ÷ Y Hardness of inlet water (mmo/L) Exchange factor (mmol/L) 400 - 1000. Down-flow regeneration, take 400 ~750. Upflow regeneration, take 450-1000. If the inlet water hardness is higher, the factor is smaller. Resin volume(m By hours: T1=Q÷Q (Hour) -
Page 23: Parameter Enquiry And Setting
K-Security factor, always take 1.2~2. It is related to the hardness of inlet water: the higher the hardness is, the bigger the K is. ⑦Set up interval backwash times When the turbidity of raw water is higher, the interval backwash time could be set F-00. That is, backwash in each regeneration;... - Page 24 3.5.2.Parameter Setting In program display mode,press and enter into program set mode.Press to adjust the value. 3.5.3.The steps of parameter setting(Take HT-SAV01, A0-1 as sample) Items Process steps Symbol When time of day "12: 12" continuously flash, it reminds to reset;...
- Page 25 1. In brine& slow rinse time display status, it shows Brine& 3-60:00. Press and enter into program set mode. Slow 60:00 flash; Rinse 2. Press to adjust the brine &slow rinse time; Time 3. Press and hear a sound "Di" , then finish adjustment, press to turn back.
-
Page 26: Trial Running
3.6. Trial Running After installing the multi-functional flow control valve on the resin tank with the connected pipes, as well as setting up the relevant parameters, please conduct the trail running as follows: A. Close inlet/outlet valve B and valve C, open bypass valve A. Cleaning the impurity in the pipe, and then close the bypass valve A. -
Page 27: Trouble-Shooting
3.7.Trouble-Shooting A. Control Valve Fault Problem Cause Correction A. Assure permanent electrical A. Electrical service has been interrupted. service(Check fuse, plug, switch and so on). 1.Softener fails to B. Regeneration time set incorrect. B. Reset regeneration time. regenerate. C. Controller damaged. C. - Page 28 A. Air in water system. A. Empty the air from the system. 8.Resin discharged B. Strainer is broken. B. Replace new strainer. through drain line. C. Large drain flow rate when backwash. C. Check and adjust proper drain rate. A.Locating signal wire breakdown. A.
-
Page 29: Assembly & Parts
B.Controller Fault Problem Cause Correction A. Wiring of display board with control A. Check and replace the wiring. 1. All indictors board fails to work. B. Replace control board. display on display B. Control board damaged. C. Check and replace transformer. board. - Page 30 54470018 Flow Meter 5457002 Animated Connector Item No. Description Part No. Quantity Item No. Description Part No. Quantity Animated Nut 8945001 Animated Nut 8945001 O-ring 8378081 O-ring 8378081 Impeller Supporter 5115022 Clip 8270004 Impeller 5436010 Connector 8458038 Impeller Supporter 5115021 Clip 8270004 Shell...
- Page 31 Item No. Description Part No. Quantity Item No. Description Part No. Quantity O-ring 73x5.3 8378143 O-ring 73x3.55 8378128 O-ring 25.8x2.65 8378078 O-ring 37.7x3.55 8378118 5022033 Anti-friction Valve Body 8216004 5022034 Washer Screw, Cross 8909016 Shaft 8258004 ST3.9x16 Screw, Cross Moving Seal 8902009 8370001 M4x30...
- Page 32 HT-SAV01 Packing List When open the box, please check the following parts Description picture Quantity Control Valve User Manual Transformer (DC12V) (Optional parts) 1 " Flow Meter Connector 1 " Water Inlet Connector Interlock Wire (1.2m) Spare Parts Kit include following parts BASE SEAL RING(73×5.3)
- Page 33 HT-SAV01T Packing List When open the box, please check the following parts Description picture Quantity Control Valve User Manual Transformer (DC12V) (Optional parts) Interlock Wire (1.2m) Spare Parts Kit include following parts BASE SEAL RING(73×5.3) Drain Hose Connector Brine Tube Hose Connector Tube Bushing Brine Line Flow Control Drain Line Flow Control(5#)
Need help?
Do you have a question about the HT-SAV01 and is the answer not in the manual?
Questions and answers