Table of Contents
Advertisement
Advertisement
Table of Contents

Related Manuals for Mustek DV 3000


Summary of Contents for Mustek DV 3000
- Page 1 Digital Video User Guide...
-
Page 2: Table Of Contents
Table of Contents Getting Started Getting to Know Your Digital Video...3 Using the Panel..4 Power... 5 Modes... 6 Mode Switch Button...9 Movie Mode Taking Movies...10 Playback Movies...11 Video Format/Video Out... 13 Camera Mode Taking Pictures...14 Night Shot...15 Playback Pictures...16 Main Functions Changing the Quality Setting...17 The Video Number and Recording Timer... -
Page 3: Getting To Know Your Digital Video
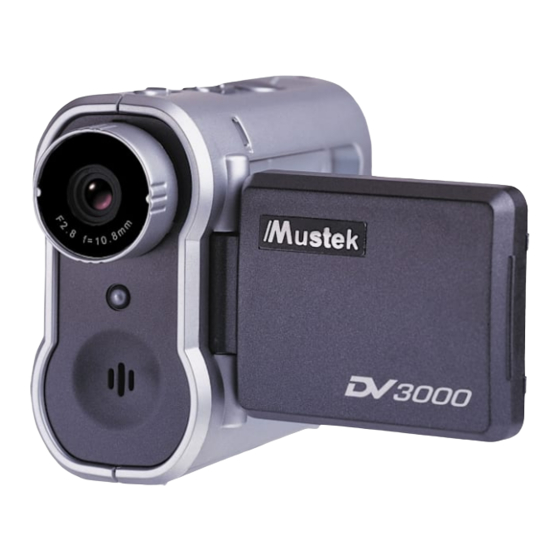
Getting to Know Your Digital Video Front View Shutter/Set (Note: Shutter button is equal to “SET” in setup menu.) Speaker Back View Status LED (Power On/USB) LCD Viewfinder Panel Zoom Power Button Lens Front LED Microphone AV out USB port MMC/SD Card Slot Battery En 3... -
Page 4: Using The Panel
Using the Panel Back/Self-timer REC/PLAY sub-mode switch Movie/Camera Mode Switch Play/ MENU Pause Stop Delete/LCD(On/Off) Volume/Night Shot NEXT/Quality En 4... -
Page 5: Power
Power Power On/Off Power Low If your battery is low, you will see a battery icon ( )shown on the top center of the LCD. If your battery is about to run out, you will see a blinking battery icon ( center of the LCD. -
Page 6: Modes
Modes Power On USB connected Mass Storage Mode Before connected to PC(Movie Mode/Camera Mode) Before connected to PC, Digital Video has two modes: Movie Mode and Camera Mode. Movie Mode lets you take sound videos.Camera Mode lets you take pictures.Each mode has a recorder sub-mode and a play-back sub-mode. - Page 7 Modes Using Console (Not Available for MAC) By connecting your Digital Video to a computer, the Console opens. Meanwhile your Digital Video switches to Mass Storage Mode, too. You may choose either to transfer the camera data through Console program or through Mass Storage Mode.
- Page 8 Modes Connected to PC(Mass Storage Mode/PC Camera Mode) Mass Storage Mode Connect your Digital Video to a computer, it will turn to Mass Storage Mode. In Mass Storage Mode, your Digital Video acts exactly like a hard disk. That means you can access it via the Windows user interface. You can copy, move or delete pictures or movies exactly the way you manipulate files.
-
Page 9: Mode Switch Button
Mode Switch Button Movie Mode When powering on your Digital Video, it will be in Movie Mode. Camera Mode You can press the Mode Switch button to shift to Camera Mode. Press the Mode Switch button again to return to Movie Mode. -
Page 10: Taking Movies
Taking Movies Taking Your First Movie Press Power Press Zoom-in or Zoom-out to frame your picture Press Shutter to start recording Press Shutter again to stop En 10 Zoom in or Zoom out... -
Page 11: Playback Movies
Playback Movies Playback a Movie Switch to Playback sub-mode Press Zoom-in or Zoom-out to preview When press Zoom-in, it will show 1 movie on the LCD. When press Zoom-out, it will show movie thumbnails on the LCD. En 11... - Page 12 Playback Movies Press Next or Back to navigate Press Play to start Press Play again to pause Press Stop to stop En 12...
-
Page 13: Video Format/Video Out
Video Format Video Format This Digital Video uses Motion JPEG as its digital video format. Motion JPEG (different from MPEG) is a compact video format supported by both Microsoft’s Windows Media Player and Apple Computer’s QuickTime. You can play it on most Windows and Mac OS computers. There are a lot of freeware or shareware programs that supports playing or editing in Motion JPEG format. -
Page 14: Taking Pictures
Taking Pictures Taking Your First Picture Press Power Press Zoom-in or Zoom-out to frame your picture (Only under “ Press Shutter to take a picture En 14 Switch to Camera Mode ” low resolution) Zoom in or Zoom out... -
Page 15: Night Shot
Night Shot Taking a night shot Night shot is about 1 second exposure to let you take a picture at night or in dim light. Press Night Shot Press Shutter to start Press Night Shot again to exit Night Shot on about 1 second exposure En 15... -
Page 16: Playback Pictures
Playback Pictures Playback a picture Switch to Playback sub-mode Press Zoom-in or Zoom-out to preview En 16 When press Zoom-in, it will show 1 picture on the LCD. When press Zoom-out, it will show picture thumbnails on the LCD. -
Page 17: Changing The Quality Setting
Changing the Quality Setting Movie Recorder Sub-Mode You can change the movie’s quality setting whenever you want. 1. In Movie Mode, press the 2. The LCD will display your current quality setting on the top left corner. Which could be “ Fine quality Camera Recorder Sub-Mode You can change the picture’s resolution setting whenever you want. -
Page 18: The Video Number And Recording Timer
The Video Number and Recording Timer The Recording Time of video 10 The Picture Counter En 18 While you’re filming, the last video’s number and the last video recording timer will be number displayed on the LCD. You can see the picture counter displayed on the Picture counter top right corner of your... -
Page 19: Using Self-Timer
Using Self-Timer This Digital Video has a built-in 10 second self-timer. Press Timer Press Shutter to start The LCD Display LCD On/Off To save energy, Digital Video allows you to switch off the LCD panel. In Playback Mode, the LCD will always be on. In Recorder Mode, press the button to turn the LCD on or off. -
Page 20: Delete
Delete Delete one Switch to Playback sub-mode Press Next or Back to select one, then press Press SET to confirm En 20... -
Page 21: Delete Delete All
Delete Delete All Follow the same steps as “DELETE ONE”, then press could directly press Press SET to confirm Note: You can press Menu to exit “DELETE ONE” or “DELETE ALL”. twice in Playback submode. Del one again. Or you Del All En 21... -
Page 22: Attention Icon
Attention Icon Memory Full If your Digital Video’s memory card is full, you can not take any new picture. So when you press the Shutter to take a picture, the LCD will display a huge icon in the center. The icon will be shown for 2 seconds to remind you of it, then it will be hidden unless you press the Shutter again. -
Page 23: Setup
Setup Press Menu Press SET to change Under the menu, you can setup the BEEP ON/OFF, AUTO-OFF, FORMAT the memory card, analog video output format (NTSC/PAL) and 50Hz/60Hz (power supply). Beep On/Off If you choose Beep On, there will be beep sound when you press the button. - Page 24 Format your Memory Card If you want to erase all movies, pictures and other files, you can select FORMAT under the menu and press SET to wipe out the memory com- pletely. If you want to keep your memory contents, press MENU to quit. NTSC/PAL NTSC/PAL are two incompatiable analog TV singal formats.
-
Page 25: Notice For Video Clip Playback On Pc
Notice for video clip playback on PC Our video clip adopts Microsoft latest video technology(Direct X 8.0). Therefore user(Mindows 98, 2000) needs to install our enclosed Direct X to playback the video clip files. Note: Direct X is a program to upgrade Microsoft’s Media Player codec. En 25...
Need help?
Do you have a question about the DV 3000 and is the answer not in the manual?
Questions and answers