Table of Contents
Advertisement
Quick Links
-2328 EX-103
-2302 EX-203
ow-speed Airmotor
peration Manual
Caution before use
r use by dental professionals only.
• The Patterson airmotor is intended for use by dental professionals only.
before using the airmotor.
• Read this operation manual carefully before using the airmotor.
structions, including all cautions and warnings.
• Be sure to follow all the operating instructions, including all cautions and warnings.
e reference.
• Keep this Operation Manual for future reference.
t and the operator when using the airmotor.
• Keep in mind the safety of the patient and the operator when using the airmotor.
1. Specifications
8 EX-103
Product number
2 EX-203
dard 4-hole
Backend configuration
ndard 2-hole is available.)
pe
Nose configuration
043-2328 EX-103
d reduction
Speed ratio
peed
Air pressure
rpm)
Maximum speed
,500
,250
Weight
043-2302 EX-203
Speed ratio
peed
Air pressure
rpm)
Maximum speed
2,000
5,000
Weight
htly depending on a rotating direction of the airmotor and
Note: The maximum speed may vary slightly depending on a rotating direction of the airmotor and
the airmotor.
the type of the tubing connected to the airmotor.
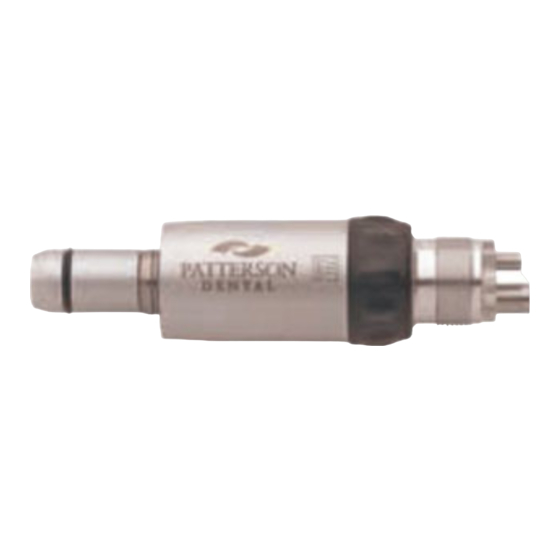
2. Part Descriptions
Water/Chip Air Outlet
PATTERSON
EX-103
MADE IN JAPAN
to Tubing Connector
3. Installation of Airmotor onto Tubing Connector
standard 4-hole or 2-hole.
- Make sure that tubing connector is ISO standard 4-hole or 2-hole.
motor with the corresponding holes of the tubing connector,
- Align the pipes at the backend of the airmotor with the corresponding holes of the tubing connector,
ubing connector by turning it clockwise.
and then tighten the nut situated on the tubing connector by turning it clockwise.
Caution
or cannot be smoothly installed onto or removed from the
• Never use the airmotor, if the airmotor cannot be smoothly installed onto or removed from the
lt the Patterson Service Center.
tubing connector. In this case, consult the Patterson Service Center.
tachment onto/from Airmotor
4. Installation/Removal of Attachment onto/from Airmotor
Installation
water system E-type attachments. Insert the sleeve of the
- The Patterson airmotor accepts external water system E-type attachments. Insert the sleeve of the
attachment until it
airmotor into the backend of the E-type attachment until it
is securely locked with a snap.
y installed onto
- Make sure that the attachment is securely installed onto
rs before use.
the airmotor, pulling it gently with fingers before use.
Removal
e attachment with
- Hold the airmotor with one hand and the attachment with
the other hand as illustrated.
or. Then, do not
- Pull the attachment out from the airmotor. Then, do not
ock is released.
separate the overlapped hands until the lock is released.
Caution
ment cannot be smoothly installed onto or removed from
• Never use the airmotor, if the attachment cannot be smoothly installed onto or removed from
tterson Service Center.
the airmotor. In this, consult the Patterson Service Center.
5. Operation
- Set the air pressure gauge below 42 PSI.
e that:
- Before use, make a trial run, making sure that:
een the connecting part of the airmotor's backend and tubing
• The drive air is not leaking from between the connecting part of the airmotor's backend and tubing
connector.
he rotating speed can be
• Changes in the rotating direction and the rotating speed can be
n.
affected with the control ring as shown.
ction, the attachment
• When the ring is turned in an "F" direction, the attachment
ckwise.
installed onto the airmotor rotates clockwise.
ction, the attachment
• When the ring is turned in an "R" direction, the attachment
nterclockwise.
installed onto the airmotor rotates counterclockwise.
osition between "F" and
• The rotation is stopped at the center position between "F" and
"R".
eed by manipulating the
• Select the rotating direction and the speed by manipulating the
ring.
Warning
rheating, etc. occurs while the airmotor is in the test run or
• When abnormal vibration, noise, overheating, etc. occurs while the airmotor is in the test run or
diately. In this case, consult the Patterson Service
in use, stop using the airmotor immediately. In this case, consult the Patterson Service
Center.
in any way.
• Never dismantle or alter the airmotor in any way.
tubing connector when the motor is rotating.
• Never remove the airmotor from the tubing connector when the motor is rotating.
onto/from the airmotor when the motor is rotating.
• Never install/remove the attachment onto/from the airmotor when the motor is rotating.
SI to the airmotor.
• Never apply air pressure above 42 PSI to the airmotor.
ng with a clamp for the Patterson attachments is supplied
External Spray System: 7.8" spray tubing with a clamp for the Patterson attachments is supplied
eded, the tubing can be connected to the airmotor.
separately. If spray, water or chip air is needed, the tubing can be connected to the airmotor.
043-2328 EX-103
043-2302 EX-203
E-type Low-speed Airmotor
: AUTOCLAVABLE
Operation Manual
OM-MK029E
043-2328 EX-103
043-2302 EX-203
ISO standard 4-hole
(ISO standard 2-hole is available.)
ISO E-type
4:1 speed reduction
Air consumption
(psi)
36
42
3.7oz
1:1 drive
Air consumption
(psi)
36
42
3.17oz
Backend
Sleeve
Speed/Rotation Direction Control Ring
Positioning Mark
Motor Stop Position
PATTERSON
EX-103
MADE IN JAPAN
Speed/Rotation Direction
Control Ring
002
Speed
(NL/Min)
(rpm)
5,500
42
6,250
51
Speed
(NL/Min)
(rpm)
22,000
42
25,000
51
Water/Chip Air Outlet
PATTERSON
EX-103
MADE IN JAPAN
Spray Outlet
Air pressure
(psi)
36
42
Air pressure
(psi)
36
42
Backend
Speed/Rotation Direction Control Ring
Motor Stop Position
PATTERSON
EX-103
MADE IN JAPAN
Speed/Rotation Direction
Control Ring
: AUTOCLAVABLE
OM-MK029E
002
Air consumption
(NL/Min)
42
51
Air consumption
(NL/Min)
42
51
Positioning Mark
Spray Outlet
Advertisement
Table of Contents

Summary of Contents for Patterson 043-2328 EX-103
- Page 1 4. Installation/Removal of Attachment onto/from Airmotor Installation water system E-type attachments. Insert the sleeve of the - The Patterson airmotor accepts external water system E-type attachments. Insert the sleeve of the attachment until it airmotor into the backend of the E-type attachment until it is securely locked with a snap.
- Page 2 - Dismantling or reassembling by any third parties other than the Patterson Service Center voids - Dismantling or reassembling by any third parties other than guarantee.
Need help?
Do you have a question about the 043-2328 EX-103 and is the answer not in the manual?
Questions and answers