Subscribe to Our Youtube Channel
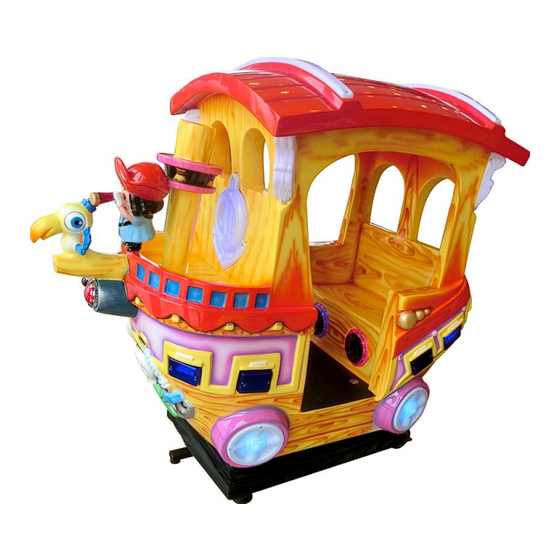
Summary of Contents for MecPower Tecway Mini Kiddie Pirate
- Page 1 Mini Kiddie Pirate Manual To avoid innormal operate, please read this operation manual before install. Please keep this manual for read.
-
Page 2: Safety Attentions
Safety Attentions 1) Certain part of the game is with high voltage. Adjust the game by technician. Do not open the game door unless maintenance or parts replacement is required. 2) Please switch off the power before checking and maintenance. 3) Please switch off the power before opening the game door. - Page 3 Notes of Usage 1) The voltage range of the game should be 105V 115V/215V 225V. The proper voltage should be 110V/220V. The specific voltage accords to the date plate on the back door of the game. 2) The plug must be plugged tightly but keep the power cords not be too tight.
- Page 4 Notes of Clean 1) Please use clean and soft cloth to clean the game. 2) Prevent damaging the surface of the game, please do not use the following cleanser: Alterative Cleanser; Acidic Cleanser; Insecticide, sterilized water, alcohol or other chemical cleanser. Notes of Moving and Shipping 1) Properly disassemble the game for necessary moving and shipping.
-
Page 5: Technical Parameter
TECHNICAL PARAMETER Voltage: AC220V/110V(50/60HZ) Max. current: 0.7A/1.4A (Note: The proper voltage and current used accords to the nameplate at the back door Max. power: 120W Power (standby mode): 50W Coin size: φ21mm φ30mm (diameter) 1.2mm 2.5mm (thickness) Capacity of coin box: about 2900 pcs with coin size φ25mm*1.5mm Location required: indoor use;... -
Page 6: Parts And Accessories
Parts & Accessories DRAWING NAME MODEL/SPEC. red, green, blue, LED light yellow 1285 # 1396 # power cord manual... -
Page 7: Check The Connection
CHECK THE CONNECTION Check if the inner structure of the game is loose caused by transportation or the terminals drop. Check if the game is grounded. Check if the resistance of the GNDs is more than 100 megohm. Adjust the coin mech before operation. Connect the power cord. -
Page 8: Check Before Operation
d) Make sure the voltage and fuse used are proper. ! w arn ing B e fore in pu ting th e p ow e r, p lea se ch e ck the re sista nce b etw e e n inp ut po rt a n d G N D . M a ke su re th e co nn ectio n is prope r. -
Page 9: Game Setting
GAME SETTING KEYS FOR SETTING 设置板 SETTING SELECT BOARD Setting TEST ENTER Change SERVE ERASE Free to play TEST: Enter into the setting menu or skip to the next menu. ENTER: Change the setting. SERVE: Free to play. -
Page 10: Setting Method
SETTING METHOD Setting method: press “TEST” to enter into the game setting menu → press the “TEST” to choose the setting item →press “ENTER” to change the setting → press “ENTER” exit setting. SETTING DESCRIPTION 1) Game setting interface: GAME SET AND TEST LANGUAGE English COIN... - Page 11 POTENTIOMETER TESTING:This setting is to test whether the encoder is working normally. When the steering wheel is turning, the number will change. EXIT:Press“ENTER”to exit setting Steering wheel Test POTENTIOMETER TESTING ( 301, 277 ) Press TEST Key to Exit Descriptions: When the steering wheel is turning, the cursor will move in the horizontal direction.
- Page 12 ADJUSTMENT Adjust the coin mech: adjusting chip of entrance sample coin chute micro-adjust resistance power/signal input GRAY COUNTER(+/-) DC+12V coin reject bar COIN SIGNAL WHITE BLACK GROUND GRAY COUNTER(-/+) COIN signal SW N.O. accurate normal N.C. 100ms SLOW 50ms MEDIUM COIN signal wavelength 25ms FAST adjusting SW...
- Page 13 Adjust the main board: Descriptions: Reset button: press this button to clear the data of coin saved in main board and reset the game settings to default settings. Volume potentiometer: twist this potentiometer with screw driver. Twist clockwisely to increase the volume, counterclockwisely to decrease the volume.
-
Page 14: Check And Maintenance
CHECK AND MAINTENANCE Daily check ITEM DESCRIPTIONS Coin mech Check if the coin mech can work properly. Encoder Check if the encoder can control the direction. Sound Check if the volume is proper. Display Check if the display can work properly. Temperature, humidity Check if the temperature and humidity is proper. -
Page 15: Troubleshooting
TROUBLESHOOTING PROBLEM CAUSES SOLUTIONS No sample coin. Insert sample coin into the coin mech. Sensitivity for coin getting through the coin Can't insert coin. Adjust the coin mech. mech was setting too high. Coin mech is bad. Replace the coin mech. Bad connection of the lights. -
Page 16: Parts List
PARTS LIST Cabinet:... - Page 17 Steering wheel:...
- Page 18 PCB assembly:...
- Page 19 Chassis:...
-
Page 20: Schematic Diagram
SCHEMATIC DIAGRAM 4" speaker Bla5 Bla1-1 R1-2 Bla4 coin mech W/Bla1 G/Bla1 setting board 290378 ENTER CON3 SELECT SERVE G/Bla1 TEST set sw IO board change sw 293961 shooting sw Bla3 encoder sw shooting button Bla2 encoder sw signal line 1 service button encoder sw signal line 2 coin sw...

Need help?
Do you have a question about the Mini Kiddie Pirate and is the answer not in the manual?
Questions and answers