Advertisement
Preliminary Examination
Remove the meter from the packing material and examine it carefully to make sure that no damage has occurred during shipment. If noticeable damage is evident, contact your local Hanna Instruments Office.
- Each meter is supplied with:
- CR2032 battery (1 pc.)
- Storage / Protection sleeve
- Instruction manual
- Quality Certificate
Note: Save all packing material until you are sure that the instrument functions correctly. All defective items must be returned in the original packaging with the supplied accessories.
General Description
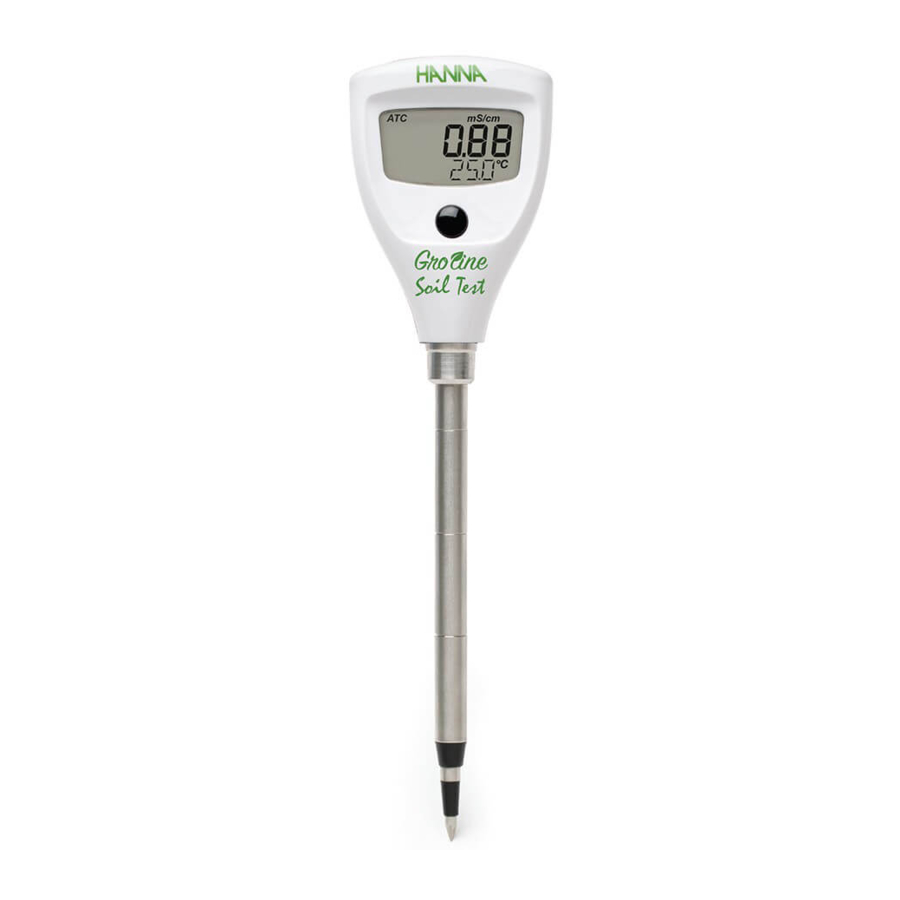
The Hanna Instruments GroLine is a special pocket conductivity meter expressly designed to directly measure soil conductivity. The meter also measures temperature.
Soil conductivity is a simple measurement that indicates if salts are present in the sample soil. Conductivity can be measured in units of μS/cm, mS/cm, or dS/m.
The conductivity is calibrated at one point, in liquid conductivity standard.
Hanna Instruments reserves the right to modify the design, construction, or appearance of its products without advance notice.
Operation

Recommendations for Users
Before using Hanna Instruments products, make sure that they are entirely suitable for your specific application and for the environment in which they are used. Avoid touching the probe at all times. Any variation introduced by the user to the supplied equipment may degrade the instrument's performance. Do not use or store the instrument in hazardous environments.
All rights are reserved. Reproduction in whole or in part is prohibited without the written consent of the copyright owner.
Specifications
| Range | 0 to 4000 μS/cm 0.00 to 4.00 mS/cm (dS/m) 0.0 to 50.0°C (32.0 to 122.0°F) |
| Resolution | 1 μS/cm 0.01 mS/cm (dS/m) 0.1°C (0.1°F) |
| Accuracy (@25°C/77°F) | ±50 μS/cm (0 to 2000 μS/cm) ±300 μS/cm (2000 to 4000 μS/cm) ±0.05 mS/cm (0.00 to 2.00 mS/cm) ±0.30 mS/cm (2.00 to 4.00 mS/cm) ±1.0°C (±1.5°F) |
| Temperature | automatic, with temperature coefficient |
| Compensation | ( β ) fixed @ 2%/°C |
| Calibration | single point, 1.41 mS/cm |
| Battery Type | CR2032 Li-ion |
| Battery Life | approximately 100 hours of continuous use |
| Probe | 114 mm (4.5") Stainless steel penetration |
| Environment | 0 to 50°C (32 to 122°F); RH 95% max |
| Dimensions | 50 x 196 x 21 mm (2.0 x 7.7 x 0.9") |
| Weight | 74 g (2.4 oz.) |
Operational Guide
The meter is shipped with the battery inside.
To turn the meter ON and check the battery status
Press the ON/OFF button to turn the meter on. At start-up, all the LCD segments are displayed for 1 second, "Err CAL" is displayed when no calibration is available, then the percent indication of the remaining battery life is displayed for another second. The meter then enters the normal measuring mode.
Note: Keeping the ON button pressed while turning the meter on will display all LCD segments as long as the button is pressed, after 10 seconds the firmware version and model will be displayed. Pressing the button 3 times will display the serial number (SN--1, SN--2, SN--3). To enter measurement mode press the ON/OFF button briefly.
To enter calibration mode
Press and hold down the ON/OFF button until "OFF" is replaced by "CAL." Release the button. To enter setup mode
While in measurement mode, remove the battery cap and hold the Setup button for 1 second. The meter will enter in setup mode.
Advanced Functions
HOLD mode
The HOLD mode can be selected only if in setup the HOLD parameter is set to "YES". While in measurement mode, press the ON/OFF button until briefly "HOLD" appears on the secondary display and the reading will be frozen on the LCD. The HOLD will toggle with the temperature value until the ON/OFF button is pressed briefly again. The "MEAS" message appears and the meter returns to measure mode.
Hold on STABILITY mode
The STAB mode can be selected only if in setup the HOLD parameter is set to "StAb".
By pressing the ON/OFF button briefly and the "WAIT" message appears on screen. The parameters are hold on screen after stabilization only; before stabilization done the stability indicator is present on the LCD.
Press the ON/OFF button briefly to exit the STAB mode and return to measure mode. The "MEAS" message appears and the meter returns to measure mode.
Taking another stable measurement is possible by pressing the ON/OFF button briefly.
(If the "HOLD" message appears, then measured stable values (EC and temp) are already retained and hold on the display.)
Meter Setup
While in measurement mode, remove the battery cover. Press Setup button located on the side of the battery in the battery compartment. The meter will enter in setup mode.
Press and hold the ON/OFF button to move through setup parameters. Change option by pressing ON/OFF button briefly. The default settings are: "EC UNIT" - mS/cm, "TEMP" measure unit - °C, "AOFF" - 8 min, "HOLD" functionality - disabled "no". After Hold, the meter returns to measurement mode.
To reenter Setup press Setup button again.
To select EC unit
To select the measurement unit when "EC UNIT" is displayed press the ON/OFF briefly to change between mS/cm, dS/m or μS/cm.
To select the temperature unit (°C/°F)
To select the temperature unit when "TEMP" is displayed press the ON/OFF briefly to change between °C or °F.
To select the Auto-Off time
To select the AUTO OFF when "AOFF" is displayed press the ON/OFF briefly to change between 8 min, 60 min or --- (disabled).
To select the HOLD mode
To select the Hold mode when "HOLD" is displayed press the ON/OFF briefly to change between disabled "no", Hold mode "YES" or Stability mode "StAb".
To return to measurement mode
Press and hold the Setup button for 1 second to exit the menu (or press and hold ON/OFF button for 2 seconds after the last parameter was selected).
Measurement and Calibration
For better accuracy, frequent calibration of the meter is recommended. In addition, the instrument must be recalibrated whenever:
- When high accuracy is required.
- At least once a month.
Measurement
Press the ON/OFF button to turn the meter ON. Place the probe to the desired depth and saturate the soil if needed with deionized water. The conductivity value, automatically compensated for temperature, will be shown on the LCD.
The meter displays conductivity in the selected unit.
The temperature measured by the probe will be shown on the secondary LCD.
Note: Before taking any measurement make sure the meter has been calibrated.
Calibration procedure
- Enter calibration mode from measurement mode.
- The meter will enter the calibration mode, displaying "1.41 USE".
- Pour 3" of standard HI7031 into a beaker.
- Place the probe in calibration solution HI7031. The probe tip should be centered in the solution and submersed 2" (5 cm). The probe should be kept at least 1" from the walls and bottom of the beaker. The meter will automatically recognize the solution.
- If the solution is not recognized or is out of the accepted range "---- WRNG" is displayed.
- If the standard is recognized "REC" is displayed until the reading is stable and the calibration is accepted.
- After acceptance, the "Stor" message is displayed and meter returns to measurement mode.
Clear calibration
Place meter in calibration mode. Press and hold ON/OFF until "Clr" is displayed. The meter will now be at default calibration.
After restarting the meter the "Err CAL" message will appear (for 2 seconds) until a new calibration is performed.
Error Message
If the measured temperature is higher than 50.0 ºC or lower than 0 ºC, the 50.0 ºC or 0.0 ºC temperature value will blink on the LCD in measure mode. In both cases, the "Err TEMP" message will appear. If CAL or HOLD mode was entered by the user the meter will enter in measurement mode.
Maintenance
- Rinse probe with water after use and between samples. Dry off.
- Store GroLine with the protection cover over conductivity probe.
Battery Replacement

Replace the battery when percentage indicator approaches 0%. To change the CR2032 Li-ion battery, turn the battery cover located on the back of the meter counterclockwise to unlock. Remove cover and replace with new battery + side facing up. Push the ON/OFF button to start the meter.
Note: Batteries should only be replaced in a safe area using the battery type specified in this instruction manual. Old batteries should be disposed in accordance with local regulations.
Accessories
| HI7031-023 | 1413 μS/cm (1.41 mS/cm) GroLine Conductivity Standard Solution, 230 mL bottle |
| HI7031M | 1413 μS/cm (1.41 mS/cm) calibration solution, 230 mL |
| HI7031L | 1413 μS/cm (1.41 mS/cm) calibration solution, 500 mL |
| HI70031P | 1413 μS/cm (1.41 mS/cm) calibration solution, 20 mL sachets (25 pcs.) |
Warranty
The GroLine is warranted for a period of one year against defects in workmanship and materials when used for its intended purpose and maintained according to instructions. This warranty is limited to repair or replacement free of charge. Damage due to accidents, misuse, tampering or lack of prescribed maintenance is not covered. If service is required, contact your local Hanna Instruments Office. If under warranty, report the model number, date of purchase, serial number and the nature of the problem. If the repair is not covered by the warranty, you will be notified of the charge incurred. If the instrument is to be returned to Hanna Instruments, first obtain a Returned Goods Authorization (RGA) number from the Technical Service department and then send it with shipping costs prepaid. When shipping any instrument, make sure it is properly packaged for complete protection.
For more information about Hanna Instruments and our products, visit www.hannainst.com or e-mail us at sales@hannainst.com.
For technical support, contact your local Hanna Instruments Office or email us at tech@hannainst.com.
Find your local Hanna Instruments Office on www.hannainst.com.

Documents / Resources
References
Download manual
Here you can download full pdf version of manual, it may contain additional safety instructions, warranty information, FCC rules, etc.
Download HANNA HI98331 - Direct Soil Conductivity & Temp Meter Manual
Advertisement


Need help?
Do you have a question about the GroLine HI98331 and is the answer not in the manual?
Questions and answers