Table of Contents
Advertisement
Quick Links
Blood Glucose Monitoring System
Model 6276-S
USER GUIDE
Before You Begin
IMPORTANT SAFETY INFORMATION
● Please use this device only for the intended use described in this user guide.
● Before using this system to test your blood glucose, please read instructions
thoroughly and practice the test when you first use this system. Do a quality
check on the system by following the instructions and consult with healthcare
professionals for questions or problems.
● Be aware of the safety of young children or handicapped persons near you
when you conduct a glucose test using this system.
● Please keep the test strip vial away from children. The test strips and vial cap
can present a choking hazard.
● Smartest Persona II test strips can only be used with the Smartest Persona II
glucose meter.
Precaution
The meter and lancing device are for single patient use.
Do not share them with anyone including other family members! Do not use on
multiple patients!
All parts of the kit are considered biohazardous and can potentially transmit infectious
diseases, even after all cleaning and disinfection procedures have been performed.
For further information, please refer to below.
FDA Public Health Notification: Use of Fingerstick Devices on More than One Person Poses
Risk for Transmitting Bloodborne Pathogens: Initial Communication" (2010)
http://www.fda.gov/MedicalDevices/Safety/AlertsandNotices/
ucm224025.htm
CDC Clinical Reminder: Use of Fingerstick Devices on More
than One Person Poses Risk for Transmitting Bloodborne
Pathogens" (2010)
http://www.cdc.gov/injectionsafety/Fingerstick-DevicesBGM.html
1.
Getting To Know Your System
Contents of the System
This User Guide has been prepared to describe the proper use of the Smartest
Persona II Blood Glucose Monitoring System Model 6276-S. Please read this User
Guide and the package insert that comes with the Smartest Persona II Glucose Test
Strips before testing. The system is available either as a meter alone or as a kit. If you
have a meter only, you can purchase the system supplies from your system provider.
Please provide to your system provider with the 3 digit system reference number
marked on the packaging box when you purchase supplies.
The starter kit of Smartest Persona II Blood Glucose Monitoring System Model 6276-
S includes the following items:
1. Smartest Persona II Glucose Meter with (2) AAA batteries
2. User Guide
3. Carrying Case
4. Smartest Persona II Glucose Test Strips
5. Smartest Persona II Control Solution (Level II)
6. Lancets
7. Lancing Device
8. Package Inserts for Test Strips, Control Solution
A single level control solution (Level II) is provided in the "Starter Kit," and no control
solution is included in the "Meter Only" kit. You may purchase Smartest Persona II
Control Solution Level I, Level II or III from your system provider if needed.
The Smartest Persona II Glucose Meter uses Smartest Persona II Glucose Test
Strips. Neither the meter nor the test strips will work when used with any other brand
of glucose products.
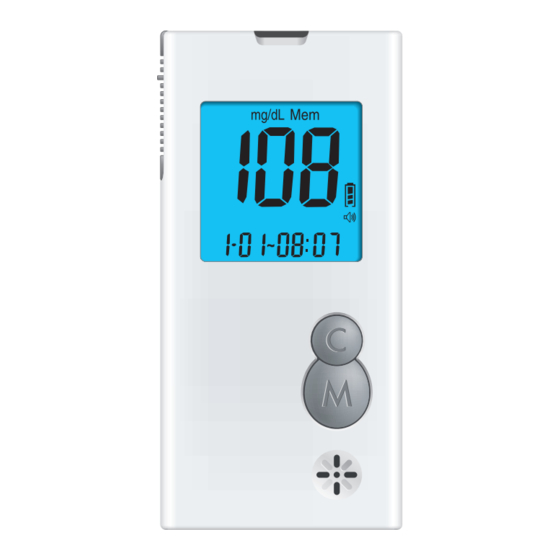
STRIP EJECTOR:
STRIP SLOT :
Slide the ejector forward
Insert the test strip here. The
to discard the test strip.
meter will turn on automatically.
DISPLAY :
Shows test results
and messages.
"C" BUTTON :
Setting mode, please
refer to manual for
detailed function
description.
"M" BUTTON :
MicroUSB Port:
Power ON/OFF, also for memory
recalling mode, please refer to manual
Cable connection and
for detailed function description.
data transmitting.
Meter
LCD Screen Overview
Below is the appearance of the LCD screen:
1. Measurement Units: Appears with the test result
either in mg/dL or in mmol/L.
2. Blood drop icon: Indicates the meter is ready to
take the blood sample when it flashes.
3. Day Average: Indicates current displayed result is
an average.
4. Alarm: Appears when alarm is on.
5. Memory: Appears when you recall the memory.
6. Setting: Appears when you are in setting mode.
7. Test flag: Appears for control solution test flag (c).
8. Battery Symbol: Indicates the battery status.
9. Month
10. Day
11. Hour
12. Minute
TEST STRIP HANDLE :
Hold this part to insert the test strip
into the meter slot.
CONTACT BARS:
Insert this end into
strip slot.
CONFIRMATION WINDOW:
This is where we confirm if enough blood is
applied for has been drawn into strip.
Test Strip
CMI Health, Inc.
5975 Shiloh Road Suite 114 Alpharetta, GA 30005 USA
Tel: 1-888-985-1125 Fax: 1-866-222-0128
Email: info@cmihealth.com
Website: www.cmihealth.com
Intended Use / Indications for Use
The Smartest Persona II Blood Glucose Monitoring System Model 6276-S is intended
to be used for the quantitative measurement of glucose (sugar) in fresh capillary whole
blood samples drawn from the fingertips or forearm. The Smartest Persona II Blood
Glucose Monitoring System Model 6276-S is intended to be used by a single person
and should not be shared.
The Smartest Persona II Blood Glucose Monitoring System Model 6276-S is intended
for self-testing outside the body (in vitro diagnostic use) by people with diabetes at
home as an aid to monitor the effectiveness of diabetes control. The Smartest Persona
II Blood Glucose Monitoring System Model 6276-S should not be used for the diagnosis
of or screening of diabetes or for neonatal use. Alternative site testing should be done
only during steady - state times (when glucose is not changing rapidly).
The Smartest Persona II Test Strips are for use with the Smartest Persona II Blood
Glucose Meter to quantitatively measure glucose (sugar) in fresh capillary whole blood
samples drawn from the fingertips or forearm.
The Smartest Persona II Control Solutions are for use with the Smartest Persona II
Blood Glucose Monitoring System Model 6276-S as a quality control check to verify that
the meter and test strips are working together properly.
● Lancet
Never share a lancet with anyone. Always use a new, sterile lancet; lancets are for
single use only.
● Lancing Devices
Lancing devices should never be used for more than one person. Lancing devices are
re-useable, and the lifetime cleaning does not affect its performance.
● Test Strips
Smartest Persona II Glucose test strips are intended for single use only. They should
be disposed of in an appropriate container according to your healthcare provider's
instructions.
● Meter
Smartest Persona II Blood Glucose Monitoring System Model 6276-S should only be
used for testing single patient.
INSTALLING / REPLACING THE BATTERY
The meter comes with 2 AAA alkaline batteries.
Battery life will vary depending on usage, so always keep spare batteries on hand.
Make sure the meter is turned off before changing the batteries.
How to replace the battery
NOTE:
It is suggested that batteries need to be replaced when the battery icon appears
1.
empty. If keep using the meter, the battery icon will start flashing and an error
message E_3 will appear on the screen.
Note that replacing the battery will not reset the stored testing results.
2.
You need to reset the time and date after the batteries are replaced.
3.
If there is any unexpected symbol on the display, please follow the above
4.
procedure to replace the batteries again.
5.
Please dispose of batteries according to your local ordinances.
SETTING TIME AND DATE
STEP 1. Set the Year
With the meter off, by pressing the M button and hold for 2 seconds,
you will enter the setting modes, press C button to adjust the year
until the desired year is displayed and then press the M button to
confirm the year setting. When pressing the C button, the year will
be adjusted in the range of 2009 to 2029. After the year setting is
confirmed, you will see the month segment flashing on the screen.
STEP 2. Set the Month
Press C button to adjust the month until the desired month is
displayed and then press the M button to confirm the month setting.
You will then see the day segment is flashing on the screen.
Battery
Compartment :
STEP 3. Set the Date
Area that holds two (2)
Press C button to adjust the day until the desired day appears and
AAA alkaline batteries.
then press the M button to confirm the day setting. You will then see
the hour segment is flashing on the LCD screen.
2.
1
5
6
Prepare For Blood Sampling
7
2
8
If your lancing device did not come with a lancing device insert, the following
3
information shall take the place of the insert.
4
Adjustable Lancing Device and Lancet
9
10
11
12
Your lancing device and lancets
are used for obtaining blood
samples from the puncture site.
Protective cap
Important Lancing Device and Lancets Information
1.
Lancet is for single use only.
ABSORBENT CHANNEL:
2. Keep lancing device and lancets clean.
Apply a drop of blood here.
3. Use caution when removing the used lancet from the device and when
disposing the used lancet.
IMPORTANT :
1. The meter and lancing device are for single patient use.
2. Do NOT share them with anyone including other family members.
3. Do NOT use on multiple patients.
11-62-8310-0003 V1-OCT21
1. Tum off the meter by pressing "M" button and hold for 2
seconds before replacing the batteries.
Slide down the battery cover on the back of the meter by
pushing the cover in the direction of the arrow and put the
cover aside.
2. Remove the two used batteries
3. Insert 2 new batteries with correct + / ‒ direction.
( Battery: AAA 1.5V 2 Alkaline 24A LR03)
4. Put the battery cover back in place by pushing the cover in
the opposite direction of the arrow to close the cover into
position.
Lancing
Device Cover
Lancet Carrier
Depth Penetration
Lancet Ejector
Trigger Button
Loading Barrel
A :
1. Getting To Know Your System
SIDE
2. Prepare For Blood Sampling
B :
SIDE
● Please test your blood glucose using the meter and the test strips with the same
reference number as labeled on the outer box of meter and the test strips.
Limitations
1.
No Neonatal use
Do not use for neonatal blood glucose testing.
2.
H ematocrit range
Hematocrit in the range of 32~56% has been shown not to affect the glucose results.
If you do not know your hematocrit level, consult your healthcare professional.
3.
Hemoglobin range
Hemoglobin levels of 500 mg/dL or below will not interfere with blood glucose test
results.
4.
Elevated Cholesterol and Triglycerides
Cholesterol levels up to 500 mg/dL (12.9 mmol/L) and Triglycerides up to 1000 mg/dL
has been shown not to affect glucose results.
5.
Medications
Interference was observed for therapeutic levels of L-DOPA. No interference
was shown for uric acid, acetaminophen, ascorbic acid and ibuprofen in normal
therapeutic levels. However, higher concentrations in blood may cause incorrect
results: Uric acid: >10.9 mg/dL; acetaminophen: > 6.2 mg/dL;
ascorbic acid: > 4.5 mg/dL; ibuprofen: > 37.5 mg/dL.
6.
The test strips may be used at altitudes up to 5,280 feet (1,609 m ) without an effect
on test results.
7.
Persons suffering from severe dehydration should not be tested using a capillary
whole blood sample.
8.
Test results below 70 mg/dL indicate low blood glucose (hypoglycemia). Test results
greater than 240 mg/dL indicate high blood glucose (hyperglycemia). If you get
results below 70 mg/dL or above 240 mg/dL, repeat the test, and if the results are still
below 70 mg/dL or above 240 mg/dL, please consult your healthcare professional
immediately
2
.
9.
Not for use on critically ill patients, patients in shock, dehydrated patients or hyper-
osmolar patients. This meter should not be used in the critically ill.
STEP 4. Set the Hour
Press C button to adjust the hour until the desired hour appears on
the screen and then press the M button to confirm the setting. You
will then see the minute segment is flashing on the screen.
STEP 5. Set the Minute :
Press C button to adjust the minute until the desired minute appears
on the screen and then press the M button to confirm the setting.
You will then see an "AL" displayed on the screen center.
STEP 6. Set the Alarm Reminder:
Press C button to toggle between the alarm reminder setting or no-
setting mode. If you see the LCD display a small flashing icon of
alarm clock in the lower left corner with a time segment display, it
means that you are in the alarm setting mode.
If you see only AL without the icon of the small alarm clock, it means
that you are not in the alarm setting mode.
Press M button to confirm the alarm setting mode. If you select the
alarm setting mode, alarm clock icon will stop flashing and the hour
of the time segment will start flashing.
Press C button until the desired alarm hour appears and then press
M button to confirm the hour setting. Then the minute segment will
start flashing. Press C button until the desired minute appears on
the screen and then press M button to confirm the minute setting.
You will see the measuring unit flashing on the upper left corner of
the LCD display.
STEP 7. Set the measurement unit:
Press C button to toggle between mg/dL and mmol/L measurement
units. Press M buttonto confirm the setting. You will see a "dEL"
displayed in the center of the screen.
The unit of measurement-mg/dL-is the standard unit of
measurement in the U.S.
STEP 8. Deleting the Memory:
Press C button to toggle between a flashing "dEL" for memory
deletion or a non-flashing "dEL". If you want to delete all memory,
press M button while the "dEL" is flashing. If you do not want to
delete all memory, press M button when the "dEL" is not flashing.
STEP 9. Power off Screen:
When the meter is off, the time, date, measurement unit, and
battery icon will be still on the screen as the picture If the alarm
reminder has been set, then the alarm icon will appear on the
power off screen as well. The LCD screen will display "OFF".
Note: Your meter can show results either in "mg/dL" or "mmol/L" units. Mg/dL is the
typical unit used in the United States, please contact the manufacturer if your meter
does not display mg/dL when you turn it on. The factory set default for the meter is
mg/dL.
In the event that the meter loses power or the batteries are changed, the factory
set default is mg/dL. It is very important to use the correct unit of measurement to
properly manage your diabetes. If you live in the United States, you should use mg/
dL. If you are testing in mg/dL, your results will never have a decimal point. If you live
outside the United States and use the metric system, you should use mmol/L.
Your result will ALWAYS have a decimal point.
Note:
1.When you change the date and time backward, you will not change the test results in the meter
memory.
2.You need to move through the year, month, day, hour, minutes, alarm, unit, and dEL to save the
meter settings and turn off the meter.
Setting your Lancing Device
STEP 1:
Insert a new sterile lancet into the Lancet Holder. Push down
firmly until it is fully seated.
STEP 2 :
Twist off the Lancet Protective Cap and save the Cap for
later use. Replace the Lancing Device Cap.
STEP 3 :
The Adjustable Tip offers 10 levels of skin penetration. To
select the desired depth, twist the Adjustable Tip in either
direction until the preferred setting lines up with the arrow. To
select the best depth:
1-3 for soft or thin skin
4-6 for average skin
7-10 for thick or calloused skin
STEP 4 :
Slowly pull back the Cocking Control. You will hear a click,
indicating that the Lancing Device is now loaded and ready
to use.
Advertisement
Table of Contents

Related Manuals for CMI Health Smartest Persona II

Summary of Contents for CMI Health Smartest Persona II
- Page 1 Elevated Cholesterol and Triglycerides The Smartest Persona II Test Strips are for use with the Smartest Persona II Blood ● Please keep the test strip vial away from children. The test strips and vial cap Cholesterol levels up to 500 mg/dL (12.9 mmol/L) and Triglycerides up to 1000 mg/dL...
- Page 2 Weight 72 g with battery 4. Smartest Persona II Control Solution is used to check that the meter and the test strips are measurement to properly manage your diabetes. If you live in the United working together as a system and that you are performing the test correctly.
Need help?
Do you have a question about the Smartest Persona II and is the answer not in the manual?
Questions and answers