Advertisement
Quick Links
Tools needed (not included):
Outils requis (non incluse):
Herramientas necesarias (no se incluye):
Clear silicone sealant
Adjustable wrench
Scellant à base de silicone clair
Clé réglable
Sellador de silicona transparente
Llave ajustable
Phillips screwdriver
Tournevis Phillips
Destornillador cruciforme
Tools needed (included):
Outils requis (incluse):
Herramientas necesarias (incluye):
0.25 cm
1/8 in
1/8 po
5.3 cm / 2-1/16 in / 2-1/16 po
Hex wrench (for set screw securing)
Clé hexagonale (pour la fixation de vis)
Llave hexagonal (para asegurar el tornillo de ajuste)
0.4 cm
3/16 in
3/16 po
7.4 cm / 2-15/16 in / 2-15/16 po
Hex wrench (for base securing)
Clé hexagonale (pour la fixation de base)
Llave hexagonal (para asegurar el base)
Need Help? Please call our toll-free service line at 1-866-789-2273 for additional assistance or service. Call Monday to Friday 8 am - 8 pm EST,
Saturday 9 am - 6 pm EST.
Besoin d'aide? Veuillez composer le numéro de notre ligne de service sans frais, soit le 1 866 789-2273, pour obtenir de l'aide supplémentaire du
lundi au vendredi de 8 h à 20 h et le samedi de 9 h à 18 h, HNE.
¿Necesita ayuda? Si Necesitas ayuda y asistencia adicional por favor llame a nuestra línea de servicio gratuito al número 1-866-789-2273 con
horario de Lunes a Viernes de 8:00 AM a 8:00 PM hora del Este y Sábado de 9:00 AM a 6:00 PM hora del Este.
Revised Date/Nouvelle Date /Fecha Rvisada 07-30-2016
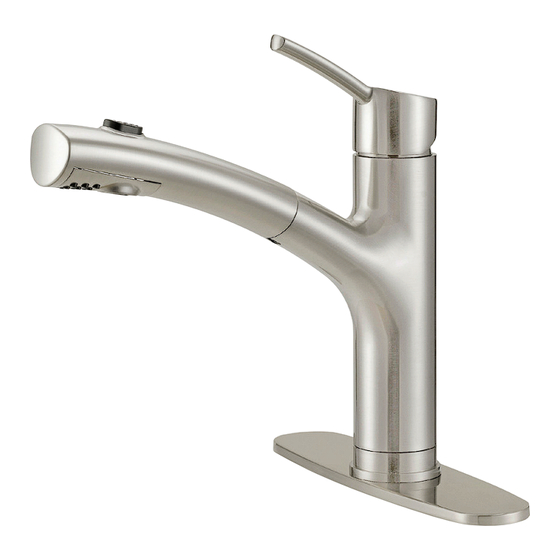
Pull-out Kitchen Faucet
Robinet d'évier avec arroseur rétractable
Grifo de cocina con rociador retráctil
Safety Tips
• When installing flexible hose, there should be no torsion or deformation; DO NOT fold into V or L
shape; DO NOT use if there are any cracks or deformations.
• The fittings should be installed by a licensed professional plumber.
• Cover your drain to avoid losing parts.
Conseils de sécurité
• Lorsque vous installez le tuyau flexible, il ne doit exister aucune torsion ou déformation;
NE le pliez PAS en V ou L; NE L'UTILISEZ PAS s'il existe des fissures ou déformations.
• Les raccords doivent être installés par un plombier professionnel agréé.
• Recouvrez le drain pour éviter de perdre des pièces.
1.1 cm
7/16 in
7/16 po
Consejos de Seguridad
• Al instalar la manguera flexible, esta no debe doblarse o torcerse; NO doblar en forma de V o L;
NO usar si está agrietada o deformada.
• La instalación de los accesorios debe realizarla un plomero profesional con licencia.
• Cubre el drenaje para evitar que se pierdan piezas.
2.4 cm
IMPORTANT, RETAIN FOR FUTURE REFERENCE: READ CAREFULLY
15/16 in
15/16 po
IMPORTANT, CONSERVER POUR RÉFÉRENCE : LIRE ATTENTIVEMENT
IMPORTANTE, CONVERVE PARA REFERENCIA FUTURA : LEA CUIDADOSAMENTE
1
ITM. /ART. 962791
FP2B0000
Advertisement

Related Manuals for WaterRidge 962791

Summary of Contents for WaterRidge 962791
- Page 1 ITM. /ART. 962791 FP2B0000 Pull-out Kitchen Faucet Robinet d’évier avec arroseur rétractable Grifo de cocina con rociador retráctil Tools needed (not included): Outils requis (non incluse): Herramientas necesarias (no se incluye): Clear silicone sealant Adjustable wrench Scellant à base de silicone clair Clé...
-
Page 2: Maintenance
Important Information Important Information • Prior to beginning installation, turn off the cold and hot water valves and turn on the old faucet to release built-up pressure. • When installing your new faucet, first hand-tighten connector nuts. Then using one hand to hold the line still while tightening the nut with an adjustable wrench to avoid any twisting or kinking. - Page 3 Includes Comprend Incluye Faucet body Spray head Corps du robinet Tête de vaporisation Cuerpo del grifo Cabezal de rociador Base Base Base Deck plate Plaque décorative Placa de cubierta Putty plate Plaque à mastic Placa para masilla Outlet hose Boyau d'évacuation Manguera de salida Water supply line Conduite d’alimentation en eau...
- Page 4 Installation Configuration Options/Les options de configuration d’installation/ Las opciones de configuración para la instalación Fits 1-hole sink (without using deck plate (D) and putty plate (E)). Fits 3-hole sink (using deck plate (D) and putty plate (E)). Pour évier 1 trou (sans applique (D) et plaque à mastic (E)). Pour évier 3 trous (avec applique (D) et plaque à...
- Page 5 Faucet Installation/Installation du Robinet/Instalar el Grifo Continued/Suite/Continuación Without deck plate installation: Rotate the two half-moon locking nuts (1) With deck plate installation: Place a bead of clear silicone sealant (not inward before inserting the base (C) into the sink. Insert the base (C) into the sink. included) around the base of the putty plate (E).
- Page 6 Faucet Installation/Installation du Robinet/Instalar el Grifo Continued/Suite/Continuación Large hole Large hole Grand trou Grand trou Orificio grande Orificio grande Insert the outlet hose (F) through the large hole of the base (C). Insert supply lines (G) one by one through large hole of base (C). NOTE: When inserting the flexible hoses through the large hole, Insérez le boyau d’évacuation (F) dans le grand trou du base ensure there is no significant twisting or deformation of the hoses...
- Page 7 Faucet Installation/Installation du Robinet/Instalar el Grifo Continued/Suite/Continuación Set Screw Vis de blocage Tornillo de prsión Tighten the set screw with the provided hex wrench (L). Remove and discard the orange cap from the lower end of outlet hose (F). Serrez la vis de pression avec la clé hexagonale fournie (L). Enlever et jeter le capuchon orange à...
- Page 8 Faucet Installation/Installation du Robinet/Instalar el Grifo Continued/Suite/Continuación Red line Ligne rouge Blue line Línea roja Ligne bleue Línea azul Chaude Caliente Cold Froide Fría Turn on water supply. Hand-tighten nut and then using one hand, hold water supply line (G) while tightening nut with adjustable wrench (avoid twisting or Ouvrez l’alimentation en eau.
- Page 9 Faucet Installation/Installation du Robinet/Instalar el Grifo Continued/Suite/Continuación Turn on faucet and allow water to run through the hose to flush Turn off faucet. Replace spray head (A). out the faucet. Fermer le robinet. Remplacez la tête de vaporisation (A). Ouvrir le robinet et laissez l’eau couler dans le tuyau pour Cierre el grifo.
- Page 10 In Case of Low Flow/En cas de faible débit d’eau/En Caso de Flujo Insuficiente Remove spray head (A). Hold hose tightly to prevent from Turn on faucet. Flush out the debris on the filter screen inside retracting. spray head (A). Retirez la tête de vaporisation (A).
-
Page 11: Trouble Shooting/Dépannage/Solución De Problemas
Trouble Shooting/Dépannage/Solución de Problemas If you’ve followed the instructions carefully and your faucet still does not work properly, take these corrective steps. Si vous avez soigneusement suivi les instructions et que votre robinet ne fonctionne toujours pas, veuillez suivre les étapes correctives suivantes. - Page 12 Parts Diagram/Schéma des Pièces/Repuestos Index Button / Repère de température / Indicador de temperatura Metal Handle / Poignée en métal / Manija de metal Trim Cap / Capuchon décoratif / Tapa del reborde Locking Nut / Écrou de blocage / Contratuerca Ceramic Disc Cartridge / Cartouche à...
Need help?
Do you have a question about the 962791 and is the answer not in the manual?
Questions and answers