Table of Contents
Advertisement
Quick Links
Advertisement
Table of Contents

Related Manuals for FNS POWER FCIFP48100A

Summary of Contents for FNS POWER FCIFP48100A
- Page 1 Lithium Iron Phosphate Battery Module Application Manual LITHIUM BATTERY...
- Page 2 Read and follow these instructions! The following precautions are intended to ensure your safety and prevent property damage. Before installing this product, be sure to read all safety instructions in this document for proper installation. Failure to comply with the instructions with this symbol may result in a serious accident, causing death or a severe injury.
-
Page 3: Table Of Contents
Table of Contents Precautions ............................1 1.1 General Safety Precautions ......................1 1.2 Installation Precautions ......................... 1 Product Introduction .........................2 2.1. Front Panel Function Introduction ....................2 2.2 Product Specifications ........................3 2.3 State Indicator ..........................5 Unpack the Battery .......................... 6 3.1 Parts List ............................6 3.2 Visual Inspection of the Modules .................... -
Page 4: Precautions
1. Precautions 1.1 General Safety Precautions The product provides a safe source of electrical energy when operated as intended and as designed. Potentially hazardous circumstances such as excessive heat or electrolyte mist may occur under improper operating conditions, damage, misuse and/or abuse. The following safety precautions and the warning messages described in this part must be observed. -
Page 5: Product Introduction
Wear rubber gloves and safety boots. Do not put tools or any metal parts on the top of the batteries. Disconnect charging source and load before connecting or disconnecting terminals. When moving batteries and wear all appropriate safety clothing and equipment. ... -
Page 6: Product Specifications
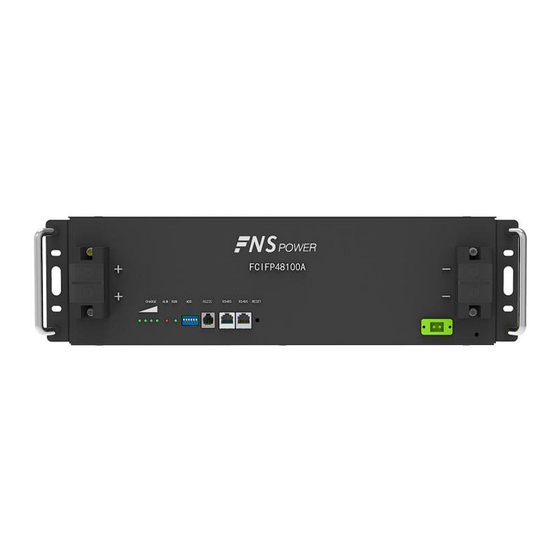
Figure 2-2: Front Panel Function Introduction 1. Reset: When the BMS is in the dormant state, press the button for 1S to activate the BMS. Meanwhile, the LED indicator will be lit to show SOC of the battery. When the BMS is in the active state, press the button for 3S to cause battery dormant. - Page 7 Basic Parameters Model FCIFP48100A Anode Material LiFePO4 Nominal Voltage(V) Layout 15S1P 100(0.5C,25℃) Rated Capacity(Ah) Rated Energy(kWh) 440×440×133(3U) Dimensions(W×D×H)mm Weight(kg) 42(About) Communication RS485,CAN 6000+(80%DOD,25℃) Cycle Life Electrical Characteristics Voltage Window(V) 40.5~54 Charge Current(A) 50(Recommend) Max Charge Current(A) Max Discharge Current(A) Operation Environment Charge Temperature(℃)...
-
Page 8: State Indicator
2.3 State Indicator Table 2-2: Unprotected fault working mode State SOC(%) 100% shutdown No light No light All no light 0-25% Light No light No light No light Standby/Disc Flash No light 25-50% Light Light No light No light harge 50-75% Light Light... -
Page 9: Unpack The Battery
Total pressure low Analog front end Fault Cell voltage is too high EEPROM Fault Cell voltage is too low short circuit Fault Monomer high low SOC temperature Monomer low temperature rise too temperature fast high differential Precharge failed pressure low temperature MOS out of control difference Overcurrent... - Page 10 Table 3-1: Parts Lists Items Appearance Usage Remarks Battery Provide power Positive output Connect the battery and cable inverter Negative output Connect the battery and cable inverter Apply to Modbus Used to RS485 monitor and protocol. Connect the communication debug the battery and the battery line...
-
Page 11: Visual Inspection Of The Modules
Table 3-2: Recommended Tools and Instruments Items Usage Appearance To fasten battery and Phillips Screwdriver or Bit assemblies Box Cutter Opening boxes Insulated Torque Wrench Installing cables and busbars Insulated Sockets Installing cables and busbars Measure battery module’s Battery Tester voltage 3.2 Visual Inspection of the Modules After transporting the modules to the installation location, check for:... -
Page 12: Battery Module Installation
Be sure to use insulated tools (torque wrench, extension, socket, etc.). All the instruments must be insulated and no metal articles (e.g. watch, ring) should be present in the installation area. All power switches must be turned off in advance. ... -
Page 13: Cable Connection
Figure 4-1: Battery Module Installation (A possible battery install procedure) We recommends installing battery modules in the upper shelves first and proceeding to the bottom. The battery can be mounted on a standard 19 inches cabinet or rack. Battery modules can be inserted into a rack frame according to the ... - Page 14 Before connection, make sure to close the battery. Please follow the instructions to protect the module BMS against damage. DO NOT deviate from the sequence of steps below. Exercise extreme caution prevent the terminals from contacting anything ...
- Page 15 Figure 5-1: Install the Grounding Wire Step 1 Wear the protective gloves. Step 2 Install the battery ground cable. Step 3 Install negative and positive power cables for the battery. 1) Remove the protective cover from the battery power wiring terminal. 2) Connect the negative power cable to the battery.
-
Page 16: Connect Cables Of The Multiple Batteries In Parallel
Figure 5-2: Single Battery Connection 3. Take-down negative fixing bolt by the Phillips Screwdriver and connect the negative output cable between the battery negative terminal of the battery and the inverter. After connecting the battery, fastening bolt immediately to avoid dropping. 4. - Page 17 1. As shown in Figure 5-5, following the cable connection method of the single battery, connect the positive and negative cables between the Battery 1 and the busbar, Battery 2 and the busbar, and Battery N and the busbar respectively. Note: To ensure the current balance, please use cables with the same diameter and length for each battery.
- Page 18 0x04 0x0c 0x05 0x0d 0x06 0x0e 0x07 0x0f 0x08 Note: After the DIP settings are changed, a restart is required to take effect. 4. Connect the communication line between battery and computer (1) RS485/CAN Port Definition (a) RJ45 Pin Male (b) RJ45 Pin Female Figure 5-5: Communication Port Table 5-2: Description of RJ45 Pin...
- Page 19 2-wire CAN communication, CAN L complying with the CAN protocol Reserved RS485 communication, complying with the Modbus protocol, RS485 A connect to Pin2 in parallel RS485 communication, complying with the Modbus protocol, RS485 B connect to Pin1 in parallel Figure 5-6: Communication Cable Connections among Multiple Batteries 5.Connect the communication line between battery and inverter Keep the battery off.
- Page 20 When the battery communicates with the inverter through RS485, the matching resistor must be inserted into the RS485 connector of the last battery in parallel. Note: When only one battery is connected to the inverter communication, a matching resistor ...
-
Page 21: Visual Inspection Of The Connection
5.3 Visual Inspection of the Connection After connecting the battery, check for: Usage of positive and negative cables. Connection of the positive and negative terminals. All the bolts are tightened. Cables fixation and the appearance. The setting of the dialing address. ... - Page 22 Figure 6-1: Communication Port Set (3) Click the network software to enter the program When the display interface shows voltage, SOC and etc., indicating that the communication is successful. Figure 6-2: System Monitoring Program...
-
Page 23: Inspection, Cleaning And Maintenance
7. Inspection, Cleaning and Maintenance 7.1 General Information The battery product is not fully charged. It is recommended that the installation be completed within 3 months after arrival; During the maintenance process, do not re-install the battery in the battery product. ... -
Page 24: Maintenance
7.4 Maintenance The Li-Ion battery is maintenance free. Charge the battery to approximately > 80% of its capacity at least once every year to preserve the battery’s capacity. 7.5 Storage The battery product should be stored in a dry, cool and cool environment; ... - Page 25 Electrochemical The voltage of the large self- Replace the battery. cell fault cell is low or discharge, the cell over dis- unbalanced. charges to below 2.0 V after long-term storage. 2. The cell is damaged by external factors, short circuits, pinpricks, or crushing occur.
-
Page 26: Battery Recovery
service personnel of our company will reply the corresponding solution after receiving the data. 9. Battery recovery Aluminum, copper, lithium, iron and other metal materials are recovered from discarded LiFePO4 batteries by advanced hydrometallurgical process, and the comprehensive recovery efficiency can reach 80%. - Page 27 severe vibration, impact or extrusion should be prevented to prevent sun and rain. It can be transported using vehicles such as cars, trains and ships. Always check all applicable local, national, and international regulations before transporting a Lithium Iron Phosphate battery. Transporting an end-of-life, damaged, or recalled battery may, in certain cases, be specially limited or prohibited.
- Page 28 www.fnspower.com...
Need help?
Do you have a question about the FCIFP48100A and is the answer not in the manual?
Questions and answers