
Summary of Contents for ConnectSense Smart Power Cord
- Page 1 A Division of Grid Connect Inc. Smart Power Cord And Mini Cord Users Guide Revision E - December 2020 Part Number CS-DOC-SC-001...
- Page 2 Grid Connect, ConnectSense, and the Grid Connect and ConnectSense logos, and combinations thereof are registered trademarks of Grid Connect, Inc. All other product names, company names, logos or other designations mentioned herein are trademarks of their respective owners.
- Page 3 A Division of Grid Connect Inc. Disclaimer and Revisions The information in this guide may change without notice. The manufacturer assumes no responsibility for any errors that may appear in this guide. Author Date Rev. Comments 3/05/2020 Preliminary Release 3/11/2020 Basic Edits to improve content and readability 4/7/2020...
-
Page 5: Table Of Contents
Table of Contents 1. Quick Start ....................2 1.1 Overview of the ConnectSense Smart Power Cord ......2 1.2 Overview of the ConnectSense Mini Smart Cord ......4 1.3 Provisioning Requirements ............. 5 1.4 Summary of the Provisioning Steps ..........5 1.5 How to Create an Account .............. -
Page 6: Quick Start
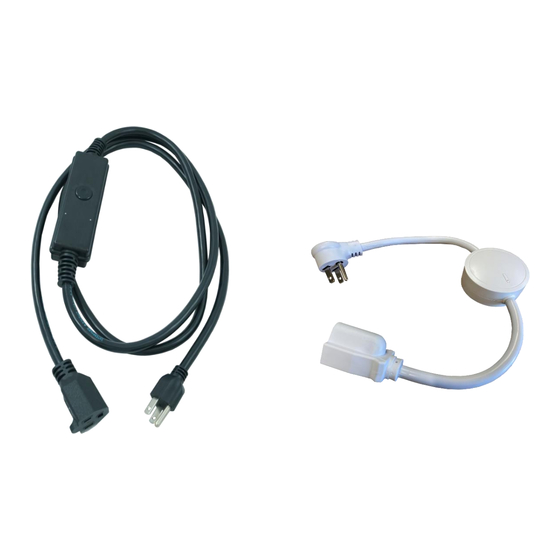
3.2 FCC/IC Information - French ............28 Quick Start This section provides an overview of the Smart Power Cord and how to quickly provision it to the ConnectSense Cloud application. 1.1 Overview of the ConnectSense Smart Power Cord LEDS There are 2 LEDs on the Smart Power Cord. - Page 7 Figure 1 Push Button The push button on the Smart Power Cord can be used to manually turn on and off any device that is plugged into the Smart Power Cord. If desired, the button can be disabled through the configuration screen. Here is the behavior of the push button...
-
Page 8: Overview Of The Connectsense Mini Smart Cord
2. SoftAP mode – allows host computers to connect to it for configuration For provisioning the Smart Power Cord to the cloud, we use the “SoftAP” or soft access point. The use of the SoftAP is temporary and is only enabled during the provisioning process. -
Page 9: Provisioning Requirements
Here is a summary of the provisioning procedure. Please refer to figure 2 when reviewing the steps: 1. Connect the Smart Power Cord to the wall outlet to power the unit. In this example you are connecting to the 120VAC power, the cord will handle up to 240VAC. -
Page 10: How To Create An Account
This section covers how to create a user account on the ConnectSense Cloud application. Before you can provision a Smart Power Cord, we must create a user account On the ConnectSense Cloud application. If you already have an account, jump to the next section. - Page 11 Click on the “Sign up” button That will show the following dialog box. Fill it out and click on the “Sign Up” button. Now go back to: https://cord.connectsense.com and Sign in and sign into your account...
- Page 12 Your email will be verified. Click on “Confirm your account” to complete the account setup. If it is successful, you will see the following screen.
-
Page 13: Connecting A Power Cord To The Network
1.6 Connecting a Power Cord to the Network This section will show you how to Add the Smart Power Cord or the Mini Cord to ConnectSense Cloud and get them connected. This section assumes that you already have an account on the ConnectSense Cloud. -
Page 14: Add A Smart Or Mini Cord
1.6.1 Add a Smart or Mini Cord To ADD a Smart Power Cord or a Mini Smart Cord to the account, select the “+” in the top left-hand pane. For the first device you can also click on text “let’s add a new device”... -
Page 15: Reboot And Reset The Power Cord
To provision the power cord onto the network you will need to reboot the unit and activate the Power Cord’s SoftAP network. For the Smart Power Cord: To start the process, press and hold the push button (about 15 seconds) until you see the Wi-Fi LED flash Red. - Page 16 Power Cord that you want to connect to. When the Smart Power Cord gets a connection from your host computer to its SoftAP, the cord will perform a Wi-Fi scan of the environment to find a suitable Access Point to connect to.
-
Page 17: Select A Wi-Fi Network
Next, you need to select a Wi-Fi network that will allow the Power Cord to make a connection to the Internet and AWS. To select the Wi-Fi network that the Smart Power Cord will pair with click the radio button next to the desired Access point. In this case we have selected the “gridconnect” access point. -
Page 18: Verify The Smart Power Cord Is Connected
Depending on the Power Cord, you will one of these screens: 1.6.5 Verify the Smart Power Cord is Connected On the Smart Power Cord, the Wi-Fi LED should go off indicating that the Cord’s SoftAP is now disabled and the Cord’s Wi-Fi interface is connected to the desired network. On the Mini Cord, the LED will no longer flash. -
Page 19: Graphical Interface
The following is the home screen which shows both the Smart Power Cord and the Mini Cord connected. The Smart Power Cord and the Mini Cord are now connected. The default name of this cord is “ConnectSense Cord” or “Mini Cord”. It is advisable to edit the name if you are using multiple Smart Power Cords to make it more meaningful for the application. -
Page 20: Pump Mode
2.1.1 Pump Mode 2.1.2 Appliance Mode... -
Page 21: Advanced Mode
2.1.3 Advanced Mode... -
Page 22: Available Graphs
2.2 Available Graphs The available graphs are under the Dashboard tab. You can select which parameters you wish to display... -
Page 23: Power Signature
2.3 Power Signature The Power Signature shows the precision real-time data of the voltage and the current waveforms. The Power Signature is only updated on demand. You can update the power signature by clicking on any of the refresh buttons. The following is a summary of the Refresh buttons: Refresh data: will update the power signature without any changes to the load... -
Page 24: Rules
2.4 Rules The following shows the rules for shut down of the device (power on/off) and notification via text and/or email. Please Note: The Rules functions only work with the Smart Power Cord. The Mini Cord does not have this capability. -
Page 25: Sample Text Message
2.5 Sample Text message Shows the name of the cord and parameter that trigged the event, note the relay and be turned off as part of the notification. -
Page 26: Miscellaneous Settings
2.6 Miscellaneous Settings These settings allow you to change the name of the Cord, the reporting frequency, or removing a device... -
Page 27: Power Signature Example
2.7 Power Signature example The following page will show the high-resolution capture of the Voltage and Current waveforms. These can be exported to a CSV file. -
Page 28: Displaying The Variables About Your Cord
2.8 Displaying the variables about your cord... -
Page 29: Sample Label On The Smart Power Cord
2.9 Sample Label on the Smart Power Cord... -
Page 30: Sample Device To Plug-In
2.10 Sample device to plug-in The following diagram shows a variable speed computer fan plugged into the Smart Power Cord... -
Page 31: Smart Power Cord Specifications
2.11 Smart Power Cord Specifications See the Smart Power Cord data sheet 2.12 Smart Power Cord Warranty See the website Compliance 3.1 FCC/IC Information - English This device complies with Part 15 of the FCC Rules and with Industry Canada license exempt RSS standard(s). - Page 32 3.2 FCC/IC Information - French 3.2 Informations relatives à la FCC / IC Cet appareil est conforme à la section 15 de la réglementation de la FCC (Commission fédérale des communications, Federal Communications Commission) et aux normes d’exemption de licence RSS d’Industrie Canada. Son fonctionnement est soumis aux deux conditions suivantes : (1) cet appareil ne doit pas provoquer d’interférences nuisibles, et (2) cet appareil doit tolérer n’importe quelle interférence subie, y compris celle que...
Need help?
Do you have a question about the Smart Power Cord and is the answer not in the manual?
Questions and answers