Table of Contents
Advertisement
Quick Links
Advertisement
Table of Contents

Summary of Contents for Weltevree dutchtub
- Page 1 - english...
-
Page 3: Table Of Contents
05 Dutchtub worldwide pag. 06 02 Safety & use pag. 07 03 General information What do you need? pag. 08 What is suitable for the Dutchtub? pag. 08 04 Standard equipment 4.1 Parts pag. 09 4.2 Use Filling pag. 10 Heating pag. -
Page 5: Introduction
This explains the nickname of designer Floris: ‘urban farmer’. service life. The Dutchtub was a project for his final exam Enjoy! at the Art Academy in Arnhem and lead to his breakthrough as a designer. The Dutchtub illustrates his attitude perfectly. -
Page 6: Dutchtub Worldwide
Because of its low weight of 75 kg, it can easily be moved or brought with you on holiday. The Dutchtub can be tested at various experience sites such as holiday houses, beach clubs and restaurants. You can also hire the Dutchtub for... -
Page 7: Safety & Use
- Before using the tub, think about what you want to do with the water drained from the tub 1. Fire (directly from the Dutchtub of by using a garden - The Dutchtub is a wood-fired tub. Always hose). consider the dangers of open fires. -
Page 8: General Information
03 General information A regular garden hose with fittings for connec- The Dutchtub is a handmade polyes- ting the hose to a water tap and the Dutchtub ter product. As with polyester boats, tap plug. Most standard fittings are suitable. -
Page 9: Standard Equipment
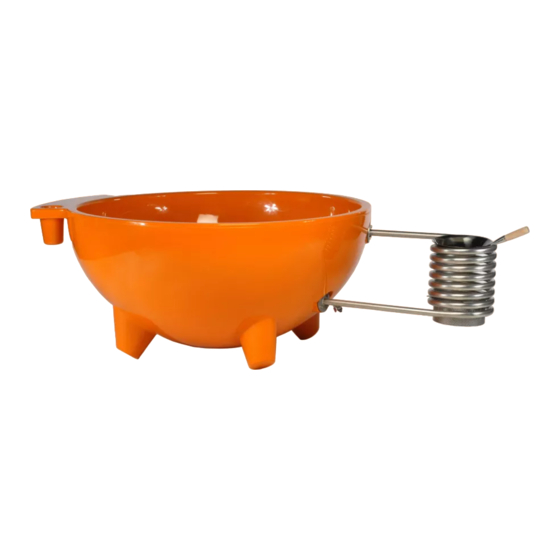
09 - dutchtub user manual 04 Standard equipment 4.1 Parts 01 Tub 08 Rubber plug: The rubber plug is used as a 02 Heating coil stopper for the water inside the cooler or as 03 Heating basket: to keep the wood inside the a stopper for the turbo. - Page 10 Insert the tap plug at the bottom Connect the hose with the fitting and open the tap to fill the tub. of the Dutchtub. The water will enter the Dutchtub at the bottom. Make sure that the Dutchtub logo is always sub- merged in water.
- Page 11 Disconnect the hose. * Loosen the tap plug. ** Try to screw on the cap as fast as possible. After filling the tub, you can leave the hose attached. Water will escape from the Dutchtub, so keep the sealing cap at hand.
- Page 12 12 - dutchtub user manual 4.2 Use: Heating Turn the heating basket into Fill the heating coil with finely Place the wok on top of the heating coil for the coil until it is supported at chopped wood and light a optimal circulation.
- Page 13 13 - dutchtub user manual 4.2 Use: Cover Grab the cover by the handles. Tilt the cover onto the Dutchtub. Observe the notch for the table.
- Page 14 14 - dutchtub user manual 4.2 Use: Draining Loosen the cap at the bottom of the Dutchtub or remove the hose and tap plug (page 10). If you want to drain the water at another location, proceed as follows: Reconnect the tap plug.
-
Page 15: Options
15 - dutchtub user manual 05 Options Various options are available making the Dutchtub even more comfortable. 5.1 Ashtray 5.2 Turbo 5.3 Chimney 5.4 Winter cover 5.5 Handtrailer... - Page 16 16 - dutchtub user manual Ashtray: Parts & use Stainless steel ashtray for collecting ashes underneath Place the ashtray centrally underneath the heating the heating coil. coil before heating the tub. The ash scoop will collect the ashes.
- Page 17 17 - dutchtub user manual Turbo: Parts The turbo can be used to accelerate the filling and heating process & the rubber plug Turbo: Use Tighten the cap. Push the rubber plug inside the Dutchtub in the heating coil lower hole.
- Page 18 18 - dutchtub user manual Connect the hose to the turbo. Open the tab and start heating, as described under “Standard equipment - Heating” page 14. As the heating coil is filling up with water, the Dutch- Open the tab partially.
- Page 19 19 - dutchtub user manual Warm water will flow from the top of the heating coil. Make sure that the Dutchtub logo on the black plate is It is possible to change the temperature by heating always submerged in the water.
- Page 20 20 - dutchtub user manual Remove the hose and heat the Dutchtub further, as described under “Standard equipment - Heating” page 14.
- Page 21 21 - dutchtub user manual Chimney: Parts The chimney accelerates the heating process. In addition, the stove pipe will guide the smoke upwards. 01 Chimney pipe 02 Cover 03 Chimney house...
- Page 22 22 - dutchtub user manual Chimney: Use* Slide the chimney over the spiral. * Heater parts may be very hot! Use gloves when handling the cover.
- Page 23 23 - dutchtub user manual Push on the table to keep the tub in balance. Make sure that the heating coil tubes fall between the grooves. Place the cover on the chimney.
-
Page 24: Winter Cover Parts & Use
24 - dutchtub user manual Winter cover: Parts & use The winter cover is an insulating cover. The winter cover is a heavy-duty version of the regular cover. It can be used in the same way as the regular... -
Page 25: Handtrailer Parts Use
25 - dutchtub user manual Handtrailer: Parts By using the handtrailer, the Dutchtub can be moved by one person. - Page 26 Dutchtub is positioned install the tub. Keep holding the table and cart handle horizontally. while moving the tub. Tilt the Dutchtub and remove the handtrailer. Put the Dutchtub on its legs. * Do NOT move the Dutchtub when it is filled.
-
Page 27: Maintenance
27 - dutchtub user manual 06 Maintenance Cleaning The Dutchtub can be cleaned with water and a cloth. If necessary, the following detergents can be used: - All-purpose detergents - Polyester garden furniture detergents (available at garden centres or hardware stores) - Page 28 28 - dutchtub user manual...
-
Page 29: Contact Information
29 - dutchtub user manual 07 Contact information Dutchtub the Netherlands P.O. box 248 6800 AE Arnhem Visit Westervoortsedijk 73 6827 AV Arnhem T/F + 31 (0)26 - 4428334 E holland@dutchtub.com Your local dutchtub dealer:... - Page 30 30 - dutchtub user manual...
- Page 31 31 - dutchtub user manual...
Need help?
Do you have a question about the dutchtub and is the answer not in the manual?
Questions and answers