Table of Contents
Advertisement
Advertisement
Table of Contents

Related Manuals for novos Bilisphere 360 LED


Summary of Contents for novos Bilisphere 360 LED
- Page 1 Bilisphere 360 LED User Manual NVS.S9.KK07/Rev.07/26.10.2020...
- Page 2 This document contains information on which NOVOS assumes the property rights. The information may not be reproduced in whole or in part unless authorized in writing by NOVOS. These information are the property of NOVOS, for its intended use only.
-
Page 3: Table Of Contents
4.1. Unpacking and Installation ......................... 15 4.2. Electronic Operation Control ........................18 Use of Device..............................26 5.1. Turning On Bilisphere 360 LED ........................26 5.2. Use of Control Panel ........................... 28 5.2.1. Main Display ............................28 5.2.2. Alarms and Warnings .......................... 29 5.2.2.1. - Page 4 5.4. Temperature Sensors ..........................45 5.4.1. Placing/Removing the Skin Probe ....................... 46 5.5. Baby Bed ..............................47 5.5.1. Baby Cotwith Drainage ........................47 5.5.2. Hammock ............................48 5.5.2.1. Hammock Replacement ......................48 5.6. Thermo-Elevation ............................49 5.6.1. Operation Principle ..........................49 5.7.
-
Page 5: Safety Information
1. Safety Information 1.1. Symbols Device is ON. Device is OFF. Protected against solid objects larger than 12.5 mm. IP20 This symbol means the device is in the BF class. This symbol is used to warn the users of the device against possible risk or injury. - Page 6 NOVOS Bilisphere 360 LED User Manual Date of Manufacture. Electrical and electronic equipment waste should not be disposed of in general municipal waste but should be collected separately. Serial number. Fuse Box Grounding CE mark Authorized body See User Manual...
-
Page 7: Label Information
NOVOS Bilisphere 360 LED User Manual 1.2. Label Information Product Identity Technical Service Warning NVS.S9.KK07/Rev.07/26.10.2020... - Page 8 NOVOS Bilisphere 360 LED User Manual Outer Box Label Reusable Skin Probe Label NVS.S9.KK07/Rev.07/26.10.2020...
-
Page 9: User Obligations For Patient Safety
NOVOS, product violation, etc. limit the liability of NOVOS regardless of whether it was the fault of NOVOS and regardless of the manner in which the fault occurred. NOVOS shall not assume any liability for compensation for damages arising from or related to the products and for the buyer's liabilities to third parties;... -
Page 10: Warranty
The carrier should be warned, and the damaged product warranty claim form should be filled. 7. In any case, NOVOS Tıbbi Cihazlar is not liable for more than the original selling price. 8. The buyer guarantees that all services and maintenance are carried out in a timely manner by qualified personnel according to NOVOS service guidelines. -
Page 11: Usage Purpose
The product is intended for professional use. 2.3. Patient Population Bilisphere 360 LED is used in the treatment of babies between 0-28 days postnatal and for preterm babies whose adjusted age is 52 weeks. NVS.S9.KK07/Rev.07/26.10.2020... -
Page 12: Usage Limitations
NOVOS Bilisphere 360 LED User Manual 2.4. Usage limitations WARNING! WARNING! HAZARD! There is a risk of explosion if used NOVOS medical equipment conforms to the in the presence of flammable anesthetics. requirements for interference immunity This device has not been approved or... -
Page 13: Warnings Regarding Indications, Contraindications, Possible Physiological Effects
NOVOS Bilisphere 360 LED User Manual 2.4.1.Warnings Regarding Indications, Contraindications, Possible Physiological Effects • Indications Hyperbilirubinaemia treatment Kernicterus prevention Patients with light sensitivity disorders (e.g. congenital erythropoietic porphyria) • Counterindications Bronze baby syndrome Dehydration Hyperthermia Temporary skin redness • Warnings on Possible Physiological Effects The eyes of the doctor and nurse, who stay with the patient for a long time, may be damaged by the radiation. -
Page 14: Parts And Controls
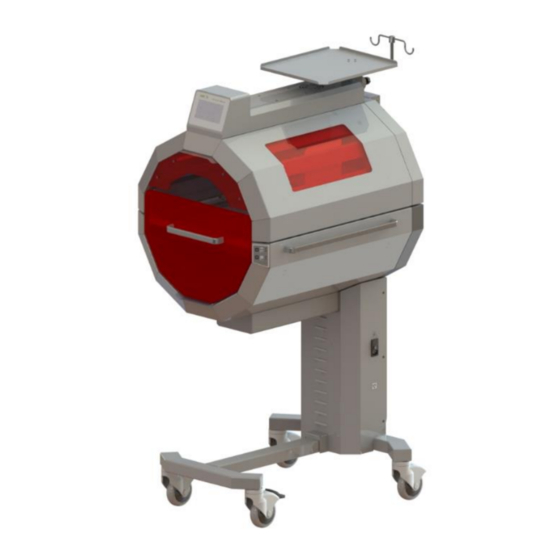
NOVOS Bilisphere 360 LED User Manual 3. Parts and Controls 3.1. Isometric View Control Panel IV Pole (Optional) Baby Bed Handle Monitor Tray Height Adjustment Membrane Switch Side Handle Wheels with brake Power Input, Fuse Holder, On/Off Switch NVS.S9.KK07/Rev.07/26.10.2020... -
Page 15: Front View
NOVOS Bilisphere 360 LED User Manual 3.2. Front View NVS.S9.KK07/Rev.07/26.10.2020... -
Page 16: Side View
NOVOS Bilisphere 360 LED User Manual 3.3. Side View NVS.S9.KK07/Rev.07/26.10.2020... -
Page 17: Control Panel
NOVOS Bilisphere 360 LED User Manual 3.4. Control Panel 3.4.1.Main Display Bilisphere 360 LED has a 5.1” single-color touch screen. On this screen; • Air temperature • Skin temperature • Therapy Time • Set Therapy Time • Fan Conditions •... -
Page 18: Preparation
4. Preparation 4.1. Unpacking and Installation Bilisphere 360 LED is packaged in two main groups as main body and accessories. It includes accessory box, hammock, monitor tray, power cord, IV pole (optional) and eye protection mask. After you receive the package, complete the installation by following the steps below. - Page 19 NOVOS Bilisphere 360 LED User Manual • Install 4 pieces of M4x12 YHB screws. • Install the white screw caps. • Slide and open the baby bed drawer. NVS.S9.KK07/Rev.07/26.10.2020...
- Page 20 NOVOS Bilisphere 360 LED User Manual • Place the hammock. • Place the IV pole in place and tighten the plastic head screw to secure it in the desired position. NVS.S9.KK07/Rev.07/26.10.2020...
-
Page 21: Electronic Operation Control
• The power cord is plugged into a suitable wall outlet. The following procedure can be used to verify the electronic operation of the Bilisphere 360 LED. 1. Press the On/Off switch located on the right side of the device. - Page 22 NOVOS Bilisphere 360 LED User Manual 5. Observe that the warning message for the air probe not attached has cleared and the air temperature measured by the air probe appears in the upper left of the display. 6. Plug the skin probe into its socket.
- Page 23 NOVOS Bilisphere 360 LED User Manual 10. Push the baby-bed drawer completely into the device. 11. Observe that the warning message is cleared for the opened bed. 12. Press MENU button. 13. Press the LAMP button to turn on the lower lamp group.
- Page 24 NOVOS Bilisphere 360 LED User Manual 14. Press the CONTINUE button to switch to the target therapy time settings. 15. Press the CONTINUE button to exit the menu. 16. Press the START button to start therapy with only the lower groups of lamps as set in the menu.
- Page 25 NOVOS Bilisphere 360 LED User Manual 17. Check that all 8 lamps of the lower lamp group work properly. 18. Press the STOP button and observe that the therapy is terminated. 19. Press MENU button. 20. Press the LAMP button to turn on the upper lamp group.
- Page 26 NOVOS Bilisphere 360 LED User Manual 21. Press the CONTINUE button to switch to the target therapy time settings. 22. Press the CONTINUE button to exit the menu. 23. Press the START button to start therapy with only the upper groups of lamps as set in the menu.
- Page 27 NOVOS Bilisphere 360 LED User Manual 24. Check that all 8 lamps of the upper lamp group work properly. 25. Press the STOP button and observe that the therapy is terminated. 26. Press Up Arrow and observe the height increase in the upper part.
- Page 28 27. Press Down Arrow and observe the height decrease in the upper part. WARNING! Side plexiglass protectors of Bilisphere 360 LED should always be installed in normal operating condition. Otherwise, there is a risk of injury for the patient during manual height adjustment.
-
Page 29: Use Of Device
NOVOS Bilisphere 360 LED User Manual 5. Use of Device 5.1. Turning On Bilisphere 360 LED • Plug the power cord into the Power Input Socket located on the right side of the device. • Switch the device on by turning the On / Off switch to the I position. - Page 30 NOVOS Bilisphere 360 LED User Manual • Wait for the device to boot. • The Main Screen appears as seen in the image. NVS.S9.KK07/Rev.07/26.10.2020...
-
Page 31: Use Of Control Panel
NOVOS Bilisphere 360 LED User Manual 5.2. Use of Control Panel Bilisphere 360 LED has a control panel that houses the motherboard and a 5.1” LCD Touch screen. Except for manual height adjustment, all user inputs are transferred and processed through the control panel. -
Page 32: Alarms And Warnings
NOVOS Bilisphere 360 LED User Manual 5.2.2.Alarms and Warnings Alarm settings can only be changed by authorized personnel! High Skin Temperature: The measured skin temperature is not within the specified limits. Alarm Message Warning Messages Low Skin Temperature: The measured skin temperature is not within the specified limits. - Page 33 NOVOS Bilisphere 360 LED User Manual Low Air Temperature: The measured air temperature is below 30 °C. High Priority Alarm Message Warning Messages 37⁰C Air Temperature: The measured air temperature is beyond 37 °C. High Priority Alarm Message Warning Messages...
-
Page 34: Alerts
NOVOS Bilisphere 360 LED User Manual 5.2.2.1. Alerts Push the baby bed all the way down: Baby bed drawer open, close completely. Change the lamps: The service life of the lamps is over. (Working Time> 20,000 hours) Upper piece rises: The height of the upper cover is increased by thermo-elevation. -
Page 35: Audible Alarms Activation / Deactivation
NOVOS Bilisphere 360 LED User Manual 5.2.2.2. Audible Alarms Activation / Deactivation • To silence the auditory alarm, press the AUDIBLE button. • The audible alarm will be silenced for 5 minutes. NVS.S9.KK07/Rev.07/26.10.2020... -
Page 36: Settings Menu
NOVOS Bilisphere 360 LED User Manual 5.2.3.Settings Menu From the settings menu, screen language selection, lamp life monitoring, temperature unit selection and touch screen calibration can be performed. To access the settings menu, follow the steps below; • Press the SETTINGS button while the startup is in progress. -
Page 37: Total Lamp Usage Time
NOVOS Bilisphere 360 LED User Manual 5.2.3.2. Total Lamp Usage Time • Press the Lamp tab to view the total usage time of the lamps. 5.2.3.3. Changing the Temperature Unit • Press the (⁰C) or (⁰F) tab key. • Press UP or DOWN to switch between Celsius and Fahrenheit temperature units. -
Page 38: Touch Screen Calibration
NOVOS Bilisphere 360 LED User Manual 5.2.3.4. Touch Screen Calibration • Press TS Calib. • Press and hold the point indicated by a cross. NVS.S9.KK07/Rev.07/26.10.2020... - Page 39 NOVOS Bilisphere 360 LED User Manual • When the progress bar shows 100%, remove your finger. • Repeat the same procedure for a total of 3 different points. • After the identification of the third point, the message "Calibration completed"...
-
Page 40: Demo Mode
NOVOS Bilisphere 360 LED User Manual 5.2.3.5. DEMO Mode To operate the device in DEMO mode; • Press the On/Off switch located on the right side of the device. • Press the SETTINGS button displayed on the opening screen. WARNING! Demo mode can only be accessed when the SETTINGS tab is pressed when the device is switched on. - Page 41 NOVOS Bilisphere 360 LED User Manual In DEMO Mode; • The device simulates the air temperature to better understand the Thermo-Elevation feature. • At the beginning of the demo mode, the air temperature is simulated as 30 °C. • The air temperature will be automatically raised to 37 °C.
-
Page 42: Starting Therapy
NOVOS Bilisphere 360 LED User Manual 5.3. Starting Therapy Before starting therapy, the Bilisphere 360 LED phototherapy device must be properly positioned. Press the outer edge of the brake pedal to lock the brakes. • Lock the brakes of the wheels to avoid unwanted movement of the equipment. - Page 43 Note: During therapy, the baby bed drawer should be in the closed position. Turn on the device as described in section 5.1 Starting Bilisphere 360 LED. There are 3 parameters to be set before starting phototherapy. 1. Upper and lower alarm limits for skin temperature.
- Page 44 NOVOS Bilisphere 360 LED User Manual • Press MENU button. • Press the UP or DOWN arrows to change between pre-defined alarm limits. (31-33, 32-34, 33-35, 34-36, 35- 37, 36-38, 37-39). • Press the CONTINUE key to proceed to the Target Therapy Time parameter.
- Page 45 NOVOS Bilisphere 360 LED User Manual • Press the UP or DOWN arrows to set the target therapy time. • Press the LAMP button to switch between the following lamp groups. Use only the lower lamp groups. Use only the upper lamp groups.
- Page 46 NOVOS Bilisphere 360 LED User Manual • Press the START to start therapy. • Watch for the "Therapy started" alert. • Press the PAUSE to pause therapy. The therapy counter will pause until it is resumed. NVS.S9.KK07/Rev.07/26.10.2020...
- Page 47 NOVOS Bilisphere 360 LED User Manual • Press the START to resume therapy. • Press the STOP to stop therapy. Note: Bilisphere 360 LED will automatically end the therapy after the target therapy time has passed. The therapy ended message will be displayed until any button is pressed.
-
Page 48: Temperature Sensors
NOVOS Bilisphere 360 LED User Manual 5.4. Temperature Sensors There is one air and one skin temperature sensor placed on the ceiling of the Bilisphere 360 LED cabinet. 1) Skin Temperature Probe 2) Air Temperature Probe WARNING! Avoid applying excessive force to sensor sockets during attaching and detaching. -
Page 49: Placing/Removing The Skin Probe
NOVOS Bilisphere 360 LED User Manual If the air probe is not connected to the device; • A dashed line will appear in the relevant part of the main screen. • "Check the air probe!” alarm will be triggered. •... -
Page 50: Baby Bed
NOVOS Bilisphere 360 LED User Manual 5.5. Baby Bed The baby bed of Bilisphere 360 LED consists of side plexiglass protectors (1), a hammock (2) and a baby cot with drainage (3). All these components can be removed from the device for disinfection purposes. -
Page 51: Hammock
NOVOS Bilisphere 360 LED User Manual 5.5.2.Hammock The hammock of Bilisphere 360 LED provides a comfortable surface while allowing the necessary blue light interference. For disinfection purposes, the hammock can be washed by hand with mild detergent and water and can be replaced again. -
Page 52: Thermo-Elevation
Therefore, the risk of hyperthermia, dehydration, tissue and cell damage is prevented. 5.6.1.Operation Principle The microcontroller of Bilisphere 360 LED continuously measures the air temperature inside the cabinet and increases the height of the upper part to provide the necessary fresh air circulation. By doing this, the temperature inside the cabinet is kept within a safe range and unwanted increases are prevented. - Page 53 NOVOS Bilisphere 360 LED User Manual Lower FAN starts to work. Air Temperature = 34.0 ⁰C The upper part is raised 10 cm higher. Air Temperature = 35.0 ⁰C NVS.S9.KK07/Rev.07/26.10.2020...
- Page 54 NOVOS Bilisphere 360 LED User Manual The upper part is raised 10 cm more higher. Air Temperature = 36.0 ⁰C Therapy will be ended. Air Temperature = 37 ⁰C NVS.S9.KK07/Rev.07/26.10.2020...
-
Page 55: Manual Height Adjustment For The Upper Part
Press and hold Down Arrow to decrease the height of the upper body WARNING! Side plexiglass protectors of Bilisphere 360 LED should always be installed in normal operating condition. Otherwise, there is a risk of injury for the patient during manual height adjustment. -
Page 56: Routine Cleaning And Maintenance
NOVOS Bilisphere 360 LED User Manual 6. Routine Cleaning and Maintenance 6.1. General Cleaning Bilisphere 360 LED should be cleaned prior to each patient use. The following process should be followed for cleaning and disinfection of the equipment: • Lift the upper part 20 cm-25 cm higher. -
Page 57: Maintenance
Technical service and maintenance services should only be provided by technically qualified persons. WARNING! Make sure that the Bilisphere 360 LED is not connected to the power supply during maintenance procedures to avoid the possibility of electrical shock. WARNING! For better performance and device safety, use only original NOVOS spare parts. - Page 58 NOVOS Bilisphere 360 LED User Manual WARNING! Make sure that the Bilisphere 360 LED is not connected to the power supply during cleaning procedures to avoid the possibility of electrical shock. WARNING! Before cleaning and disinfecting, raise the upper part 20-25 cm.
-
Page 59: Troubleshooting
NOVOS Bilisphere 360 LED User Manual 7. Troubleshooting 7.1. Fast Troubleshooting Guide Failure Case Cause Solution Recommendation Connect the power cord to a suitable Power supply failure. outlet. The main on / off switch is in the Device does not Turn the switch to the I (on) position. -
Page 60: Annexes
NOVOS Bilisphere 360 LED User Manual 8. Annexes 8.1. Technical Specifications 8.1.1.Environmental Conditions Operating Temperature 20°C - 30°C Operating Humidity 5%-95% RH, uncondensed Storage Temperature -20°C - 60°C Storage Humidity 5%-95% RH, uncondensed 8.1.2.Mechanical Properties Height 1460mm- 1660mm Width 685mm... -
Page 61: Other Properties
IV Pole (Optional) Height: 146cm- 166cm- Capacity: 2kg 8.2. Compatibility NOVOS Bilisphere 360 LED phototherapy system has been designed to comply with the requirements of the following standards: IEC 60601-1 Medical electrical equipment - Part 1: General requirements for basic... -
Page 62: Compliance Directive
8.2.2.1. Electromagnetic Environment Bilisphere 360 LED is intended for use in the electromagnetic environment specified below. The customer or user of the Bilisphere 360 LED must guarantee that the device will be used in such an environment. Emission experiments Compatibility... -
Page 63: Electromagnetic Immunity
8.2.2.2. Electromagnetic Immunity Bilisphere 360 LED is intended for use in the electromagnetic environment specified below. The customer or user of the Bilisphere 360 LED must guarantee that the device will be used in such an environment. IEC 60601 Compatibility... - Page 64 NOVOS Bilisphere 360 LED User Manual Electromagnetic Immunity Test IEC 60601 test level Compatibility level Environment Main power quality should be in typical 100% drop for 0,5 100% drop for 0,5 cycle, commercial quality or cycle, at 0 , 45...
- Page 65 RF transmitters, electromagnetic site survey should be considered. If the measured field strength in the location in which the Bilisphere 360 LED is used exceeds the applicable RF compliance level above, the Bilisphere 360 LED should be observed to verify normal operation. If an abnormality is observed in performance, additional measurements such as reorientation or repositioning may be required.
-
Page 66: Recommended Separation Distance
Recommended separation distance between portable and mobile RF communications equipment and the Bilisphere 360 LED The Bilisphere 360 LED is intended for use in an electromagnetic environment in which radiated RF disturbances are controlled. The customer or the user of the Bilisphere 360 LED can prevent...
Need help?
Do you have a question about the Bilisphere 360 LED and is the answer not in the manual?
Questions and answers