
Summary of Contents for JFA-CAM LRS-367
- Page 1 Surround View Monitoring System Special for bus/ School bus/ Truck/ Fire engine User’s Guide Please kindly read this guide carefully before using correctly...
-
Page 2: Table Of Contents
Safety Tips Table of Contents 1.0 Product brief 2.0 Product features Serious traffic accidents may Please read this be caused by keeping watching 3.0 Main application scenarios manual carefully on the screen or operating before using and 4.0 Features Profile the system during driving. -
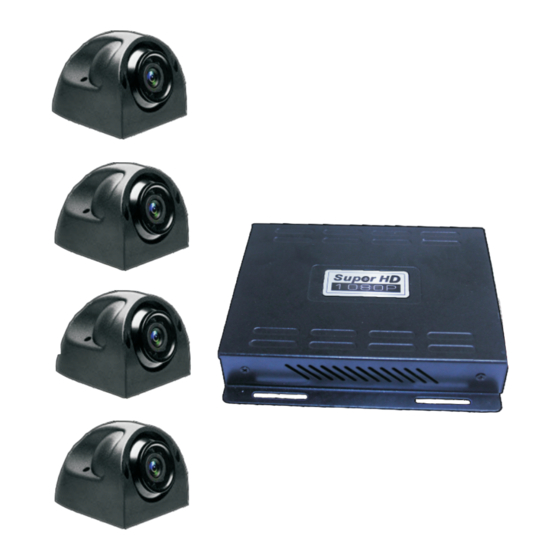
Page 3: Product Features
1.0 Brief Introduction of System 2.0 Product Features The surround view parking assistant system captures the images of four different views ° 2.1 Four 180 ultra-wide angle fish-eye cameras to provide (front/rear/left/right), with the use of four ultra-wide angle fish-eye cameras installed around raw images for processing the vehicle. -
Page 4: Main Application Scenarios
4.0 Features Profile 5.0 Specification 3.0 Main application scenarios When the car driving, CPU:Quad-core Cortex™-A7 the screen can optional show the FLASH: 4GB driving view. You can set the birdview show’s DDR: 512MB time in the Menu Check surroundings! When the car Languege: English,Russian, Japanese,Korean, reverse(pull up Portuguese,German,Chinese, Chinese traditional... -
Page 5: Bdv06-Diagram
6.0 BDV06-Diagram 7.0 BDV09-Diagram HDMI LVDS Signal Video cable USER USER Front Camera Front Camera DISPLAYER DISPLAYER Check Surrounding! Blue Trigger line Back Camera Back Camera LVDS Signal HDMI Left Camera Left Camera Right Camera Right Camera Remote Receiver Remote Receiver Right light Right light USB DISC Record... -
Page 6: Installation Preparation
9.0 Installation preparation Power Save 1). Prepare two 7.5M tapes and two 15M tape. Menu 2).Prepare four pieces of 1.6M*1.2M checkerboard ruler cloth made of matte material, which is much better than reflective one and preferred for image identification. Number Description Functions Power... -
Page 7: Product Installation
10.0 Product installation 10.3 Camera installation 1) Unscrew this 4 screws, disassemble the camera base, Fix the base to the bus or truck proper location, 10.1 Host installation: use the Glass cement make the waterproof. 1) Disassemble the panel of central control unit, and connect the reversing video channel of Lcd monitor or other display screen(AV in). -
Page 8: Place Calibration Clothes &Adjust The Cameras Angle
11.0 Place calibration clothes &adjust the cameras angle 12.0 Birdview calibration 12.2 Automatic calibration 1) After input the car Width, Length, Offset 【menu】 1) Place the calibration clothes, the calibration clothes center line should aligned with the 12.1 Press the Remote control uto Cal 【A 】... -
Page 9: System Settings
13.0 System settings 12.3 Manu calibration 3) Select “ Control” enter the Control settings 1) If you don’t satisfy with the Auto Calibration interface, set Delay Set, save it. 【OK】 Press the remote control to enter 【Manu 】 effect image, please select the system main Menu. -
Page 10: Driving Records
14.0 Driving Records Menu 【 】 Press the remote control to enter the system Menu. Safety precautions Select “Record File” inter to “ Video List” interface To avoid damage to people or loss to property, please pay high attention to the following items: Items with the sign Items with the sign are "prohibited".