Table of Contents
Advertisement
Quick Links
Dictum Health
eVER-HOME Quick Start Guide
Use the instructions of this quick start guide to unpack a new eVER-HOME and prepare it for use.
Caution:
Follow this quick start guide exactly to ensure safety and ease of assembly. The instructions of this quick start guide are a summary, so for more detailed
instructions consult the complete IFU (Instructions for Use) accessible on the eVER-HOME.
© 2020 Dictum Health. All rights are reserved. To support the intended use of the product described in this publication, the purchaser of the product is permitted to copy
this publication, for internal distribution only, from the media provided by Dictum Health. No other use, reproduction, or distribution of this publication, or any part of it, is
permitted without written permission from Dictum Health. Dictum Health assumes no responsibility for any injury to anyone, or for any illegal or improper use of the product,
that may result from failure to use this product in accordance with the instructions, cautions, warnings, or statement of intended use.
Dictum Health™ and eVER-HOME™ are trademarks of Dictum Health.
Software in this product is copyright 2020 by Dictum Health or its vendors. All rights are reserved. The software is protected by United States of America copyright laws and
international treaty provisions applicable worldwide. Under such laws, the licensee is entitled to use the copy of the software incorporated with this instrument as intended in the
operation of the product in which it is embedded. The software may not be copied, decompiled, reverse-engineered, disassembled, or otherwise reduced to human perceivable
form. This is not a sale of the software or any copy of the software; all rights, title, and ownership of the software remain with Dictum Health or its vendors.
For information about any Dictum Health product, contact Dictum Health Technical Support: service@dictumhealth.com
Dictum Health Inc. • 255 3rd Street, Suite 102 • Oakland, CA 94607 • (510) 295-4450 • www.dictumhealth.com
1
Advertisement
Table of Contents

Related Manuals for Dictum Health eVER-HOME

Summary of Contents for Dictum Health eVER-HOME
- Page 1 The software may not be copied, decompiled, reverse-engineered, disassembled, or otherwise reduced to human perceivable form. This is not a sale of the software or any copy of the software; all rights, title, and ownership of the software remain with Dictum Health or its vendors.
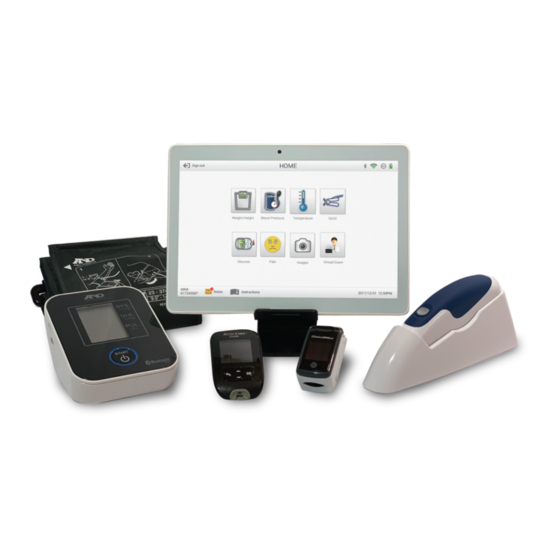
- Page 2 1 UNPACK THE eVER-HOME AND ACCESSORIES UNPACK THE eVER-HOME AND ACCESSORIES Pack Box Pulse Oximeter Probe covers (optional) Glucometer (optional) Thermometer Blood Pressure Monitor Tablet Box (pg 3) Carrying Case Scale Accessories (your actual accessory may appear slightly different) Pulse Oximeter...
-
Page 3: Quick Start
Place the dividers in the slots to create spaces for the accessories. Place the devices so that the screens aren’t pressed on by anything sharp or hard. Place the eVER-HOME in the top pocket. Here are two examples of possible configurations. www. -
Page 4: Device Setup
DEVICE SETUP eVER-HOME Features Speaker Back Camera Camera Flash Speaker Power On/Off Volume Up/Down Front Camera Microphone USB-C Power Port Headphone Port DICTUMHEALTH... -
Page 5: Charge The Device
DEVICE SETUP, CONTINUED Charge the Device Use the supplied USB-C cable to charge the device through a USB port or with the included wall USB-C Power Port adapter. Power-on the Device Power on/off Press and hold the power button until the start screen appears. -
Page 6: Start Menu
DEVICE SETUP, CONTINUED Start Menu If the eVER-HOME has already been setup Tap the START button to start the eVER-HOME software. eVER-HOME Settings Tap the SETTINGS button open the Settings menu. Update Software If an UPDATE button is present, UPDATE... - Page 7 DEVICE SETUP, CONTINUED Wi-Fi Tap the Wi-Fi button . A list of available networks appears. Tap on the name of your network and enter your password when prompted. To return to the previous view, tap the triangle icon at the bottom of the screen Cellular If your tablet is equipped with a cellular SIM card,...
-
Page 8: Select Time
DEVICE SETUP, CONTINUED Date & Time Screen Brightness To set the tablet’s date and time, tap the DATE & Tap the BRIGHTNESS slider to set the screen to TIME button the desired brightness. Ensure that “Automatic date & time” is enabled. If disabled, tap the toggle button at the right to enable (green). -
Page 9: Starting The Device
STARTING THE DEVICE Patient Consent and Authorization The first time you start the device you will be asked to confirm your agreement to remote patient monitoring. If you choose not to accept the agreement, please contact your doctor’s office to arrange for the return of the equipment. -
Page 10: Test Screens
TESTS Test Screens Each test has the following elements: a Quick-start Test data is synced to the tablet automatically when guide of basic instructions , a graphic of the test using the Bluetooth devices, but you may occasionally device , the previous test results , a quick view of need to enter data manually . - Page 11 . For further Instructions for Use, refer to the HELP section available from the footer bar of the eVER-HOME. You may have been assigned from one or more of the tests listed here. Scale 1. Step on the Scale. 2. Wait for “StEP oFF” to appear in display.
- Page 12 TESTS, CONTINUED Thermometer 1. Press the circular ON/MEMORY button to power on. 2. Insert a probe cover. 3. Stretch the ear canal by pulling the ear backwards and upwards and gently inserting the probe into the ear ensuring that the probe tip seals the ear canal. SCAN 4.
- Page 13 TESTS, CONTINUED Glucose — Accu-Chek Guide 1. Insert test strip into the meter. 2. When “Apply Drop” appears, perform fingerstick. 3. Touch the yellow edge of the strip to the blood drop. 4. The result is displayed, and COMMENT is highlighted.
- Page 14 UNPACK THE eVER-HOME AND ACCESSORIES CAMERA The device has two built-in cameras — one front- be changed . Previously captured images are facing and one back-facing. Choose the camera available in the HISTORY page . Tap the button to for your purpose...
- Page 15 UNPACK THE eVER-HOME AND ACCESSORIES VIRTUAL EXAM ROOM (VER), CONTINUED When your clinician initiates a call, a window will open asking if you would like to accept the call. Tap to accept the VER request. You are now connected to your clinician.
- Page 16 General Cleaning Guidelines Gently wipe the eVER-HOME and accessories as needed with a lint-free microfiber cloth dampened with a small amount of distilled water. Avoid getting excess moisture onto the devices; the corner of the microfiber cloth is sufficient. You may also use a camera lens cleaning cloth.
Need help?
Do you have a question about the eVER-HOME and is the answer not in the manual?
Questions and answers