Table of Contents
Advertisement
Available languages
Available languages
Quick Links
Advertisement
Chapters
Table of Contents

Related Manuals for Cole Parmer 50006-01

Summary of Contents for Cole Parmer 50006-01
- Page 1 Ultra-Compact Digital Mixer User Manual...
-
Page 3: Table Of Contents
Language Index English ........................1 French........................11 Spanish ........................23 German .......................33 Contents Packing List Introduction Safety Label Legend Safety Instructions General Instructions Approvals Installation Environmental Operating Conditions Auto Start Dimensions Technical Data Torque Capabilities General Operating Instructions Cleaning and Service Warranty and Product Liability 250MN007... -
Page 4: Packing List
Packing List Compare the contents of the shipment to the items on the following list to ensure all parts are received with the stirrer. Do not discard the container and packing ma- terials until all parts are accounted for. It is recommended that the original packing materials be kept for transportation and storage. -
Page 5: Safety Label Legend
Safety Label Legend CAUTION: Read operating instructions carefully and in full. RECYCLE: Recycle in accordance with the waste electronic & electrical equipment (WEEE) directive. Safety Instructions All operators must be familiar with the stirrer and read this entire manual. If the stirrer is used in a manner not specified by the manufacturer, the protection provided by the equipment may be impaired. -
Page 6: General Instructions
General Instructions Read Safety Instructions: Unpack the stirrer carefully. Ensure the stirrer is not damaged and verify the contents against the packing list. If the stirrer is damaged or the contents do not correspond with the packing list, notify your supplier immediately. -
Page 7: Installation
Installation Stand Assembly Remove lock nut. Insert the threaded end of the stand rod into the stand base. Turn rod clockwise to tighten. Secure with lock nut. Mixer Installation Slide the clamp opening over the top of the stand rod. Lower to desired height. Turn clamp knob to securely tighten the mixer onto the stand rod. -
Page 8: Auto Start
Auto Start This stirrer includes an optional Auto Start feature. When set, the stirrer will resume mixing after a power failure, when power has been removed by control equipment (i.e., PLC) or when the power has been cut (i.e., stirrer unplugged). When power is restored, the stirrer will automatically ramp up to the last set speed and resume mixing. -
Page 9: Technical Data
Technical Data Model Number 50006-01 Speed range 50 to 2500 rpm Maximum torque 10 Ncm Mechanical output power 1/50 hp AC 100 to 240 volts, 50/60 Hz (must use Input to power supply supplied power cord) Electrical output from power DC 24 V, 1.0 amp... -
Page 10: General Operating Instructions
General Operating Instructions The stirrer must be securely mounted as specified in the installation instructions. Ensure the mixing shaft and blade are securely attached. The stirrer is now ready for use to mix liquids. Button Operation Functions Power Button - Turns the stirrer motor on and off. When initially turned on, stirrer will spin at 50 rpm following a 5 second delay. -
Page 11: Cleaning And Service
Cleaning and Service Cleaning Unplug stirrer prior to cleaning. Using a mild soap and water solution, wipe the housing and control panel of the mixer with a damp cloth. Do not use chlorine bleach, chlorine-based cleanser, abrasives, ammonia, steel wool, or scouring pads with metal content or similar harsh solvents or abrasives. -
Page 12: Warranty And Product Liability
Warranty and Product Liability Warranty Cole-Parmer warrants the herein described product of its manufacture for three years from receipt of the equipment by the purchaser, against defects in material and workmanship. This limited warranty covers parts and labor. If the mixer housing is opened, the warranty becomes void. - Page 13 Index Langue Anglais ........................1 Français ......................11 Espanol ........................23 Allemand ......................33 Sommaire Liste de controle Introduction Légende des étiquettes de sécurité Consignes de sécurité Instructions générales Homologations Installation Environnement et conditions de fonctionnement Auto Start (mise en marche automatique) Dimensions Donnees techniques Capacités de couple Consignes de fonctionnement Nettoyage et maintenance...
-
Page 14: Liste De Controle
Liste de controle Vérifier que tous les éléments figurant dans la liste suivante sont contenus dans l’emballage. Ne pas jeter le contenant et l’emballage tant que cette vérification n’a pas été effectuée. Il est recommandé de garder l’emballage d’origine pour le transport et l’entreposage. -
Page 15: Légende Des Étiquettes De Sécurité
Légende des étiquettes de sécurité ATTENTION : Lire attentivement et intégralement les consignes de fonctionnement. RECYCLAGE : Recycler les pièces conformément à la réglementation locale. Consignes de sécurité Tous les utilisateurs doivent être familiarisés avec l’agitateur et avoir lu le manuel dans son intégralité. Si l’agitateur est utilisé d’une façon non spécifiée par le fabricant, la protection offerte par l’équipement peut être altérée. -
Page 16: Instructions Générales
10. L’alimentation de l’agitateur peut être arrêtée en appuyant sur le bouton Marche/Arrêt. En cas d’urgence, déconnectez le câble d’alimentation du réseau. 11. S’assurer que le bouton d’alimentation et le câble du secteur sont accessibles rapidement, directement et sans risque, à tout moment, mais surtout en cas de panne. -
Page 17: Homologations
Homologations Normes CAN/CSA C22.2 No. 61010-1:2012/R:2019-07 CSA-C22.2 No. 61010-2-051:2019 UL 61010-1:2022/R:2019-07 Amérique du Nord UL 61010-2-051:2019 FCC Part 15, Subpart B:2017 ICES-003:2017 IEC 61010-1:2010/A1:2019 Europe, Royaume- IEC 61010-2-051:2015 Uni, Australie IEC 61326-1:2012 Nouvelle-Zélande IEC 61326-1:2013 Canadian Standards Association Communité European (European Community) Underwriters Laboratories Federal Communications Commission The International Electrotechnical Commission... -
Page 18: Environnement Et Conditions De Fonctionnement
Assemblage de l’hélice Fixez l’hélice sur la tige d’agitation. Resserrez les vis de serrage pour les fixer en position. Installation de l’hélice Insérez la tige de l’hélice dans l’ouverture du dispositif de serrage jusqu’à l’arrêt. Environnement et conditions de fonctionnement Tous les agitateurs doivent fonctionner dans les conditions suivantes: Indoors 1. -
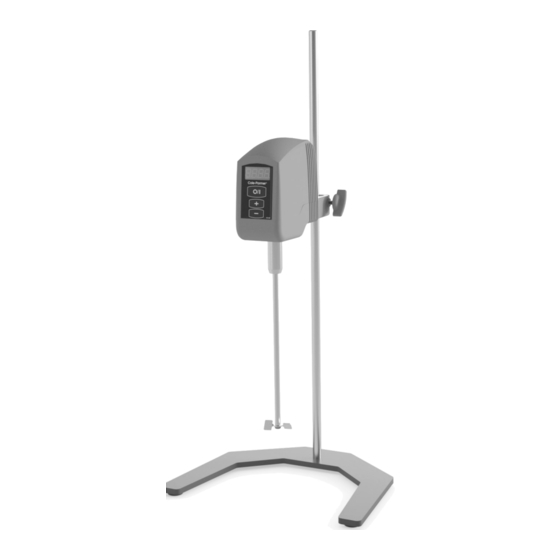
Page 19: Dimensions
Dimensions 157mm [6.2 in] 53mm 96mm [2.1 in] [3.8 in] 102mm [4.0 in] 141mm [5.6 in] 100mm [3.9 in] Affichage LED à quatre chiffres Dispositif de serrage Bouton - Marche/Arrêt Boîtier Bouton - augmenter tours/min. Ouverture de la pince ... -
Page 20: Donnees Techniques
Donnees techniques Numéro de modèle 50006-01 Plage de vitesse 50 à 2500 ta/min. Couple max. 10 Ncm Puissance mécanique de sortie 1/50 hp C.A. 100 à 240 volts, 50/60 Hz (le cordon Entrée Alimentation électrique d’alimentation Cole-Parmer fourni doit être utilisé) -
Page 21: Capacités De Couple
Capacités de couple Courbe de couple 1000 1250 1500 1750 2000 2250 Consignes de fonctionnement Assurez-vous que l’agitateur est bien fixé comme spécifié dans les consignes d’installation. Assurez-vous que la tige et la pale d’agitation sont bien fixées. L’agitateur est désormais prêt à être utilisé pour mélanger des liquides. Fonction des boutons Bouton Marche/Arrêt - Pour allumer ou éteindre le moteur de l’agitateur. -
Page 22: Nettoyage Et Maintenance
La sécurité est intégrée dans cet agitateur. Lorsque l’agitateur est mis sous tension, il reste en pause pendant 5 secondes avant de commencer à mélanger. La dernière vitesse utilisée est affichée sur la DEL. L’utilisateur a le choix entre trois options. 1. -
Page 23: Garantie Et Responsabilité Produit
Garantie et responsabilité produit Garantie Cole-Parmer garantit le produit décrit dans le présent document contre tout défaut de fabrication, et tout défaut matériel ou de main d’œuvre pendant trois ans à compter de la réception de cet appareil par l’acheteur. Cette garantie limitée couvre les pièces et la main d’œuvre. - Page 25 Índice de idioma Inglés ........................1 Francés ........................11 Español .......................23 Alemán ........................33 Contenido Lista de envio Introducción Leyenda de etiqueta de seguridad Instrucciones de seguridad Instrucciones generales Aprobaciones Instalación Condiciones ambientales de funcionamiento Auto Start (Inicio automático) Dimensiones Datos Técnicos Capacidad de torque de la batidora Instrucciones de operación Limpieza y servicio Garantía y responsabilidad del producto...
-
Page 26: Lista De Envio
Lista de envio Compare el contenido del envío con respecto a los elementos de la siguiente lista, para asegurarse que se han recibido todas las piezas con el agitador. No deseche la caja y los materiales de empaque, hasta verificar que cuenta con todas las piezas. -
Page 27: Leyenda De Etiqueta De Seguridad
Leyenda de etiqueta de seguridad PRECAUCIÓN: Lea las instrucciones de operación con cuidado y por completo. RECYCLE: Recycle in accordance with the waste Instrucciones de seguridad Todos los operadores deben estar familiarizados con el agitador y leer este manual completo. Si el agitador se usa de una forma distinta a lo especificado por el fabricante, la protección provista con el equipo puede verse afectada. -
Page 28: Instrucciones Generales
11. Asegúrese de poder acceder de inmediato al botón de encendido y al cable de alimentación que conecta a la red eléctrica, en forma directa y sin riesgos en todo momento, y sobre todo en caso de falla. 12. El agitador se debe utilizar con el cable de alimentación provisto. El cable y el tipo de enchufe con conexión a tierra son elementos de seguridad importantes. -
Page 29: Instalación
Canadian Standards Association Communité European (European Community) Underwriters Laboratories Federal Communications Commission The International Electrotechnical Commission ICES Interference Causing Equipment Standards Electromagnetic Compatibility Electromagnetic Interference TÜV SÜD UKCA UK Conformity Assessed Instalación Ensamblaje de la base Retire la tuerca. Introduzca el extremo roscado de la barra de la base en la base de soporte. -
Page 30: Auto Start (Inicio Automático)
Auto Start (Inicio automático) Este agitador incluye una función opcional de Inicio automático. Cuando se configura, el agitador reanudará el mezclado después de una falla de corriente; cuando el equipo de control ha quitado la alimentación (es decir, el controlador lógico programable) o cuando la alimentación ha sido interrumpida (es decir, cuando se desconecte el agitador). -
Page 31: Datos Técnicos
Datos Técnicos Número de modelo 50006-01 Margen de velocidad De 50 a 2.500 rpm Torsión máx. 10 Ncm Alimentación de salida mecánica 1/50 hp CA 100 - 240 voltios, 50/60 Hz, (Debe Entrada de alimentación usar el cable de alimentación Cole-Parmer suministrado) Salida eléctrica de la ali-... -
Page 32: Capacidad De Torque De La Batidora
Capacidad de torque de la batidora Curva de par 1000 1250 1500 1750 2000 2250 Instrucciones de operación El agitador debe estar instalado en forma segura según se especifica en las instrucciones de instalación. Asegúrese de que el eje de mezclado y el álabe estén bien ajustados. -
Page 33: Limpieza Y Servicio
Se han incorporado funciones de seguridad en este agitador. Al encenderlo, se detiene por 5 segundos antes de comenzar a mezclar. En la pantalla LED aparece la última velocidad que se utilizó. El usuario tiene tres opciones. 1. No hacer nada. Después de cinco segundos, el agitador comenzará a girar a 40 rpm. -
Page 34: Garantía Y Responsabilidad Del Producto
Garantía y responsabilidad del producto Garantía Cole-Parmer garantiza el producto aquí descrito de su fabricación contra defectos de materiales y de mano de obra por un período de tres años contados a partir de la recepción del producto por parte del comprador. Esta garantía limitada cubre piezas y mano de obra. - Page 35 Sprachindex Englisch .........................1 Französisch ......................11 Spanisch ......................23 Deutsche ......................33 Inhalt Packungsliste Introduction Sicherheitshinweise – Legende Sicherheitshinweise Allgemeine Hinweise Zulassungen Aufbau Umgebungsbedingungen Im Betrieb Autostart Maße Technische Daten Drehmomentwerte Allgemeine Bedienungshinweise Reinigung Und Wartung Garantie Und Produkthaftung...
-
Page 36: Packungsliste
Packungsliste Überprüfen Sie anhand der folgenden Liste, ob alle zum Rührer gehörenden Elemente geliefert wurden. Den Transportbehälter und das Verpackungsmaterial erst entsorgen, nachdem alle Teile erfasst wurden. Es wird empfohlen, die Original- Packmaterialien für Transport- und Lagerungszwecke aufzubewahren. • Kleiner Digitalrührer •... -
Page 37: Sicherheitshinweise - Legende
Sicherheitshinweise – Legende ACHTUNG: Bedienungsanleitung sorgfältig und vollständig lesen. RECYCLING: Bestimmungsgemäß entsorgen. Sicherheitshinweise Sämtliche Bediener müssen sich mit dem Rührer und dieser Anleitung gründlich vertraut machen. Falls der Rührer nicht wie vom Hersteller vorgegeben eingesetzt wird, können Schutzmechanismen des Gerätes beeinträchtigt werden. -
Page 38: Allgemeine Hinweise
10. Mit der Ein-/Austaste kann die Stromzufuhr zum Rührer unterbrochen werden. In Notfällen trennen Sie das Netzkabel vom Gerät. 11. Achten Sie darauf, dass Ein-/Ausschalter und Netzkabel des Rührers im Falle einer Fehlfunktion sofort, direkt und ohne jegliches Risiko erreicht werden können. -
Page 39: Zulassungen
Zulassungen Normen CAN/CSA C22.2 No. 61010-1:2012/R:2019-07 CSA-C22.2 No. 61010-2-051:2019 UL 61010-1:2022/R:2019-07 Nordamerika UL 61010-2-051:2019 FCC Part 15, Subpart B:2017 ICES-003:2017 Europa, IEC 61010-1:2010/A1:2019 Vereinigtes IEC 61010-2-051:2015 Königreich, IEC 61326-1:2012 Australien IEC 61326-1:2013 Neuseeland Canadian Standards Association Communité European (European Community) Underwriters Laboratories Federal Communications Commission The International Electrotechnical Commission... -
Page 40: Umgebungsbedingungen Im Betrieb
Impellermontage Setzen Sie Impellerflügel auf den Impellerschaft auf. Ziehen Sie die Feststellschraube zum Fixieren an. Impellerinstallation Schieben Sie den Impellerschaft bis zum Anschlag in die Aufnahmeöffnung ein. Umgebungsbedingungen Im Betrieb Der Rührer muss unter den folgenden Bedingungen betrieben werden: Betrieb nur in Innenbereichen 1. -
Page 41: Maße
Maße 157mm [6.2 in] 53mm 96mm [2.1 in] [3.8 in] 102mm [4.0 in] 141mm [5.6 in] 100mm [3.9 in] Vierstelliges LED-Display Aufnahme Taste - Ein/Aus Gehäuse Taste - U/min erhöhen Klemmöffnung Taste - U/min vermindern Klemmknopf... -
Page 42: Technische Daten
Technische Daten Modellnummer 50006-01 Geschwindigkeitsbereich 50 bis 2500 U/min Maximales Drehmoment 10 Ncm Mechanische Ausgangsleistung 1/50 PS 100 bis 240 Volt Wechselspannung, 50/60 Hz Netzteileingang (mitgeliefertes Cole-Parmer-Netzkabel muss verwendet werden) Netzteilausgang zum Rührer 24 V Gleichspannung, 1,0 A Gewicht - nur Rührer... -
Page 43: Drehmomentwerte
Drehmomentwerte Drehmomentkurve 1000 1250 1500 1750 2000 2250 Allgemeine Bedienungshinweise Der Rührer muss wie in der Installationsanleitung angegeben auf sichere Weise fixiert werden. Vergewissern Sie sich, dass Mischerschaft und Flügel sicher fixiert sind. Der Rührer kann nun zum Mischen von Flüssigkeiten eingesetzt werden. Bedientastenfunktionen Ein-/Austaste - Schaltet den Motor des Rührers ein und aus. -
Page 44: Reinigung Und Wartung
OL Steht für Overload (Überladen). Die Lademenge kann vom Rührer nicht verabeitet werden. Reduzieren Sie die Lademenge. Um den Rührer zurückzusetzen, schalten Sie ihn aus und wieder ein. Dieser Rührer ist mit wichtigen Sicherheitsmerkmalen ausgestattet. Der Rührer läuft erst fünf Sekunden nach dem Einschalten an. Sie können die zuletzt verwendete Rührdrehzahl auf der LED-Anzeige ablesen. -
Page 45: Garantie Und Produkthaftung
Garantie Und Produkthaftung Garantie Ab Übernahme des Cole-Parmer-Gerätes durch den Käufer garantiert Cole- Parmer über einen Zeitraum von drei Jahren die Fehlerfreiheit des Produktes hinsichtlich Material- und Herstellungsfehlern. Diese eingeschränkte Garantie deckt Teile und Arbeitsaufwand ab. Falls das Gehäuse des Rührers geöffnet wird, erlischt die Garantie. Diese Garantie kann nur durch speziell publizierte Revisionen abgeändert werden. - Page 48 Cole-Parmer® 625 E. Bunker Court Vernon Hills, IL 60061 United States 847-549-7600 Toll Free: 1-800-323-4340 (USA) sales@antylia.com www.coleparmer.com Canada 1-514-355-6100 info@antylia.ca www.coleparmer.ca United Kingdom +44 (0) 1480 272279 uk.sales@antylia.com www.coleparmer.co.uk Germany +49 (0) 9377 92030 de.sales@antylia.com www.coleparmer.de France +33 (0) 1486 37800 fr.sales@antylia.com www.coleparmer.fr Italy...
Need help?
Do you have a question about the 50006-01 and is the answer not in the manual?
Questions and answers