Advertisement
1
重点
项目
校对项
库
A
文件名
1.版面尺寸
2.材质标注
3.物料编码
B
4.颜色标注
5.客户型号
6.产品名称
C
7.重量标注
8.电压功率
D
E
F
@:完善印刷颜色技术要求
# : Keep warm
$: 更改封底、倒数第二页的地址,增加UKCA标识。
G
$
#
@
1
标 记 处 数 更改 文 件号
H
制 图
设 计
校 对
会 签
1
2
1、颜色:黑色印刷。
2、尺寸(mm):A5,采用钉装。
3、印刷内容从下一页开始。
4、警语字高要求:大写字母字高大于3mm。
改为Warm
20210604
替换
贾晓慧
20200808
替换
贾晓慧
20200703
贾晓慧
签 字
日 期
贾晓慧
审 核
杨旭
-- - --
标准化
古 广 君
-- -- -
审 定
古 广 君
20200628
日 期
- - - --
2
3
封面
技术要求(版本号: A, 2017-01)
压力锅
使用说明书
K
3
4
5
封底
16161000A13292
WP-MY-CS6019WPB(50019614)-0501
材料:
100g双胶纸
1:1
广东美的电热电器制造有限公司
4
5
6
A
B
C
D
E
F
G
H
6
Advertisement
Table of Contents

Summary of Contents for George Home GPC201SS-20
- Page 1 重点 项目 校对项 库 文件名 1.版面尺寸 2.材质标注 3.物料编码 4.颜色标注 5.客户型号 6.产品名称 7.重量标注 8.电压功率 封面 封底 技术要求(版本号: A, 2017-01) 1、颜色:黑色印刷。 2、尺寸(mm):A5,采用钉装。 3、印刷内容从下一页开始。 4、警语字高要求:大写字母字高大于3mm。 @:完善印刷颜色技术要求 # : Keep warm 改为Warm $: 更改封底、倒数第二页的地址,增加UKCA标识。 16161000A13292 压力锅 20210604 WP-MY-CS6019WPB(50019614)-0501 替换 贾晓慧 20200808 替换 贾晓慧 20200703 贾晓慧...
- Page 2 GPC201SS-20 Pressure cooker User Guide 220-240V~50/60Hz, 1000W IMPORTANT: RETAIN FOR FUTURE REFERENCE...
-
Page 3: About This Guide
About this guide We’ve written this manual to help you get the most from your Pressure Cooker. Please keep hold of it for future reference. WARNINGS: THIS PRODUCT WAS DESIGNED AND MANUFACTURED TO MEET STRICT QUALITY AND SAFETY STANDARDS. THERE ARE, HOWEVER, SOME OPERATIONAL PRECAUTIONS THAT YOU SHOULD BE AWARE OF. - Page 4 damage before use. If damage is found, notify ASDA to exchange the product. 10. If the supply cord is damaged, it must be replaced by the manufacturer, its service agent or similarly qualified persons in order to avoid hazard. 11. Do not use if the appliance, cord or plug is damaged. 12.
- Page 5 27. Surfaces of the pressure cooker will become hot when in use. Take care to only touch the handles or buttons. 28. Never overfill or exceed the ‘MAX’ marker on the inner pot. 29. Do not fill the pressure cooker beyond 2/3 of its capacity. When cooking food that expands during cooking, such as rice or dehydrated vegetables, do not fill the pressure cooker to more than half of its capacity.
-
Page 6: Important Safety Reminders
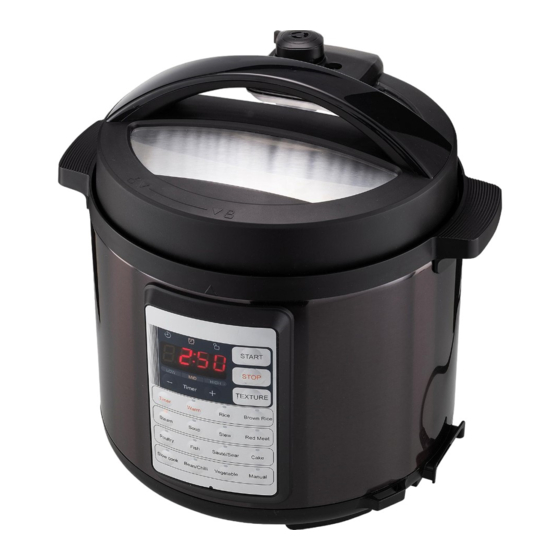
41. The ducts in the pressure regulator allowing the escape of steam should be checked regularly to ensure that they are not blocked. 42. WARNING! Avoid spillage on the connector. 43. WARNING! Misuse may lead to injury. Use this appliance solely in accordance with these instructions. - Page 7 What’s in the box Measuring Inner pot Pressure cooker Paddle User Ladle Condensation Guide collector Power cable Features Lid (Back) Steam Lid Handle Pressure cooker (Front) valve Body Handle Floating valve Control panel Lid (Inside) Pressure cooker (Back) Lid seal Safety button Valve Power...
-
Page 8: Before Using
Before using 1. Grip the handle on the top of the lid and turn anti-clockwise (A). Check that the arrow head on the top of the outer body aligns with (unlocked) symbol on the lid. Lift the lid off the outer body (B). 2. - Page 9 4. Wipe the body and lid of the pressure cooker with a damp cloth and then dry with a soft dry cloth. 5. Slot the inner pot into the pressure cooker and rotate clockwise and anti-clockwise to ensure it correctly inserted. 6.
- Page 10 Setting up 1. Slot the condensation collector onto the condensation outlet on the back of pressure cooker. 2. Slot the end of the power cable into the power socket on the side of the pressure cooker as shown in the diagram. 3.
-
Page 11: Control Panel
Control panel Delay timer light Shows the delay timer is set Pressure light Shows the cooker is at pressure, and the cooking Unlock light countdown will begin Shows the lid is not locked Digital screen Shows time, Start button Press to begin present function cooking process Stop button... - Page 12 Note: The below list is an approximate guide to pressure and slow cooking modes. Default time for texture selected Cooking Start Steam valve program delay setting HIGH (default) Rice 15 mins 12 mins 13 mins Sealing (use 1:1 ratio rice to water) Brown rice 20 mins 22 mins...
- Page 13 Filling the inner pot Minimum fill level = 2 cups Remove the inner pot from the pressure cooker. Place the ingredients for the recipe into the inner pot. Now place the liquid required in the inner pot. Wipe the top edge and outside of the pot to remove any spillage.
-
Page 14: Setting The Delay Timer
Changing texture You can change the pressure setting of your pressure cooker using the TEXTURE button on the control panel. You can choose from 3 different pressure levels at LOW, MID or HIGH by pressing the TEXTURE button. 1. Select the cooking program by pressing preset button that you want to use on the front of the control panel first. - Page 15 Using the Sauté/Sear function Never use the Sauté/Sear function with the pressure cooker lid fitted. 1. Remove the lid from the pressure cooker and place a small amount of oil and ingredients into inner pot. Plug your pressure cooker in and turn the power on at the socket if required.
-
Page 16: Using Your Pressure Cooker
Using your pressure cooker 1. Remove the lid by rotating it anti-clockwise (A) and then lifting upwards (B) off the pressure cooker. 2. Lift the inner pot out of the pressure cooker. 3. Place the ingredients and the liquid into the inner pot. Wipe any spillage off the inner pot if required. - Page 17 7. Select the preset cooking program you want to use (Manual cooking is covered later in these instructions) by pressing the button on the front of the control panel. You can now set the delay timer as shown on page 13 if required. 8.
- Page 18 Safely opening the pressure cooker lid IMPORTANT: When releasing the pressure, we suggest using tongs and always wear oven gloves to turn the steam valve to the Venting position. This will protect your hand from the hot steam being released. The lid won’t open until sufficient amount of steam has vented and pressure has dropped.
- Page 19 Using the Cake function 1. To use this function, you will need a suitable size trivet or small oven proof tin or bowl, and cake tin (not supplied). Avoid ceramic dishes with any unglazed areas. 2. Place the trivet or bowl in the inner pot.
-
Page 20: Using The Steam Function
Using the Steam function 1. Place water up to the minimum level (see page 12) in the inner pot. More water can be added but only to just under the trivet (not supplied) so it doesn’t touch the food. 2. If you want to use your pressure cooker as a steamer, you will have to prepare a trivet or oven proof bowl and place on the bottom of... - Page 21 Using the Manual function 1. Remove the lid by rotating it anti-clockwise (A) and then lifting upwards (B) off the pressure cooker. 2. Lift the inner pot out of the pressure cooker. 3. Place the ingredients and the liquid into the inner pot. Wipe any spillage off the inner pot if required.
- Page 22 7. Select the Manual cooking program by pressing the button on the front of the control panel. 8. The display will show the preset 30 minutes of cooking time. Use the + – buttons to change the minutes to what you require between 1 minute to 60 minutes.
- Page 23 11. The digital display will show and this shows the pressure cooker is heating and the pressure is building inside the cooker before countdown begins. 12. Once the pressure cooker has reached the desired pressure the icon will be illuminated and the cooking countdown will begin.
- Page 24 Cleaning the pressure cooker after use IMPORTANT: After using your pressure cooker it is very important that the lid and the pressure cooker are correctly cleaned to ensure they will work correctly next time you want to use the pressure cooker. Allow the cooker to cool before cleaning.
- Page 25 5. Lift the bottom of the float valve Brush upwards and remove any material from around it using a damp cloth. If the material is hard to remove use a brush or a pin if required. Cloth/ sponge Clean the steam valve cover to remove any material.
- Page 26 9. Wash the inner pot, and all other accessories that you used in warm soapy water and dry with a soft cloth. 10. Wipe the outside of the pressure cooker with a damp soft cloth to remove any spillages and dry with a soft cloth.
- Page 27 Removing and fitting the Lid seal lid seal IMPORTANT: If your lid seal becomes damaged you will need to replace it with a new one, or the pressure cooker will not be able to seal and contain the pressure required to cook the ingredients.
-
Page 28: Changing The Fuse
Changing the fuse Only use a 10 amp fuse. To change the fuse, place a screwdriver into the recess of the plug cover and pull the fuse holder upward until it’s free. Slide the fuse out and pop in the replacement. -
Page 29: Troubleshooting
Troubleshooting Problem Cause Solution Sealing ring not installed properly. Refit the sealing ring. Cannot close the lid: The float valve is jammed in the up Lightly push down the floating valve. position. There is pressure inside the pressure Turn the steam valve to the Venting cooker. - Page 30 Write please contact customer services at the ASDA,Leeds LS11 5AD telephone number or address shown opposite. N.B. When calling or writing Product name: GPC201SS-20 Pressure Cooker please quote the product name. Product site code: 15A.10.21.163...
- Page 31 Copyright Disposal This symbol on the product or in the instructions means © 2020 ASDA Stores Limited. that your electrical and electronic equipment should All other trademarks appearing herein are the be disposed at the end of its life separately from your property of their representative owners.
Need help?
Do you have a question about the GPC201SS-20 and is the answer not in the manual?
Questions and answers