
Summary of Contents for Elecrow Crowtail
- Page 1 Crowtail Adavanced Kit for Arduino User Guide V2.0 2020.02 2020 ELECROW All Rights Reserved. www.elecrow.com...
-
Page 2: Table Of Contents
Content Content Instruction Modules List Crowtai ● Crowtail – Base shield ● Crowtail – Module Lessons ● Lesson 1 – LED control ● Lesson 2 – Vibration detector ● Lesson 3 – Raining reminder ● Lesson 4 – Intelligent corridor light ●... -
Page 3: Instruction
Instruction Instruction Welcome to the Crowtail-Advanced kit for Arduino user guide. Do you already have some knowledge of electronics and some programming skills. How do you continue to strengthen your thinking, hands-on skills, programming and innovation capabilities? This kit will lead... -
Page 4: Modules List
● Crowtail - LED(Green) x1 ● Crowtail - Vibration Sensor x1 ● Crowtail - RTC x1 ● Crowtail - Temperature& Humidiy Sensor x1 ● Crowtail - IR Receiver x1 ● Crowtail - MOSFET x1 ● Crowtail - Water Sensor x1 ●... -
Page 5: Crowtail
It will satisfy all you need for your project! Crowtail is a series of products that we made to solve the messy jumper wires when connecting electronic circuits. It consists of a Base Shield and some basic Crowtail modules, which helps you creating small, simple, and easy-to-assemble circuits.In other words, when you use Crowtail, your... -
Page 6: Crowtail - Module
Compared with the traditional way of carrying out electronic projects, Crowtail has a huge performance benefit. All Crowtail has the standard 4 pin connectors. Your creative idea can be realize easier and faster just by plug and play. In addition, you don’t need to debug the electronic circuits! Connect Crowtail-Base shield with your Arduino. -
Page 7: Lessons
STEP1: Plug the Crowtail- Base Shield onto the Arduino or Crowduino Board. STEP2: Connect Crowtail-Button to Crowtail-Base Shield D4 port and Crowtail-LED to D2 port. The complete connection is as follows: Open the P01_LED_Control with Arduino IDE and upload it. - Page 8 What will you see If you press the button, the LED will light on, and it will light off when you release the button. If it doesn’t, make sure the LED and button are properly connected to the corresponding Crowtail-Base Shield interface.
-
Page 9: Lesson 2 - Vibration Detector
Lesson 2 – Vibration detector Introduction The Crowtail-Vibration Sensor is a high sensitivity non-directional vibration sensor. When the module is stable, the circuit is turned on and the output is low. When the movement or vibration occurs, the circuit will be briefly disconnected and output high. At the same time, you can also adjust the sensitivity according to your own needs. -
Page 10: Lesson 3 - Raining Reminder
2. Define whether the module is output or input. 3. Read the value of the vibration sensor. 4. If the value of the vibration sensor is LOW(shaked), turn on the LED. 5. If the value of the vibration sensor is HIGH(not shaked), turn off the LED. Code usage Integer Variables: int ledPin = 2;... - Page 11 Required Parts Crowduino UNO-SD/Arduino UNO x1 Crowtail – Water Sensor x1 Crowtail – Base Shield x1 Crowtail – Cable x2 Crowtail – LED(Red) x1...
-
Page 12: Lesson 4 - Intelligent Corridor Light
LOW to remind us it is raining and light off when water sensor value is HIGH. Lesson 4 – Intelligent corridor light Introduction Crowtail - PIR Motion Sensor(Passive Infrared Sensor) can detect infrared signals caused by motion. If the PIR sensor notices the infrared energy, the motion detector is triggered and the sensor outputs HIGH on its SIG pin. - Page 13 Hardware Connection STEP1: Plug the Crowtail-Base Shield onto the Arduino or Crowduino Board. STEP2: Connect Crowtail-LED to Crowtail-Base shield’s D4 and Crowtail-PIR motion sensor to D5 port. The complete connection is as follows: Open the P04_Intelligent_corridor_light with Arduino IDE and upload it.
-
Page 14: Lesson 5 - Breathing Light
STEP1: Plug the Crowtail-Base Shield onto the Arduino or Crowduino Board. STEP2: Connect Crowtail-LED to Crowtail-Base shield’s D3 and Crowtail-Rotary angle sensor to A0 port. The complete connection is as follows: Open the P05_Breathing_Light with Arduino IDE and upload it. - Page 15 What will you see When turning the knob on the rotary angle sensor, the brightness of the led will change. When you turn to the limit in one direction, if the led is off, then if you turn to the limit in the other direction, the brightness of the led is the maximum.
-
Page 16: Lesson 6 - Calculating Light Intensity
And APDS-9002 spectrum and human eye is extremely close to. It is very suitable for the field of AI applications. In this lesson, we will use Crowtail-Luminance Sensor to obtain the light intensity and print it in serial monitor. - Page 17 What will you see Open the serial monitor, you will see the monitor is printing the voltage and luminance. When you block the luminance sensor with your hand, you will see that the voltage and luminance detected by the luminance sensor is significantly reduced. Code overview 1.
-
Page 18: Lesson 7 - Get Current Time
Crowtail – Base Shield x1 USB Cable x1 Crowtail – RTC x1 Hardware Connection STEP1: Plug the Crowtail-Base Shield onto the Arduino or Crowduino Board. STEP2: Connect Crowtail-RTC to Crowtail-Base shield’s I port. The complete connection is as follows: Open the downloaded folder “Crowtail- Advanced kit for Arduino demo code”,... -
Page 19: Lesson 8 - Lcd Display
OCT is the octal, and HEX is the hexadecimal. If you want to output a string, you need to wrap the string with " ". If you want to output the variable, just write the variable name in parentheses. Lesson 8 – LCD display Introduction Crowtail-I2C LCD includes LCD1602 and MCP23008 modules. Unlike ordinary LCDs, which require... - Page 20 Connect Crowtail-I2C LCD to Crowtail-Base shield’s I port. The complete connection is as follows: Open the downloaded folder “Crowtail-Advanced kit for Arduino demo code”, navigate to the folder lib-> LiquidCrystal, and add LiquidCrystal to the Arduino library. Open the P08_LCD_Display with Arduino IDE and upload it.
- Page 21 Code overview 1. Import the I2C and LCD library. 2. Create an LCD instance object. 3. Set up the LCD’s number of rows and columns. 4. Print message on the LCD. 5. Clear LCD display and turn off the backlight of LCD. Code usage Import library: #include <Wire.h>...
-
Page 22: Lesson 9 - Electric Watch
Crowtail – Cable x2 Crowtail – I2C LCD x1 USB Cable x1 Hardware Connection STEP1: Plug the Crowtail-Base Shield onto the Arduino or Crowduino Board. STEP2: Connect Crowtail-I2C LCD and Crowtail-RTC to Crowtail-Base shield’s I port. The complete connection is... -
Page 23: Lesson 10 - Temperature&Humidity Detecting System
This lesson, we will use Crowtail-Temperature&humidity sensor and Crowtail-I2C LCD to make a temperature and humidity detecting system, which aim to help you get the environment’s temperature and humidity around you. - Page 24 Connect Crowtail-I2C LCD and Crowtail-Temperature&Humidity Sensor to Crowtail-Base shield’s I port and D5 port. The complete connection is as follows: Open the downloaded folder “Crowtail-Advanced kit for Arduino demo code”, navigate to the folder lib-> DHT, and add DHT to the Arduino library. Open the P10_Temperature&Humidity_Detecting_...
-
Page 25: Lesson 11 - Pwm Control
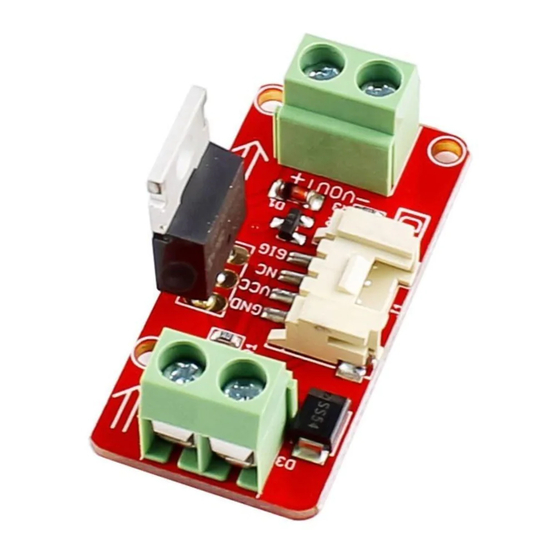
(such as 5V) on a microcontroller. A MOSFET is also a switch. There are two screw terminals on the board. One for input power and the other for the device you want to control. Crowtail-MOSFET transfers power from one end to the other when closed. However, if there is no external power source, your device can still get power from the microcontroller through the Crowtail interface. - Page 26 Hardware Connection STEP1: Plug the Crowtail-Base Shield onto the Arduino or Crowduino Board. STEP2: Connect Crowtail-MOSFET to Crowtail-Base shield’s D5 port. Connect battery case and DC motor to Crowtail-MOSFET. The complete connection is as follows: Open the P11_PWM_Control with Arduino IDE and upload it.
- Page 27 What will you see You will see the motor start at a low speed and then it will slowly increase the speed until it reaches its maximum speed. When the motor reaches its maximum speed, the speed of the motor will start to slowly decrease and reach its minimum speed.
-
Page 28: Lesson 12 - Servo Control
Crowtail – 9G Servo x1 Crowtail – Base Shield x1 USB Cable x1 Hardware Connection STEP1: Plug the Crowtail-Base Shield onto the Arduino or Crowduino Board. STEP2: Connect Crowtail-9G Servo to Crowtail-Base shield’s D5 port. The complete connection is as follows: Open the downloaded folder “Crowtail-... -
Page 29: Lesson 13 - Matrix Display
LED on and off but does not have the ability to individually PWM dim them. In this lesson, we will learn how to use Crowtail-LED Matrix to show the string. Let’s use this module to make a billboard and show a... - Page 30 Crowtail – Base Shield x1 USB Cable x1 Crowtail – LED Matrix x1 Hardware Connection STEP1: Plug the Crowtail-Base Shield onto the Arduino or Crowduino Board. STEP2: Connect Crowtail-LED Matrix to Crowtail-Base shield’s I port. The complete connection is as follows: Open the downloaded folder “Crowtail-Advanced kit for Arduino...
-
Page 31: Lesson 14 - Get Atmospheric Pressure
Create LED Matrix instance: Adafruit_8x8matrix matrix; Create an LED Matrix instance after we import the Adafruit_LEDBackpack.h library. The name of the instance object is matrix. Initialize LED Matrix: matrix.begin(0x70); Initialize the LED Matrix instance object and pass the I2C address. The instance object matrix address is 0x70. - Page 32 These come factory-calibrated, with the calibration coefficients already stored in ROM. What makes this sensor great is that it is nearly identical to its former rev, the BMP085! This lesson we will try to use Crowtail-BMP180 Barometer to get the pressure of atmospheric. Required Parts Crowduino UNO-SD/Arduino UNO x1 Crowtail –...
-
Page 33: Lesson 15 - Digital Compass
Lesson 15 – Digital compass Introduction Crowtail-3-Axis Compass module, a member of Crowtail family uses I²C based Honeywell HMC5883L digital compass. This ASIC is equipped with high-resolution HMC118X magneto-resistive sensors and a 12-bit ADC. It can provide an accurate compass heading. Signal conditioning like amplification, automatic degaussing strap drivers and offset cancellation are inbuilt. - Page 34 Hardware Connection STEP1: Plug the Crowtail-Base Shield onto the Arduino or Crowduino Board. STEP2: Connect Crowtail-3-Axis Compass to Crowtail-Base shield’s I port. The complete connection is as follows: Open the downloaded folder “Crowtail- Advanced kit for Arduino demo code”, navigate to the folder lib-> 3Axis_Digital_- Compass_HMC5883L, and add Digital Compass to the Arduino library.
-
Page 35: Lesson 16 - Ir Control System
Lesson 16 – IR control system Introduction The Crowtail- IR Receiver module uses the HS0038B which is miniaturized receivers for infrared remote control systems and it is the standard IR remote control receiver series, supporting all major transmission codes. - Page 36 Arduino or Crowduino Board. STEP2: Connect Crowtail-LED(Red), Crotail-LED(Green) and Crowtail-IR Receiver to Crowtail-Base shield's D3, D4 and D5 ports.The complete connection is as follows: Open the downloaded folder “Crowtail- Advanced kit for Arduino demo code”, navigate to the folder lib-> IRremote, and add IRremote to the Arduino library.
-
Page 37: Lesson 17 - Esp8266 Tcp Server
number variables that will not change throughout the program. “uint16_t” is a char unsigned character, the constant declared with it is a 16-bit character. "0x6897" is the encoding for hex button 0. Start receiver: irrecv.enableIRIn(); Before we use the remote control to control the project, we need to make the IR Receiver start receiver so that IR Receiver can get the data we send from the remote control. - Page 38 Crowtail – Base Shield x1 USB Cable x1 Crowtail – Serial Wifi x1 Hardware Connection STEP1: Plug the Crowtail-Base Shield onto the Arduino or Crowduino Board. STEP2: Connect Crowtail-Serial Wifi to Crowtail-Base shield’s U2 port. The complete connection is as follows: Open the P17_ESP8266_TCP_Server with Arduino IDE and upload it.
-
Page 39: Lesson 18 - Weather Reminder
I was shivered by the coldness. In this lesson, we will solve this problem for you! We will use Crowtail-Temperature & Humidity sensor, Crowtail-Water sensor, Crowtail-I2C LCD and Crowtail-LED as a weather reminder so that you can also know the weather when you are in a hurry. - Page 40 What will you see You can see the LCD will display the information of temperature and humidity. And if there is a rain detected by water sensor, the LCD will display the "Bring umbrella" prompt. In addition, the red led will light up to make it more obvious that it is raining.
-
Page 41: Lesson 19 - Remote Control System
The “pin” represents the pin of the DHT sensor connected to the Arduino. The “type” represents the type of the DHT sensor. Our Crowtail–Temperature & Humidity Sensor uses DHT11. The “count” is an optional parameter. “LiquidCrystal lcd(0)” is to create an instance of LCD, which is connected to 0(I2C address). - Page 42 Open the P19_Remote_Control _System with Arduino IDE and upload it. What will you see Upload the program, when you press the “0” button on Infrared remote control, you can see the servo is turning to 180 degrees (open door) and then rotate back to 0 degrees (close door). When you press the “1”...
-
Page 43: Lesson 20 - Polite Automatic Door
This is definitely a very annoying thing, and I am determined to change it! So in this course, we will use Crowtail-LED Matrix, Crowtail-9G Servo and Crowtail-Button to make a simulated automatic door opening for the door of our house. Of course, this door will be very polite to visitors. - Page 44 #include <Servo.h> This would be always the first thing to do when you need to use the external function. Crowtail-LED Matrix is an I2C module, so we need to import I2C library(Wire.h) first. Then we import LED Matrix’s library “Adafruit_LEDBackpack.h” and servo’s library “Servo.h”.
-
Page 45: Lesson 21 - Weather Station
We will use Crowtail- Temperature & Humidiy Sensor, Crowtail- Water Sensor, Crowtail- BMP180 Barometer, Crowtail- Luminance Sensor, Crowtail- I2C LCD to make a rich weather information that can provide you with temperature, humidity, rain, atmospheric pressure and brightness. - Page 46 What will you see Upload the program and you will see that the LCD will first display the brightness information of the environment and whether it is raining, and then the LCD switches the screen to display the humidity and temperature information of the current environment.
- Page 47 Code usage Import library: #include <SFE_BMP180.h> #include <Wire.h> #include "LiquidCrystal.h" #include "DHT.h"imp As I had said before, it would be always first to import the library, so we can very convenient to use the function which is created by others. “SFE_BMP180.h” is the library file of BMP180 module. “Wire.h”...
Need help?
Do you have a question about the Crowtail and is the answer not in the manual?
Questions and answers