
Summary of Contents for Powertrain hgm-pow-j06-blk
- Page 1 Product may change slightly from the item above due to model upgrades. Read all instructions in this manual before using this equipment. Keep this manual for future reference.
-
Page 2: Table Of Contents
TABLE OF CONTENTS 1. SAFETY INSTRUCTIONS____________________________________ 3 2 COMPONENT DETAIL TABLE_______________________________ 4 3. ACCESSORIES DETAIL TABLE________________________________ 5 4. ASSEMBLY INSTRUCTIONS________________________________ _ 6 5. WARRENTY & CONTACT DETAILS___________________________ _ 12... -
Page 3: Safety Instructions
1. SAFETY INSTRUCTIONS 1. Read this manual before assembling and using the equipment. 2. Consult your physician before beginning an exercise program. This is especially important for people with pre-existing health problems. 3. Incorrect or too much exercise can injure or damage your health. Stop exercising immediately if you feel light headed, short of breath or any type of pain. -
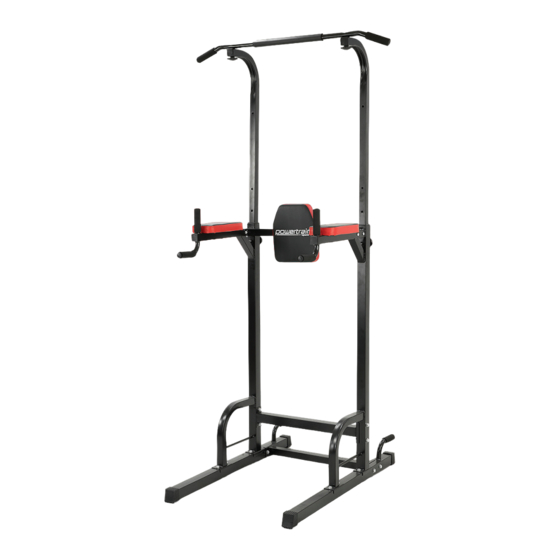
Page 4: Component Detail Table
2. COMPONENT DETAIL TABLE Name Quantity Name Quantity Upper Elbow Bar Push-up Bar Support Bar Elbow Pads Lower Transverse Bar Back Pad Upper Transverse Bar Pull-up Bar Back Pad Bar Pull-up Bar (9) Back Pad (8) Upper Elbow Bar (6) Upper Elbow Bar (6) Elbow Pads (7) Elbow Pads (7) -
Page 5: Accessories Detail Table
3. ACCESSORIES DETAIL TABLE Name Model Quantity Group Bolt M10x60 Washer Bolt M8x50 Bolt M8x50 Knob M10x70 Carriage Bolt M10x70 Knob M10x70 Wrench... -
Page 6: Assembly Instructions
4. ASSEMBLY INSTRUCTIONS Step 1 1. Place the Support Bar (2) onto the Push Up Bar (1) and use four M10x60 Bolts (10) to tighten and secure into place. 2. Place the Support Bar (2) onto the Push Up Bar (1) and use four M10x60 Bolts (10) to tighten and secure into place. - Page 7 Step 2 1. Place the Lower Transverse Bar (3) to the Push Up Bars (1) and insert four M10x60 Bolts (10). (10) Lower Transverse (10) Bar (3) 2. Secure the Upper Transverse Bar (4) to the 2 Support Bars (2) with four M10x60 Bolts (10).
- Page 8 Step 3 1. Secure and tighten the Back Pad Bar (5) to the 2 Support Bars (2) with the four M8x50 bolts and nuts (12) Back Pad Bar (5) (12) (12)
- Page 9 Step 4 1. Insert the Upper Elbow Bars (6) into the Support Bars (2) and tighten into desired position with the two Knobs (14) Upper Elbow Bar (6) Upper Elbow Bar (6) (14) (14)
- Page 10 Step 5 1. Place the Elbow Pads (7) onto the Support Bar (2) area by using four M8x50 (11) bolts and tighten to keep in place. 2. Place the Back Pad (8) onto the Back Pad Bar (5) area by using two M8x50 (11) bolts and tighten to keep in place.
- Page 11 Step 6 1. Place the Pull-up Bar (9) to the two Upper Elbow Bars (6) and tighten using the two Knobs and Carriage Bolts (13). Pull-up Bar (9) (13) (13)
-
Page 12: Warrenty & Contact Details
5. WARRENTY & CONTACT DETAILS Kmate Pty Ltd provides a 12 month warranty for this product when used for domestic purposes. Commercial use of the product will void all warranty. The benefits of this warranty are provided in addition to other rights and remedies you may have under a law in relation to the goods and services to which this warranty relates.
Need help?
Do you have a question about the hgm-pow-j06-blk and is the answer not in the manual?
Questions and answers