Advertisement
- 1 Overview
- 2 Shoulder Abduction (10º to 90º)
- 3 Fitting and Securing the Waistband (10º to 45º)
- 4 Fitting the Metal Waistband (45º to 90º)
- 5 Setup of Airplane Components (45º to 90º)
- 6 Sizing and Applying the Sling
- 7 Sizing Sling Length and Thumb Loop
- 8 Fitting and Securing the Waistband (45º to 90º)
- 9 Adjusting Strap Lengths
- 10 Converting to Shoulder Immobilizer
- 11 Care instructions
- 12 The Perfect Post-Recovery Pairing
- 13 Documents / Resources
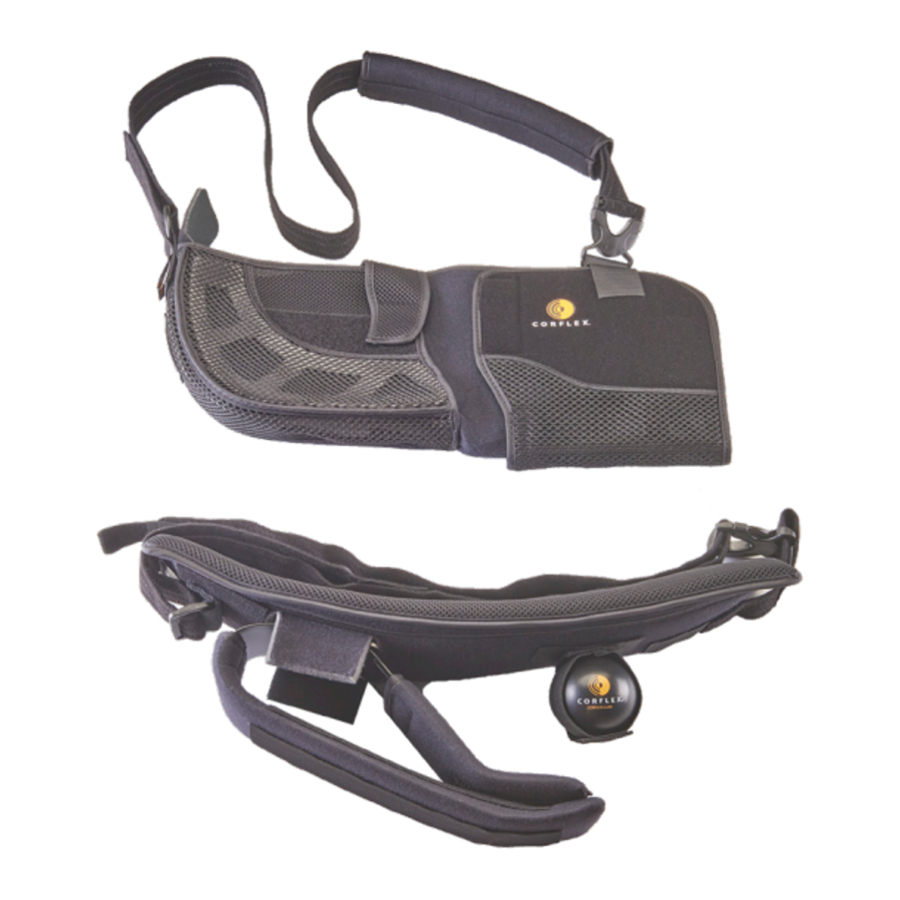
Overview


RANGER AP COMPONENTS
- Padded Shoulder Strap
- Waistband with Arm Support
- 60º Foam Positioning Block
- 30º Foam Positioning Block
- Mesh Airplane Platform Cover
- Retaining Strap
- Airplane Platform
Ranger AP Shoulder Brace
The Ranger AP Shoulder Brace gives you flexibility to adjust the amount of shoulder abduction from 10º to 90º with rotational control from full internal rotation to 70º of external rotation. Use simply with the waistband and arm support for shoulder abduction from 10º to 45º or attach the AP Platform to adjust the amount of shoulder abduction from 45º to 90º. This customization meets patient's individualized needs and post-surgical protocols. The brace is easy to apply and is universal for either right or left shoulders. The following instructions will assist in the application of the Ranger AP and the assembly and fitting of all parts and components.
Shoulder Abduction (10º to 90º)
NOTE: When converting this product for use from 45º through 90º of shoulder abduction, pliers may be needed but not included with Ranger AP.
- Remove the sling from the waistband and set aside.
- Go to Step 2 or Step 3 for Fitting the Waistband (Instructions shows right arm assembly).
NOTE: When using product with shoulder abduction from 10° to 45° it is not necessary to attach airplane platform.
Fitting and Securing the Waistband (10º to 45º)
")
- Orient waistband so the long flat section is toward body and exercise ball is in front. For use on left arm remove elastic ball holder and rotate 180°, reattach to front end of waistband/strap.
- Curve waistband to match patient's waistline, this will provide a stable platform for the arm support and reduce migration.
- Shape outer frame section for desired abduction/rotation. Waistband can be adjusted to provide shoulder abduction from 10° to 45° and from full internal rotation to 70° of external rotation as specified by the physician or other qualified healthcare provider.
- Apply at patient's waist on their affected side. Wrap strap around the patient's waist and secure buckle at the front of waistband.
- If the waistband can be easily pushed down, tighten waist strap. Strap should be snug but not cause discomfort.
- Go to Steps 5 through 7 for set-up of sling. When both the sling and waistband are properly fit attach the sling to waistband by securing hook and loop portions together.
Fitting the Metal Waistband (45º to 90º)
")
- Unscrew the 2 threaded knobs to remove the arm support from the waistband. (You will find temporary thread locking liquid on the fasteners which may make initial removal difficult but helps prevent accidental loosening - Pliers may be needed).
- Orient waistband so the long flat section is toward body and exercise ball is in front. For use on left arm remove elastic ball holder and rotate 180°, reattach to front end of waistband/strap.
- Curve waistband to match patient's waistline, this will provide a stable platform for the airplane splint and reduce migration.
- Continue with Steps 4 through 7.
Setup of Airplane Components (45º to 90º)
- Remove arm support from waistband and place the airplane platform on the waistband and secure with 2 threaded knobs.

- Attach the arm support to airplane platform with 2 screws and threaded knobs. Adjust along the slots based on patient's arm length.

- Insert the foam positioning blocks into the airplane platform for 60° or 90° abduction. The foam blocks should fit tight to the Airplane Platform with the thumb knobs aligning with the cutouts in the foam.

- Apply the Mesh Airplane Platform Cover to the airplane platform and position to cover all metal edges.
- Attach the Retaining Strap to properly secure positioning blocks.


Sizing and Applying the Sling

Shoulder sling features a universal design that accommodates a wide variety of patients, fitting a forearm length from 9"20". Length is measured from wrist to elbow. Sling comes shipped as a typical medium right arm sling.
Sizing Sling Length and Thumb Loop

- Release front hook closure at shoulder strap buckle. Adjust sling length by removing the forearm section and reapplying in the desired position.
- Proper fit: Edge of sling should extend to first knuckle (PIP joint) on the pinkie finger, ensure elbow is positioned as far back in the pocket as possible.
- Release thumb loop strap and align bottom fold of strap with third metacarpal.
- Thumb should rest comfortably inside loop when properly fit.
- Hand should rest fully along the bottom of the sling and never be suspended by the thumb loop. Trim excess strap and secure to hook at top.
- Secure the pillow to the sling by reapplying the 2" x 9" mesh strap across the top of the sling. Locate close to the elbow to help prevent the arm from sliding forward in the sling.
- Reapply front hook closure to secure the front panel for use.
Fitting and Securing the Waistband (45º to 90º)
")
- With both the sling and waistband properly fit apply the waistband and airplane components to patient's waist on their affected side. Wrap strap around the patient's waist and secure buckle at the front of waistband.
- Attach the sling to the arm support by securing hook and loop portions together.
- If the waistband can be easily pushed down, tighten waist strap.
Adjusting Strap Lengths

- Unbuckle Comfort Harness Strap and guide strap around the back, sliding opposite arm through the sling loop.
- Secure front buckle at sling, leaving the strap loose at this time.
Converting to Shoulder Immobilizer
This product can also be stepped-down to a shoulder immobilizer. Use as a shoulder immobilizer should only be at the direction of the patient's physician or other qualified healthcare provider.
- Strap Removal

- Remove waist strap from waistband by releasing the hook fastener attached to the front end of waistband.
- At the opposite end of the waist strap, release the hook fastener and thread the strap out through the plastic buckle.
- Remove waistband from sling by detaching the hook and loop fasteners. 2" x 9" mesh strap should now be secured to the front and back sling panels close to the upper arm.
- Attaching Strap to Sling

- Locate webbing loop on the back end of the sling.
- Thread hook end of strap through webbing loop and secure back onto strap.
- Final Waist Strap Fit

- Wrap strap around the patient's waist and secure the hook fastener to the front sling panel.
- Adjust waist strap length as needed for a secure fit. Strap should be snug but not cause discomfort.


Care instructions
Sling and mesh airplane platform cover should be hand washed only using warm water and detergent for delicate fabrics, repeatedly rinsed and line dried only. Do not use bleach or place in a dryer. Waistband, airplane platform and foam positioning blocks can be surface washed using warm water and a detergent for delicate fabrics or wiped clean with a mild disinfectant. Do not immerse waistband. airplane platform or foam positioning blocks in liquids.

This product has been designed and tested based on single patient use only. It should never be used by multiple patients. If additional pain, swelling or symptoms occur while using the device, seek medical attention. Product should be applied by a licensed or certified healthcare practitioner and as prescribed by a physician or other qualified medical authority.
Indications
Indicated for treatment after Bankart and SLAP repairs, rotator cuff repairs, shoulder arthroscopy, separations and dislocations, capsule repairs, humeral fractures and joint reconstruction.
Warranty
Products manufactured by Corflex are warranted to the original purchaser against defects in workmanship and material for the life of the product. The foregoing warranty shall not apply to normal wear and tear; or if the product has been subjected to misuse or misapplication the warranty will be voided at the discretion of Corflex.
To Reorder
Product Number - UNIV
Ranger AP Shoulder Brace - 23-2660
The Perfect Post-Recovery Pairing

The Cryo Pneumatic Shoulder Wrap is designed to combine the benefits of pneumatic compression with cold therapy. Ideal for post-surgical application, acute injury, or as part of a physical therapy or athletic training program, the Cryo Pneumatic Shoulder Wrap can help improve recovery time when used in combination with Ranger AP Shoulder Brace.
The hand bulb delivers adjustable compression helping to reduce edema and maximize gel pack contact. The wraps are universal and the gel packs are offered with options to suit your needs - one gel, two gels or a package of ten.
To Reorder
| Product Number | Cryo Pneumatic Shoulder Wrap |
| No Gel | 72-7180 |
| One Gel | 72-7181 |
| Two Gels | 72-7182 |
| Accessories | Shoulder |
| Single Gel | 72-7189 |
| 10 Pack Gels | 72-7189-010 |
| 14" Universal Ext Straps (10 Pack) | 72-7190 |
| Pump & Hose Set | 72-7165 |
Sizing: One size fits most patients.
Shoulder Wrap fits up to 48" circumference.
CORFLEX
669 EAST INDUSTRIAL PARK DRIVE
MANCHESTER, NH 03109
CORFLEX.COM
TOLL FREE: 800 426 7353
FAX: 603 623 4111
© 2020 Corflex. All Rights Reserved.

Documents / Resources
References
Download manual
Here you can download full pdf version of manual, it may contain additional safety instructions, warranty information, FCC rules, etc.
Advertisement


Need help?
Do you have a question about the Ranger AP and is the answer not in the manual?
Questions and answers