Table of Contents
Advertisement
Quick Links
Advertisement
Table of Contents

Related Manuals for TAN Bead Smart LabAssist Series

Summary of Contents for TAN Bead Smart LabAssist Series
- Page 1 Smart LabAssist Series 使用手冊 User Manual Model: SLA-E13200...
-
Page 2: Safety Items
Safety Items Notice these tips below for avoiding electric shock or fire accidents. 1. Do not touch any plugs and electric switches with wet hands. 2. Turn off and unplug the machine before moving it. 3. Fasten robot before moving and delivering the machine. 4. -
Page 3: Table Of Contents
Contents Safety Items…………………..………………………………….01 About this manual………………………………………………04 Symbols……………………………………………..…04 Introduction……………………………………………………05 Operation Interface……………………………………………05 Heating system………………………………………………...06 Operation Environment………………………………………07 Operation Principle…………………………………………. .07 Intended use …………………………………………………. .08 Specifications……………………………………………...……09 Safety and EMC information…………………………….. ….10 Appearance of the Machine……………………………..…..13 Front view………………………………………………..13 Control panel……………………………………………13 Back view………………………………………………..15 Internal view…………………………………………..…..15 Introduction of TOUCH Screen………….…...…………..…..19 RUN Screen……………………………………………..…20 Program Screen…………………………….………………22 Clock Screen……………………………………….………..24... - Page 4 Introduction of Execution Condition………………………..34 How to start………………………………………………….34 How to pause……………………………………………….36 How to stop……………………………………………….…37 Installation the SLA-E13200………………………………..…38 Cleaning the SLA-E13200…………………………………..…40 Maintain the SLA-E13200…………………………………. .…42 Storage and Transport…………………………………………42 Replace the fuse………………………………………………...42 Disposal machine………………………………………………43 Chart of Pre-loaded programs………..……………...………44 The picture of wiring at the back of controller …………..45 I/O chart……………..………………………………………….
-
Page 5: About This Manual
About This Manual Symbols The label on the back of the instrument, the User Manual, and other packaging material may contain the following symbols: www.tanbead.com... -
Page 6: Introduction
Introduction What is Automatic Platform for Magnetic System? Automatic Platform for Magnetic System (SLA Series) is a robot designed to handle magnetic reagent assays. It is popularly applied to the extraction of nucleic acids/proteins and the separation of cells. Users just need to put samples into a pre-filled reagents plate. Then, combining a reagent plate and a specially-designed strip, the SLA-E13200 can automatically handle 1-32 samples simultaneously. -
Page 7: Heating System
Heating System The heating system can provide reagents with the best working temperatures. All temperatures are programmed. In Perform Program Screen, “PRESET” is programming temperature and “PRESENT” is real temperature on stainless steel board. The heating system is connected with the main power system. Switch off both of the main power and heating switch when you turn your machine off. -
Page 8: Operation Environment
Operation Environment Place of operation In door use only Altitude 2000 m Pollution Degree Transient overvoltage 2500 V at Mains Supply Operation Principle The robot of SLA-E13200 uses magnetic rod to transfer magnetic beads from one well to another and strip to mix solution. -
Page 9: Intended Use
Intended use ® ■ Nucleic Acid Extractor is combination with TANBead DNA/RNA Extraction Kit to extract DNA/RNA from specimen. ■ Suitable medical inspection personnel in vitro diagnostic testing. ■ Strips and reagent plates contacted with the specimen are potentially infectious. After using, please put them in the infectious waste bucket. -
Page 10: Specifications
Specification Model SLA-E13200 Width(cm) Height(cm) Length(cm) Weight(Kg) Voltage (V) 100-240 Current (A) Operation Temperature Range(℃) 5-50 Operation Humidity Range (%) <80 Temperature Range (℃) RT-70 Sample Number 1-32 50µl – 1000µl Processing Volume Transmit Interface USB / RS232 www.tanbead.com... -
Page 11: Safety And Emc Information
Safety and EMC information 1.1 Safety Requirements ■ The medical device has passed the tests and conformed to the standards of IEC 61010-1:2001 & EN61236-1:2006,“Safety Requirements for Electrical Equipment for Measurement, Control and Laboratory Use, Part 1: General Requirements”. ■ The medical device has passed the tests and conformed to the standards of IEC 61010-2-101:2001&EN61236-1:2006, “Safety Requirements for Electrical Equipment for Measurement, Control and Laboratory Use, Part 2-101:... - Page 12 1.2 EMC requirements ■ The medical device has passed the tests and conformed to the standards of IEC 61326-1:2005 & EN61236-1:2006 (First Edition), “Electrical Equipment for Measurement, Control and Laboratory Use – EMC Requirements, Part 2-6: Particular Requirements – In Vitro Diagnostic (IVD) Medical Equipment”.
- Page 13 Accessory RS232- USB 傳 輸 線 Disk RS232 傳 輸 線 電 源 線 磁 座 導熱塊(選配) www.tanbead.com...
-
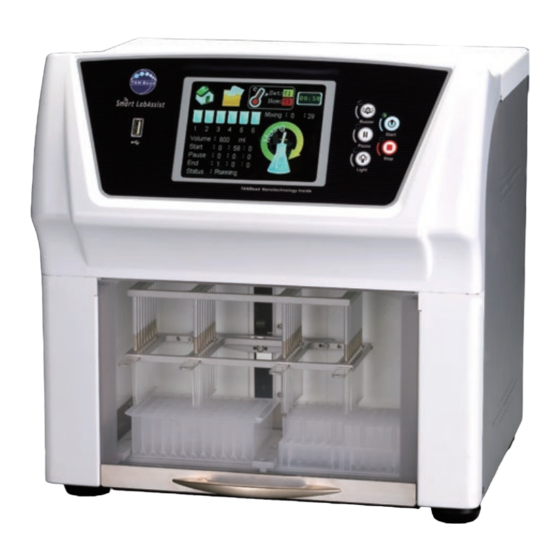
Page 14: Appearance Of The Machine
Appearance of the Machine Front view Control Panel Introduction USB Plug 控制按鈕 觸控螢幕 : LED 燈號指示使用者按該鍵,具有引導功能。 www.tanbead.com... - Page 15 Appearance of the Machine Front view Control Panel www.tanbead.com...
-
Page 16: Back View
Back view Switches and Electrical Inlet (voltage: 100-240V,fuse: 5A/250V) (A) Heating switch (B) Main power switch (C) RS232 port (D) Electrical inlet www.tanbead.com... -
Page 17: Internal View
Internal view (A) Magnetic rod frame (B) Strip rack frame (C) Reagent plate rack (D) 8-channel strip (E) Reagent plate (F) Reagent tube www.tanbead.com... - Page 18 Introduction of the Control Panel : LED light-up indicates users to press the button. Start bottom LED is green, and others are red. Start: to initiate the program The buzzer will alarm when turn on the instrument. Stop: to terminate the program It shows “STOP?”...
- Page 19 Buzzer: Press the button to turn buzzer-beater off. Pause: It stops temporarily when you press the button. Press the button again to continue program, and the End time will be recalculated. Light: Turn on/off the LED light. www.tanbead.com...
-
Page 20: Introduction Of Touch Screen
Introduction of Touch Screen Home Screen: : Touch to enter RUN Screen. : Touch to enter PROGRAM Screen. : Touch to enter CLOCK Screen. : Touch to enter USB Screen. : Touch to enter TEMP Screen. : Touch to enter UV LAMP Screen. : Touch to enter BARCODE Screen. -
Page 21: Run Screen
Run Screen: www.tanbead.com... - Page 22 Programmable Temp: The temperature is already setting and programmable. It is fluctuation. User could reference the reagent protocol which is written the detail. Temperature Setting : The temperature is setting by user currently. It is constant and regular. www.tanbead.com...
-
Page 23: Program Screen
PROGRAM Screen: www.tanbead.com... - Page 24 Program Name: The name is no more than 15 characters. Program No: It displays the last program number you used. You can preload 100 programs, program number from 00 to 99. SEARCH: Insert the digits to search the program directly. www.tanbead.com...
-
Page 25: Iii. Clock Screen
III. Clock Screen www.tanbead.com... - Page 26 Year(YYYY) : The digits from 0000 to 9999 Month(MM) : The digits from 01 to 12 Day(DD) : The digits from 01 to 31 Hours(hh) : The digits from 00 to 23 Minutes(mm) : The digits from 00 to 59 Seconds(ss) : The digits from 00 to 59 www.tanbead.com...
-
Page 27: Iv. Usb Screen
IV. USB Screen Import Procedure(from instrument to USB) www.tanbead.com... - Page 28 Export Procedure (from USB to instrument) www.tanbead.com...
-
Page 29: Temperature Screen
TEMP Screen www.tanbead.com... - Page 30 Present : Real working temperature (℃). Preset: Set temperature of bottom stainless plate . Range from RT to 70(℃). Set Period : Set up the working time. ( hh : mm ) Start : Start time .( hh : mm ) End: Estimated the end time.
-
Page 31: Vi. Uv Lamp Screen
VI. UV LAMP Screen www.tanbead.com... - Page 32 Set Period : Set working time of UV Lamp. ( hh : mm ) Start : Start time .( hh : mm ) End: Estimated the end time. ( hh : mm ) : It shows current time in the right lower corner. Time is 24-hour format.
-
Page 33: Introduction Of Run Screen
Introduction of RUN Screen VOLUME :The buffer volume in the well (μl) START :Start time of program(hh:mm:ss) Pause : Pause time(hh:mm:ss) :End time of program(hh:mm:ss) www.tanbead.com... - Page 34 :Return to the “Home Screen” at the status of END. :Return to the “Program Screen” at the status of END. SET:Preset working temperature. It shows “NA”, when there is no preset input. NOW:Real working temperature It shows “NC”, when there is no connection with thermal couple.
-
Page 35: Introduction Of Execution Condition
Introduction of execution condition How to START www.tanbead.com... - Page 36 1)Touch parameter area at the screen last longer, the program name will show up in the green block. 2)Confirm two things before you start the program. Ⅰ.Did you put reagent plate toward outside by the missing corner and push it to the bottom of plate rack? Ⅱ.Did you put 8-channel strip to the bottom of strip rack? www.tanbead.com...
-
Page 37: How To Pause
How to PAUSE 2.1 If you press the button in the process of executing program, the execution will be paused immediately. The robot will stop working and move back to the top. Meanwhile, other buttons will be unworkable. : In Collect step, the robot can not be stopped immediately. -
Page 38: How To Stop
3. How to STOP 3.1 Press the button in the process of executing program, the execution will be stopped immediately. The robot will stop working immediately and it shows “STOP?” at status row. Press the button again to confirm terminating the program and the robot will go back to the initial site. -
Page 39: Installation The Sla-E13200
Installation the SLA-E13200 1.1 Installation crew: 1.1.1 Instrument installation: With general electronic concepts, Volt-Ohm-Milliammeter for inspection. Pass the training of Automatic Platform for Magnetic System. 1.1.2 Reagent testing: With polytechnic, biomedical background, could communicate the operation question with customer. ... - Page 40 Operation Validation Contents Function Operation: UV Lamp, heating function, safe door, buzzer etc. Software testing: Use the standard consumables to test. C. Other: Light and alarm etc. (regard if necessary) 1.4 Performance Validation Inspect the instrument in the fully state could conform the user requirements.
-
Page 41: Cleaning The Sla-E13200
Cleaning the SLA-E13200 1.1 Cleaning the case Wiping with 75% ethanol solution. 1.2 Cleaning the inner instrument Wiping with 75% ethanol solution in the inner region. The magnetic rod and aluminum rod is connecting by adhesive. Please do not wiping with ethanol solution. -
Page 42: Maintain The Sla-E13200
Maintain the SLA-E13200 1.1 Maintain Cycle: Once a year. 1.2 Maintain by the engineer who pass the training regular. 1.3 Maintain Content External inspecting: Only inspecting an external. Internal inspecting: Split the case, inspecting an internal. Software testing: Execute program “DEMO” to confirm instrument is executing in normal. -
Page 43: Storage And Transport
Storage and Transport 1.1 Storage Storage condition: Storage temperature range: 5 - 50℃ Storage humidity range: <80% Operation condition: Operation temperature range: 5 - 50℃ Operation humidity range: <80% 1.2 Transport To avoid damaging the linear side through the transport, please use the fixing plate or fixing screws fix the mechanism before transporting. -
Page 44: Disposal Machine
Disposal machine 1.1 The strips and reagent plates, reagent tubes which contact with the specimen are potentially infectious. Those are belonged to industrial waste. Please follow the infectious waste treatment. After use, please put in the bucket. 1.2 The used instrument its inner region maybe will infect by specimen. -
Page 45: Chart Of Pre-Loaded Programs
Chart of Pre-loaded Program : There are 13 pre-loaded programs in the machine. Program No Program Name Model DEMO SLA-E13200 BLOOD-AUTO SLA-E13200 VIRUS-W4-AUTO SLA-E13200 VIRUS-40-5 SLA-E13200 B10-W4-AUTO SLA-E13200 L-BNA-PK-AUTO SLA-E13200 RNA-BWE-AUTO SLA-E13200 DNA-RICE-AUTO SLA-E13200 BWE-AUTO SLA-E13200 PK-10MIN SLA-E13200 PK-20MIN SLA-E13200 PK-30MIN SLA-E13200 VALIDATION... -
Page 46: The Picture Of Wiring At The Back Of Controller
The picture of wiring at the back of controller LCD contrast White 4PIN outlet connecting to stepping motor White 2PIN outlet connecting to DC 24V Black 3PIN outlet (X, Y, Z) connecting to 3-axis zero sensor Black 3PIN outlet (D) connecting to emergency door It means variable electric resistance. -
Page 47: Troubleshooting Guide
Troubleshooting guide Problems Suggestions Did you turn on the power system It displays nothing on already? the screen. Did the plug connect with the power system? Measure the voltage of outlet. Check the strip to see if it has Noises from the been pushed into the bottom of machine. - Page 48 Check the heating switch The function of heating is to see if it has been turned abnormal. The temperature doesn’t Contact service center: increase. 886-3-3607555. Be sure to put a clean strip Stain on the magnetic on the strip rack whenever rod.
-
Page 49: Program Import/ Export
Program import/ export 1. Accessory 1.1 AutoMag.rar file (AutoMag 4.1) 1.2 USB to serial converter driver disc 1.3 RS-232 transmission cable 1.4 USB connection cable 2. Install AutoMag software 2.1 Copy AutoMag.rar to your computer and extract it. 2.2 If you don’t have any decompression software, please contact your dealer to obtain AutoMag file. - Page 50 3. Transmit AutoMag program 3.1 RS-232 transmission cable can be connected to the RS232 port of PC. The preset port is COM1. 3.2 For portable computers without RS-232 port, you should connect USB connection cable to USB port. Please install USB to serial converter driver.
-
Page 51: Automag Software
AutoMag software 1. Log in 1.1Key in user name and password (6 digits at most) 1.2 Change your password 1.3 Confirm your password 1.4 Protocol Edit Window www.tanbead.com... - Page 52 2. Instruction of keys File: New- open a new file Open- open an old file Save- Save a file End- close the file Edit: Cut Copy Paste Move up Move down Insert Delete COM Port: Choose a COM port. There 16 COM ports.
- Page 53 used port checked control/system/device manage/port. Export: Export the program from a computer to a machine. Import: Import the program from a machine to a computer. Excel: Transfer the program data or program list to Excel. Use Excel software to print the program data or program list in machine.
- Page 54 3. Instruction of the usage and function of icons 3.1 Open a new file 3.2 Open an old file 3.3 Save a file 3.4 Cut When you select a certain row, you could cut off a whole row of data. However, if you highlight a certain cell, all you could cut is the data in the field length that you mark.
- Page 55 Insert a row of blank space. 3.10 Delete You could delete a whole row of data when you select a certain row. However, if you highlight a certain cell, all you could delete is the data in the field length. 4.
- Page 56 Well: The maximum amount working during a program is 6 well. Please refer to the picture of reagent plate. First group is from column #1 to #6. Second group is from column #7 to #12. Temp (℃): working temperature of bottom stainless plate ...
- Page 57 Collect (S): working time of magnetic rod The time using magnetic rod to collect magnetic beads. (seconds) 999 seconds is the maximum. : It takes 30 seconds to move the magnetic rod reaching the lowest position. Therefore, do not set collect time less than 30 seconds.
- Page 58 Pause: short stop after finishing the step Drop-down list to select “ON” or “OFF”. ON : It will stop after finishing this step. OFF : It will not stop after finishing this step. : When you pause, the robot will remain the same action and move to the top and the buzzer will ringing at the same time.
- Page 59 5. When you use the AutoMag software, please pay attention to the matter below 5.1 Could use the mouse or the keyboard to move the cursor. Use the mouse, you could move the cursor to the place that you edit, and then click left key of mouse. ...
- Page 60 5.6 Transmit program If you want to transmit the program from a computer to a machine, please save the program first, and then key in the number of the program that you are going to transmit. After that, click “Export”. If it is transmitted normally, a word “Success”...
-
Page 61: Manufacture
Manufacturer Taiwan Advanced Nanotech Inc. No.2, Aly. 12, Ln. 81, Longshou St., Taoyuan City, Taoyuan County 330, Taiwan (R.O.C.) TEL:+886-3-3607555 http://www.tanbead.com www.tanbead.com...
Need help?
Do you have a question about the Smart LabAssist Series and is the answer not in the manual?
Questions and answers