Advertisement
OVERVIEW


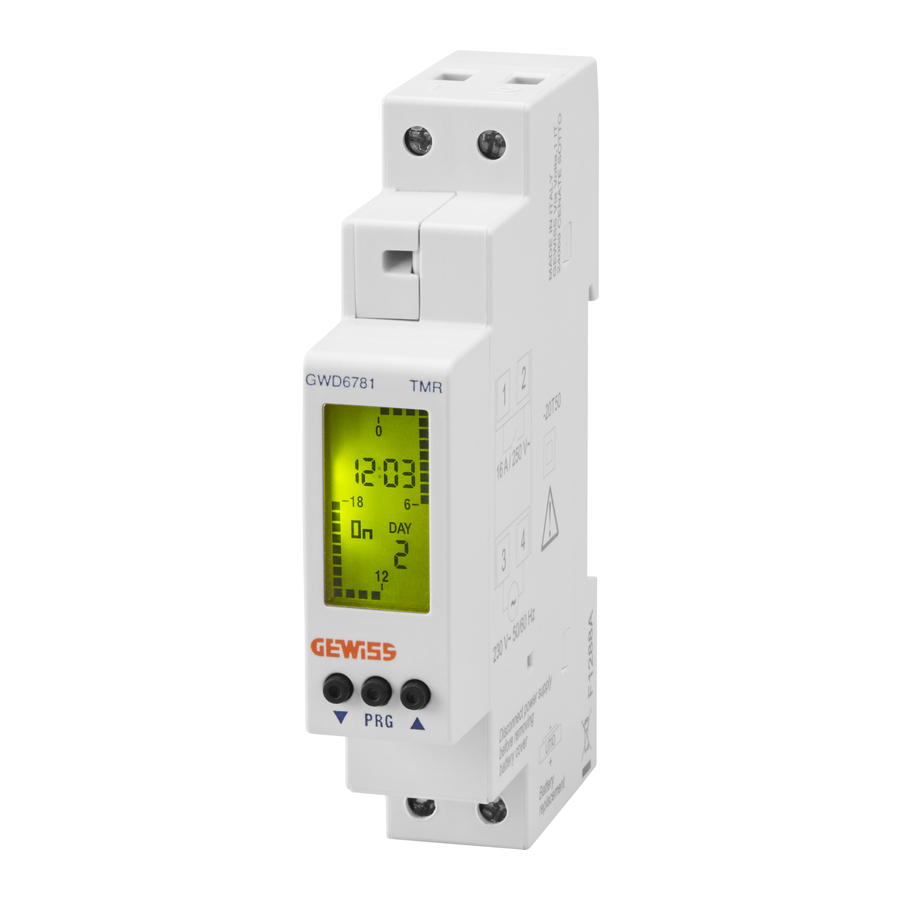
Electronic time switch with weekly programming for the control of an electrical load. Combines the precision of digital switches with the ease of programming of electromechanical tappet switches. The hatch on the front of the device enables the battery to be replaced once it is flat. It is an electronic device that carries out 1B type actions, and is designed to operate in environments with category III overvoltage and degree of pollution 2 according to the standard EN 60730-1.
| Code | Description |
| GWD6781 | Weekly digital time tappet switch |
SAFETY WARNINGS
The following indications must be respected during the installation and operation of the device:
- The device must be installed by a qualified person, scrupulously respecting the connection diagrams.
- Do not supply power to the device if any part is damaged.
- The device must be installed and put into operation in accordance with current legislation regarding electrical systems.
- An overcurrent protection device must be installed in the electrical system, upstream of the product.
- Check that the conductors are not live before accessing the connection terminals.
- Ensure that it is not possible to access the connection terminals without the use of special tools after installation.
- Do not carry out repairs in the event of device malfunction, and contact the technical assistance service.
TECHNICAL CHARACTERISTICS
- Power supply: 230 VAC (-15% ÷ +10%) 50/60 Hz
- Absorption: 5.5 VA (1 W)
- Output: normally open relay, 16 A/ 250 VAC
- Programming: weekly (a different programme for every day of the week)
- Programming resolution: 30 minutes
- Automatic update of solar time/ daylight saving time (can be isolated) in accordance with the geographical area of installation (Europe, North America, Australia, Chile, New Zealand)
- Backlighting of the display activates with the mains power supply
- Replaceable backup battery, CR-1632 type (lifespan: approx. 4 years)
- Operating temperature: -20 to +50°C
- Storage temperature: -10 to +70°C
- Operating humidity: 20÷90% non-condensing
- Container: 1 DIN module
- Degree of protection: IP20
DISPLAY DESCRIPTION
(Fig. B)

- Current time indication
- Indication of year, month, day set (displayed in advanced prog.)
- Set programming
- Relay status
- Relay switchover block active
- Programming menu active (PROG)
- Advanced programming menu active (SET)
- Day of the week
- Tappet off: relay OFF
- Tappet on: relay ON
INSTALLATION

The device is supplied with the battery inserted and the date set. It is possible to wake up the device (display switches on without backlight) by pressing the key. Connect the power supply and the relay output as shown in the box in Fig A.
The backlight is turned on as soon as the device is powered up, and remains on at all times (when mains power is present).
NOTE: The momentary relay only switches if the device is connected to the mains.
PROGRAMMING
In the GWD6781, the programming includes 7 different programmes, one for each day of the week. Each programme is defined by the position of the 48 tappets (one every 30 minutes), which can be switched on (relay on) or off (relay off). The first time the device is started, the tappets for all programmes are switched off (relay off).
To change the programming:

- from the main page, press the
![]() button. The first day will flash (Monday)
button. The first day will flash (Monday) - choose the day of the week that you wish to change (1 = Monday, ..., 7 = Sunday) with the
![]() and
and ![]() buttons and confirm by pressing
buttons and confirm by pressing ![]()
- the programming starts from midnight (00:00) of the selected day
- use keys
![]() or
or ![]() to set the tappet ( = relay on, = relay off) and press to confirm and advance 30 minutes (to the next tappet)
to set the tappet ( = relay on, = relay off) and press to confirm and advance 30 minutes (to the next tappet) - once the desired programming has been obtained for that day, keep the
![]() key pressed down for at least 3 seconds to exit and return to the choice of day
key pressed down for at least 3 seconds to exit and return to the choice of day - repeat steps 2, 3, 4, 5 until each day of the week has been Impostazion programmed ora
- once the desired programming has been obtained, keep the
![]() key pressed down for at least 3 seconds to exit and return to the main page.
key pressed down for at least 3 seconds to exit and return to the main page.


NOTE: you exit programming even if no key is pressed within the time-out (40 seconds if the device is powered by an electric relay, 10 seconds if powered by the backup battery). The changes are saved anyway.
Copy function
The copy function enables the programming from one day to be copied to any other day.

To copy an existing programme to another day:
- go to the relevant day change menu (points 1, 2, 3 of basic programming)
- press the
![]() and
and ![]() buttons simultaneously. The words
buttons simultaneously. The words ![]() will appear on the display, and the day to be copied will flash
will appear on the display, and the day to be copied will flash - choose the day you want to copy with the
![]() and
and ![]() buttons and confirm with the
buttons and confirm with the ![]() button.
button.
 buttons simultaneously. The words
  will
will Viewing the data and programmes
From the main page, pressing the  button will allow you to view the programmes for each day in succession, followed by the date set (day and month). To move from one programme to the next, press the button.
ADVANCED PROGRAMMING
From the main screen, pressing and holding the  button (>3 seconds) allows you to set:
- geographical area of installation,
- date, time,
- updated daylight saving time,
- the operating mode (daily or weekly).

(*) Daylight saving/standard time change
If the automatic update of daylight saving time is active (on), the change takes place according to the geographical area set:
| Area | DST start (+1h) | DST end (-1h) |
| 01 Europe | Last Sunday of March | Last Sunday of October |
| 02 North America | Second Sunday of March | First Sunday of November |
| 03 Australia | First Sunday of October | First Sunday of April |
| 04 Chile | Second Sunday of October | Second Sunday of March |
| 05 New Zealand | Last Sunday of September | First Sunday of April |
NOTE: the time change is fixed for all zones at 2:00 am for the start of the DST and at 3:00 am for the end of the DST.
Functioning mode

In the GWD6781, after the "change daylight saving time/ solar time" menu, you can access the menu which enables the operating mode to be selected: daily (1) or weekly (7). If this is set to daily, the device works like a daily time switch, running the same programme every day.
NOTE: you exit programming even if no key is pressed within the time-out (40 seconds if the device is powered by an electric relay, 10 seconds if powered by the backup battery). If this occurs, the changes are not saved.
MANUAL RELAY SWITCHOVER
To change the relay output status manually (from ON to OFF or vice-versa) press key  .
.
 Attention: the status is maintained until the key is pressed again or until the next programmed switchover.
To block the current status of the relay and to prevent switching, press and hold (> 3 seconds) the key . The symbol  is on in this status.
To unlock the status, press and hold (> 3 seconds) the key.
LOW BATTERY
When the power of the backup battery is low, the device displays the text  alternating with the main page. If this is the case, replace the battery as soon as possible by accessing the battery compartment, to prevent the date and time from being lost in the event of a power failure.

Attention: disconnect the power supply before accessing the battery compartment.
Attention: carry out the operation in a maximum time of one minute so as not to lose the date and time set. Use CR-1632 type batteries only.
DEFAULT PARAMETERS
The default parameters return the device to the factory settings, i.e.:
- geographical area: 1 (Europe)
- automatic daylight saving time change: active
- programming: always OFF
To restore the default, from the main screen, keep the keys  ,
,  and
and  pressed simultaneously for at least 3 seconds and, while the text
  is flashing, confirm by pressing the key.
Attention: if no key is pressed within 5 seconds while the text is flashing, the device returns to the main screen without resetting.
REFERENCE STANDARDS
Compliance with EU Directives: 2014/35/EU (LVD), 2014/30/EU (E.M.C.D.) is declared in reference to the following harmonised standards: EN 60730-2-7
Contact details according to the relevant European Directives and Regulations:
GEWISS S.p. A. Via A.Volta, 1 IT-24069 Cenate Sotto (BG) Italy tel: +39 035 946 111 E-mail: qualitymarks@gewiss.com
 |  | +39 035 946 111 8.30 - 12.30 / 14.00 - 18.00 monday ÷ friday |  | +39 035 946 260 |  | sat@ gewiss.com www.gewiss.com |

Documents / Resources
References
Download manual
Here you can download full pdf version of manual, it may contain additional safety instructions, warranty information, FCC rules, etc.
Download Gewiss 90 TMR GWD6781 - Digital Time Tappet Switch Manual
Advertisement


Need help?
Do you have a question about the 90 TMR and is the answer not in the manual?
Questions and answers