Table of Contents
Advertisement
Advertisement
Table of Contents

Summary of Contents for CHAMPIONX SOOFIE
- Page 1 REPAIR AND MAINTENANCE GUIDE July 2022 – rev 1...
-
Page 2: Table Of Contents
Common Operational Issues ..............................3 General Recommended Maintenance ............................ 4 SOOFIE Support Contact ................................ 4 12 Volt Power System Wiring Diagram and General SOOFIE Components ................5 Methane Sensor Orientation ..............................8 Temperature and Humidity Sensor (SHT85) Orientation ......................8 Correct Sensor Board Mount Location ............................ -
Page 3: Common Operational Issues
• Boron/Argon in fault state • Press and release reset button on Boron/Argon Fan spinning; Boron/Argon LED • Incorrect Boron/Argon • Contact SOOFIE support to confirm/update device pulsing cyan; no data registered to site registration • Check solar fuse for correct insertion and function Solar fuse not inserted correctly •... -
Page 4: General Recommended Maintenance
Clean panel surface with water or Solar Panel Optional damp cloth Intake Fan Filter Replace Annually SOOFIE Support Contact Please contact us regarding SOOFIE device and dashboard questions SOOFIE Support Email: Support@ScientificAviation.com SOOFIE Support Number: (720) 836-0481 M-F 7am-4:30pm MST July 2022 – rev 1... -
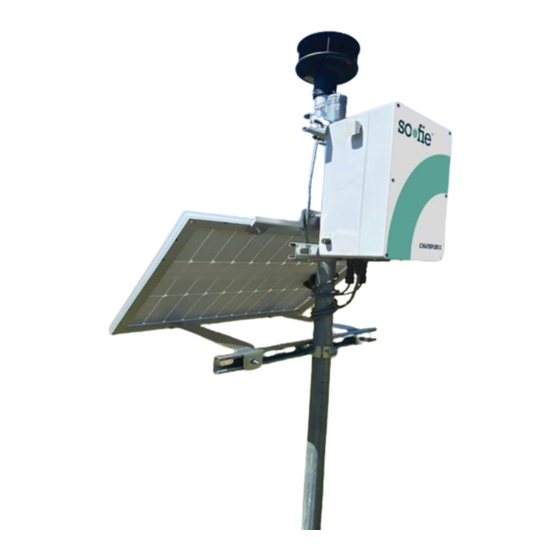
Page 5: Volt Power System Wiring Diagram And General Soofie Components
12 Volt Power System Wiring Diagram and General SOOFIE Components Exhaust Ba�ery Solar Charge Controller Sensor Board Internal Sonic Cable Connec�on Ba�ery Solar Fuse Fuse Intake Holder Holder July 2022 – rev 1... - Page 6 External Fan Filter Sonic Cable Connec�on Solar Ba�ery Fuse Fuse Holder Holder Solar (+) Solar (-) Connec�on Connec�on Op�onal Electrochemical sensor (H S, CO, SO Boron OR Argon (Micro- , NO) processor/COMMS Device) Op�onal Sensor (H Temperature/ Pressure CO, SO , NO , NO) RH Sensor...
- Page 7 Micro -USB Micro -USB Input Input RGB Status RGB Status Light Light Reset Mode Reset Mode Bu�on Bu�on Bu�on Bu�on Serial Number Bluetooth Antenna Serial Wi-Fi Connec�on Number Antenna (NOT USED) LTE Antenna Connec�on Connec�on Ba�ery Posi�ve (+) Cable Ba�ery Nega�ve (-) Cable Boron/...
-
Page 8: Methane Sensor Orientation
Temperature and Humidity Sensor (SHT85) Orientation Some SOOFIE sensor boards have removable temperature/relative humidity sensors. When handling the temperature/relative humidity sensor, please do not touch the square white PTFE filter covering the sensor element. The square white PTFE filter must be facing away from the methane sensor and all 4 pins must be aligned in its socket, as shown below. -
Page 9: Correct Sensor Board Mount Location
Correct Sensor Board Mount Location The most recent sensor board brackets are screwed into the enclosure. The correct position is just below the solar charge controller, as shown below. July 2022 – rev 1... -
Page 10: Boron/Argon Led Guide
Boron/Argon LED Guide Normal SOOFIE Operation LED Behavior Status Description Breathing/Pulsing cyan Connected Device is connected to the internet and taking readings Blinking magenta OTA (Over the Air) Firmware Currently loading an app or Update updating its firmware green Blinking... -
Page 11: Check Signal Strength Of A Connected Boron
Check Signal Strength of a Connected Boron When Boron is Breathing/Pulsing cyan; tapping the MODE button on your device will blink out the bars of cellular signal strength. 1-5 blinks (1 blink is about 20% of maximum signal) July 2022 – rev 1... -
Page 12: Anemometer Relay Board Installation
Anemometer Relay Board Installation 1. Open SOOFIE box with the attached anemometer using a Phillips #2 screwdriver to remove the six M4x0.7 – 25mm pan head Phillips lid screws to open SOOFIE lid. Ensure the lid sealing gasket remains in lid channel and is not twisted. - Page 13 4. Reconnect the anemometer cable to the new anemometer relay board. Existing cable tie may need to be separated for wires to not be strained. 1. Reattach the SOOFIE cover and tighten screws to 9 in-lbs. of torque. Inspect the cover circumference to verify the sealing gasket is properly seated and leak-free.
-
Page 14: Inhand Router Retrofit And Installation
1. Power off SOOFIE by removing the RIGHT fuse and then the LEFT fuse. 2. Open SOOFIE box using a Phillips #2 screwdriver to remove the six M4x0.7 – 25mm pan head Phillips lid screws. Ensure the lid sealing gasket remains in lid channel and is not twisted. - Page 15 8. Power up the SOOFIE by inserting the LEFT fuse and then the RIGHT fuse. 9. Confirm that the “Cellular” indicator light comes on and remains solid (note: this could take 5-10 minutes). If the light doesn’t come on or fails to become solid after 5-10 minutes, please contact SOOFIE support at (720)-836-0481.
-
Page 16: Inhand Router Led Guide
InHand Router LED Guide Color Operation Off – No Power Power (Solid) On – Powered Green Off – No Power/ Fault Status (Solid) On – System Initialized Yellow Flashing – Dialing/ No Signal Cellular (Flashing/Solid) Solid – Connected to Verizon Red –... -
Page 17: Electrochemical Sensor Install
1. Power off SOOFIE by removing the RIGHT fuse and then the LEFT fuse. 2. Use Phillips #2 screwdriver and remove six M4x0.7 – 25mm pan head Phillips screws to open SOOFIE lid. Ensure lid gasket remains in lid channel and is not twisted. Carefully un-plug all three connections to the sensor board by pulling on the plastic housing. - Page 18 Do not touch the white chemical filter. 6. Insert plastic legs into SOOFIE sensor board (push until you hear a click). There are two sets of 4 holes, use the set furthest away from the black header connector (see pictures)
- Page 19 7. Align the 6 connector pins on electrochemical sensor with the 6 connector receptacles on the sensor board while aligning the 4 legs. Firmly push electrochemical sensor onto the 4 legs of the sensor board until you hear a click from all 4. Ensure equal pressure around both boards to prevent damage to the PCBs. Do not touch the white chemical filter.
- Page 20 9. Insert Boron/Argon microprocessor into the sensor board, be sure all pins are aligned. 10. Reattach the SOOFIE cover and tighten screws to 9 in-lbs. of torque. Inspect the cover circumference to verify the sealing gasket is properly seated and leak-free.
-
Page 21: Soofie Intake Filter Assembly - Cleaning And Replacement
4. Remove the four #2 Phillips-head screws securing the intake filter to the box; discard the old filter housing. 5. Install the new filter housing on the bottom of the SOOFIE enclosure. Ensure that the fan is oriented with its label facing upwards (label must be visible) and its wires exit towards the left of the box. -
Page 22: Fan Replacement
1. Power off SOOFIE by removing the RIGHT fuse and then the LEFT fuse. 2. Open SOOFIE box using a Phillips #2 screwdriver to remove the six M4x0.7 – 25mm pan head Phillips lid screws. Ensure the lid sealing gasket remains in lid channel and is not twisted. - Page 23 10. The fan should start to spin, if it does not loosen the fan screws as they may have been over tightened. 11. Reattach the SOOFIE cover and tighten screws to 9 in-lbs. of torque. Inspect the cover circumference to verify the sealing gasket is properly seated and leak-free.
-
Page 24: Fuse Installation Issues
Fuse Installation Issues The fuse holder has a bayonet style connection. 2 tabs on the fuse holder cap must line up with slots in the fuse holder to be inserted. There is a spring in the fuse holder cap that provides force on the fuse to contact points in the fuse holder. The fuse holder cap needs to be pushed in and turned about ¼... -
Page 25: Solar Panel Power Output Testing
5. After testing is complete, reconnect the solar panel leads by inserting them into their corresponding receptacle and push in until the tabs lock into place. 6. Power up the SOOFIE by inserting the LEFT fuse and then the RIGHT fuse. July 2022 – rev 1...
Need help?
Do you have a question about the SOOFIE and is the answer not in the manual?
Questions and answers