Advertisement
Quick Links
INSTALLATION INSTRUCTIONS
DX16.5 Actuator (Formerly Model 16.5K) for 16,500 lbs Capacity Trailer Brakes
7
7
2
8
4
2
READ AND UNDERSTAND THE ENTIRE INSTRUCTION/ASSEMBLY
PROCEDURE BEFORE INSTALLATION.
The DX16.5 works by the "surge" or "push" of the trailer toward the
tow vehicle. This automatically synchronizes the trailer brakes with the
brakes on the tow vehicle. When the trailer pushes against the tow
vehicle, the actuator telescopes together and applies the force to the
master cylinder, supplying hydraulic pressure to the brakes. The built
in sealed and independent dampening shock absorber controls the
telescoping shock against the hitch.
Be sure to comply with regulations for brakes in your state. Brake laws
sometimes are minimum standards and you may wish to add additional
brakes to your trailer to meet minimum Gross Vehicle Weight Ratings
(G.V.W.R.). Note: G.V.W.R. is the Gross Vehicle Weight Rating which
includes the trailer and the load weight as a Total Gross Weight.
READ YOUR TOW VEHICLE OWNER'S MANUAL ON TOWING CAPACITY
AND OTHER TOWING RECOMMENDATIONS BEFORE INSTALLATION.
The DX16.5 Actuator is completely assembled and ready to bolt into
place (Tongue sizes: 3"x 4" & 3"x 5", 9 ga. min.).
1. Bolt the actuator to the tongue using 5/8" diameter, 4" long grade
5 bolts. Attachment strength should equal or exceed 1-1/2 times
trailer G.V.W.R.
2. Hydraulic brake lines should be installed on the trailer as
described in the installation manual supplied with the brakes.
Note: Some disc brakes require the use of flexible brake lines
at the connection point on the brake caliper. Follow brake
manufacturer instructions.
3.
Use only DOT-3 brake fluid in the DX16.5 actuator. Use a pressure
type brake bleeder to bleed brakes. Follow manufacturer's directions.
Or, manually bleed the brakes using directions on page 3.
4.
To bleed master cylinder and brakes, install bleeder hose on first
©2019 Dexter Axle Company | www.dexteraxle.com
9
1
4
3
4
1A & 5
1A
6
1C
#
TDE Part #
1A
70403K
1A
70403KD
10
1B
11286-BLK
1C
17028SA
2
70404K
1B
3
70407K
4
70408K
5
48986A
6
50306
7
50307K
8
70409K
9
70405K
10
70406
wheel cylinder to be bled; if tandem axle trailer, bleed farthest axle
first, and the farthest brake on that axle first. Use a loose end of
hose from the bleeder valve submerged in a clear container of brake
fluid to observe bubbling (hose must be submerged into clean brake
fluid to keep air from traveling back into the brake cylinder). Loosen
the bleeder screw located in the wheel cylinder one turn; the system
is now open to the atmosphere. The bleeding operation for that brake
is complete when bubbling stops. Be sure to tighten bleeder screw
securely. Each wheel cylinder must be bled until all air is out of the
lines. Replenish the brake fluid during the bleeding process so the
level does not fall below half full level in the master cylinder reservoir.
When bleeding and testing is completed, make sure master cylinder
is filled to approximately 3/8" below the top of the reservoir and
filler cap is securely in place.
5. Road test trailer a short distance to activate the actuator several
times. Check fluid level again. Remember, low brake fluid levels will
result in reduced braking or no braking at all.
6.
When testing is complete, make sure master cylinder is filled to
approximately 3/8" below the top of the reservoir and filler cap is
securely in place. Road test again to make sure brakes work properly.
-1-
DX Part #
Description
Disc Brake DX16.5 Master
K68-523-21
Cylinder Kit: master cylinder, cap
and 4 mounting screws
Drum Brake DX16.5 Master
K68-523-01
Cylinder Kit: master cylinder, cap
and 4 mounting screws
Disc Brake Solenoid - used with
054-240-00
Disc brake actuators
Dampener Cylinder (each) 2
052-017-00
required
Wear Pad Kit: upper and lower
K68-540-00
wear pads
K68-532-00
Emergency Stop Lever and Spring
Actuator Pin Kit: 3 pins with
K68-519-00
retainers and pin kit
Master Cylinder Cap with internal
068-572-00
bladder
074-480-00
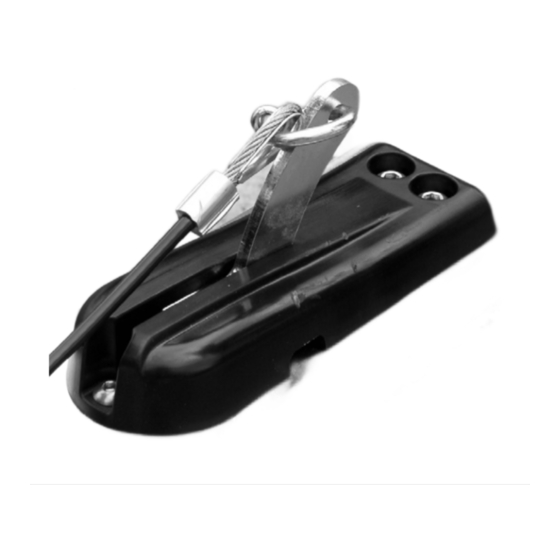
Safety Pin and Cable Assembly
Emergency Stop Cable with
K68-529-00
Connector Link
K74-571-00
Latch Kit
Emergency Stop Lever Cover and
068-576-00
Spring and 3 mounting screws
068-560-00
Rear Cover
059-Z01-06 2019.10 | 08197
Advertisement

Subscribe to Our Youtube Channel
Related Manuals for Dexter Laundry DX16.5

Summary of Contents for Dexter Laundry DX16.5
- Page 1 Master Cylinder Cap with internal PROCEDURE BEFORE INSTALLATION. 48986A 068-572-00 bladder The DX16.5 works by the “surge” or “push” of the trailer toward the 50306 074-480-00 Safety Pin and Cable Assembly tow vehicle. This automatically synchronizes the trailer brakes with the Emergency Stop Cable with brakes on the tow vehicle.
- Page 2 SERIOUS PROPERTY DAMAGE, INJURY OR DEATH. system, and the tow vehicle. DX16.5 will accept 2-5/16” trailer hitch balls with a 16,500 lb. Automatic Free-Backing (backing-up without braking action) is capacity only. Trailer balls larger than 2-5/16” or out of round will possible with this Actuator when supplied with an electrically operated not fit he coupler or may result in coupler failure.
- Page 3 9. Test brakes in a protected area such as a parking lot or side street. EMERGENCY STOP CABLE OR E-STOP CABLE The DX16.5 actuator is supplied with an emergency stop system that applies the brakes in the unlikely situation were the trailer becomes disconnected from the tow vehicle.
- Page 4 WARNING: IT IS POSSIBLE THAT THE E-STOP CAN BE ACTIVATED BY RELEASING THE E-STOP PULLING ON THE CABLE IN VARIOUS WAYS. Always check the position of the E-stop lever to make sure it is not in a 1. Forgetting to disconnect the E-stop cable from the tow vehicle and locked position.
Need help?
Do you have a question about the DX16.5 and is the answer not in the manual?
Questions and answers