
Related Manuals for SwitchDoc Labs OUR WEATHER

Summary of Contents for SwitchDoc Labs OUR WEATHER
- Page 1 Assembly and Operation Manual February 2020 www.switchdoc.com Page 1 of 56 February 2020...
-
Page 2: Table Of Contents
What is in the OurWeather Box? ....................5 ..............................11 ..............................13 ..............................14 Step By Step Assembly ......................17 Building the Weather Sensors ....................24 Testing the OurWeather Weather Station ................. 36 Power Up OurWeather ......................39 Setting up your OurWeather WiFi Connection ................ 40 Looking at the OurWeather Webpage .................. - Page 3 www.switchdoc.com Page 3 of 56 February 2020...
- Page 4 www.switchdoc.com Page 4 of 56 February 2020...
-
Page 5: What Is In The Ourweather Box
What is in the OurWeather Box? Following is a list of all the parts included in OurWeather. A - Micro USB 5V Power Supply www.switchdoc.com Page 5 of 56 February 2020... - Page 6 B - Grove OLED Display www.switchdoc.com Page 6 of 56 February 2020...
- Page 7 C – WiFi Antenna www.switchdoc.com Page 7 of 56 February 2020...
- Page 8 D -Grove Outdoor Temperature and Humidity Sensor SHT30 www.switchdoc.com Page 8 of 56 February 2020...
- Page 9 E – M2 Box of Nylon standoffs, screws and bolts F - Grove Cable (One included) www.switchdoc.com Page 9 of 56 February 2020...
- Page 10 G - Wind Direction Wind Vane H - Bracket for Anemometer and Wind Vane www.switchdoc.com Page 10 of 56 February 2020...
- Page 11 I - Rain Bucket J - Wind Speed Anemometer www.switchdoc.com Page 11 of 56 February 2020...
- Page 12 K - Rain Gauge Mounting Assembly L - Wire Ties www.switchdoc.com Page 12 of 56 February 2020...
- Page 13 M - Metal Mounting Tubes M - Metal Mounting Mast for Weather Instruments N – No Part www.switchdoc.com Page 13 of 56 February 2020...
- Page 14 O - Mounting Brackets for Metal Mast P - Screws for Mounting Weather Instruments to Brackets. Contains two small self tapping screws and three screws with bolts www.switchdoc.com Page 14 of 56 February 2020...
- Page 15 Q – OurWeather Base Stand www.switchdoc.com Page 15 of 56 February 2020...
- Page 16 R – WeatherPlus2 Computer Board www.switchdoc.com Page 16 of 56 February 2020...
-
Page 17: Step By Step Assembly
Step By Step Assembly Building the Computer Module. Step 1 – Take the OurWeather Base 3D Print (Q) and put four standoffs and bolts from the Nylon Spacers (E) into each of the four corners of the Base Print. Step 2 – Using Super Glue, place a standoff (E) in each of the remain pylon holes on the OurWeather Base 3D Print (Q). - Page 18 Red cap if present) and attach it to the Base using the brass nut and screw. Route the wire up through the “O” in the SwitchDoc Labs Logo on the OurWeather Base (Q). Screw on the black antenna on the connector from the top of the OurWeather Base as shown below.
- Page 19 www.switchdoc.com Page 19 of 56 February 2020...
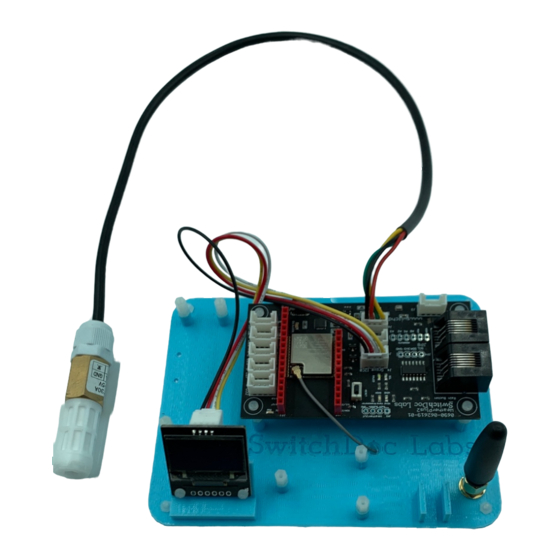
- Page 20 Step 5 – Attach the WeatherPlus2 Board (R) to the OurWeather Base unit (Q) using four screws from the M2 Nylon box (E). Take the small gold part of the WiFi Antenna Wire (C) and push it gently down on the www.switchdoc.com Page 20 of 56 February 2020...
- Page 21 Step 6 - Plug a Grove Cable (F) in the OLED Display (B) and then into the I2C Grove Connector on the WeatherPlus2 Board(R) (any I2C socket will work, use the front one on the WeatherPlus2 Board) www.switchdoc.com Page 21 of 56 February 2020...
- Page 22 Step 7 - Plug in the Grove connector from the SHT30 Outdoor Temp/Humidity Sensor (D) into the I2C Grove Connector Slot on the WeatherPlus2 (Q) Any I2C Grove socket will work, use the one on the back of the WeatherPlus2 Board(Q). www.switchdoc.com Page 22 of 56 February 2020...
- Page 23 Step 8 - This completes the assembly of the OurWeather Base Computer Module. Check your work over at this point. www.switchdoc.com Page 23 of 56 February 2020...
-
Page 24: Building The Weather Sensors
Building the Weather Sensors Step 9 - Pick up the Metal Mounting Mast (M) with the mounting holes drilled in the top of the mast. www.switchdoc.com Page 24 of 56 February 2020... - Page 25 Step 10 - Place the Bracket for the Wind Vane and Anemometer (H) into the Mounting Mast (M) from Step 9. Note the Mounting tab in the bracket and Key in the Mounting Mast and make sure they are aligned. Step 11 - Take a screw and bolt (P), remove the bolt, slide the screw through the hole in the Mounting Mast (M) from step and tighten the bolt to the Mast.
- Page 26 Step 12 - Take the Rain Gauge Mounting Assembly (K) and slide it on the Mounting Mast (M) to about 5 inches from the top of the Mast as shown. Tighten the bolts to secure the Rain Gauge Mounting Assembly to the the Mounting Mast. Note that the Square Bracket points towards the top of the Mast.
- Page 27 Step 13 - Take the Anemometer (J) and place it at the left end Wind Vane and Anemometer Bracket (H). Note the alignment tab on the Anemometer. www.switchdoc.com Page 27 of 56 February 2020...
- Page 28 Step 14 - Take a screw and bolt (P), slide it into the Wind Vane and Anemometer Bracket (H) under the Anemometer (J) and tighten in place to secure the Anemometer (J). www.switchdoc.com Page 28 of 56 February 2020...
- Page 29 Step 15 - Take the Wind Vane (G) and place it on the other end of the Wind Vane and Anemometer Bracket (H). Note the alignment tab on the Wind Vane. Step 16 - Take a screw and bolt (P), slide it into the Wind Vane and Anemometer Bracket (H) under the Wind Vane (G) and tighten in place to secure the Wind Vane.
- Page 30 Step 17 - Take the RJ45 plug on the cable from the Anemometer (J) and snap it into the bottom of the Wind Vane (G). The plug will only fit one way and it will snap into place. www.switchdoc.com Page 30 of 56 February 2020...
- Page 31 Step 18 - Take the Rain Gauge (I) and place it on the Rain Gauge Mounting Assembly (K) perpendicular to the Rain Gauge Mounting Assembly (K) as shown. www.switchdoc.com Page 31 of 56 February 2020...
- Page 32 Step 19 - Take a self tapping screw and screw it in the bottom of the Rain Bucket Mounting Assembly to secure the Rain Bucket. Step 20 - Push the second Mounting Mast (M) into the first Mounting Mast (M). www.switchdoc.com Page 32 of 56 February 2020...
- Page 33 Step 21 - Stand the Mounting Mast up and secure it with books, wood or bricks to keep it secure for testing. www.switchdoc.com Page 33 of 56 February 2020...
- Page 34 Step 22 - Plug the RJ54 Cable coming from the Wind Vane Assembly (G) into the Plug receptacle labeled Rain Bucket on the WeatherPlus2 board (R). Note that there are two RJ54 Plug receptacles on the WeatherPlus3 board (R). One is labeled Rain Bucket and the other is labeled Anemometer/Wind Vane.
- Page 35 Step 23 - Plug the RJ54 Cable coming from the Rain Bucket (I) into the RJ54 Plug receptacle on the WeatherPlus board (R). One is labeled Rain Bucket and the other is labeled Anemometer/Wind Vane. If you plug them in the wrong postition, nothing will be damaged, but the Weather sensors will not work until you plug them in correctly.
-
Page 36: Testing The Ourweather Weather Station
This completes the WeatherRack assembly. Note that you have clamps and wire ties left over in the assembly process for the WeatherRack. You can use these to install the WeatherRack assembly outdoors and use the wire ties to secure the cables from the WeatherRack to the Computer Assembly. You will also have a power pack left over. - Page 37 Step 2 - Plug in the Wall unit of the 5V Power Supply (A) into a 110V AC outlet. You will then see the OurWeather Logo on the OLED Display (B). If you don;t see the Logo then see the Troubleshooting section at the end of this manual.
- Page 38 Step 3 - Wait 10 minutes and then you will see the OurWeather OLED Display (B) start to cycle through current weather conditions. Step 4 - Turn the Wind Vane (G), wait until the display rotates to the Wind Direction and see if it has changed.
-
Page 39: Power Up Ourweather
Power Up OurWeather Step 1 - Get the name (often called an SSID) and password for your local WiFi network and write them here: WiFi Access Point Name: __________________________________ WiFi Access Point Password: ________________________________ Step 2 - Plug the power supply into the micro USB power plug on the WeatherPlus board Note: If you don’t want to connect up to a WiFi, just wait 5 minutes and OurWeather will start displaying your local weather information. -
Page 40: Setting Up Your Ourweather Wifi Connection
Setting up your OurWeather WiFi Connection In the previous chapter, you found your local WiFi access point name and password. We will start using all this information now to set up OurWeather on your local WiFi connection. Step 1: Unplug the OurWeather power supply. Note: Hitting reset or unplugging your OurWeather system will disconnect your from the OurWeather WiFi. - Page 41 Step 5: Connect your computer or laptop WiFi to the Wireless Access Point name (OurWeather -AA61 in our example above). Example on a Mac below. www.switchdoc.com Page 41 of 56 February 2020...
- Page 42 Step 6: Open a web browser (Safari, Chrome preferred - will work with most Internet Explorer versions) and type in “http://192.168.4.1” and shortly you will see a screen as below. Note that you only have 5 minutes to complete the next steps. Otherwise OurWeather will start displaying the weather data.
- Page 43 Example filled out page follows. Step 9: Hit Save. OurWeather will try to connect. If it doesn’t connect (for example if you typed a bad password or WiFi name - watch the screen) then it will reset it self back to Step 4 and you can try again.
-
Page 44: Looking At The Ourweather Webpage
Step 2: Find the OurWeather local IP number. To do this, either turn OurWeather on and off using the power supply or hit the RESET button on Our Weather. Step 3: As Our Weather powers up, you will see a window similar to the following: www.switchdoc.com... - Page 45 192.168.1.140 is the local IP number showing in the above picture. Your IP number will be different. www.switchdoc.com Page 45 of 56 February 2020...
- Page 46 Step 4: Open a browser window and type in the following URL: http://www.switchdoc.com/OurWeatherPage.html This will bring up the following page. Step 5: Look under “Setup OurWeather” and enter your IP number gathered in Step 3 and put in the provided box next to the “Which IP Address is OurWeather at?” button Step 6: Click on the button “Which IP Address is OurWeather at?”...
- Page 47 Step 7: Click the button at the top of the page saying “Get Current Weather” Step 8: You are now able to read OurWeather on your computer! Note: This procedure needs to be repeated on each computer (or mobile device) that you wish to read OurWeather from.
- Page 48 Description of the other “Setup OurWeather” buttons: Metric Units - Change all units to Metric on this page English Units - Change all units to English on this page Set Small Weather Display - Change the OurWeather Display to Small type Set Medium Weather Display - Change the OurWeather Display to Medium type size Set Large Weather Display - Change the OurWeather Display to Large type size Set Demo Weather Display - Change the OurWeather Display to demo mode.
-
Page 49: Advanced Usage - Ourweather Administration Page
Advanced Usage - OurWeather Administration Page For OurWeather Administrators: Note: IT IS RECOMMENDED THAT YOU SET AN ADMINISTRATION PASSWORD IMMEDIATELY TO PROTECT YOUR OURWEATHER STATION FROM BEING CHANGED BY UNAUTHORIZED PEOPLE. Step 1: Open a browser and type in the following URL: http://www.switchdoc.com/OurWeatherAdmin.html This will open a page as follows. - Page 50 Step 2: Change your Admin password. The default password for OurWeather is “admin” Now you have set a new password (38555533 in our example page above), you can use all the other functions. Button Descriptions Any of these buttons (with the exception of “Check For Latest OurWeather Version”) requires the use of the Admin password that you set in Step 2 above.
-
Page 51: Updating The Ourweather Software
The final buttons on the OurWeatherAdmin page are for doing an update of the onboard OurWeather Software. Check For Latest OurWeather Version - clicking this button checks the SwitchDoc Labs OurWeather Server to check the latest version available for update. - Page 52 During boot you can see the software version number that OurWeather is running as seen below: You can compare this version number to the available update version shown by clicking on the “Check For Latest OurWeather Version” button. www.switchdoc.com Page 52 of 56 February 2020...
-
Page 53: Buttons And Lights On The Ourweather Board
Buttons and Lights on the OurWeather Board The OurWeather Weather Kit is built upon the SwitchDoc Labs WeatherPlus2 board. There is one button on the WeatherPlus2 board. Reset - Push this button to reboot the OurWeather Kit Resetting OurWeather to Default Values There is a REST command to do this in the Advanced Programming manual. - Page 54 Pin 1 is the one inside the board and Pin 4(Ground) is on the outside of the board. Turn your power on the board and remove the jumper when you see "Trying WIFI AP" your preferences are completely gone. www.switchdoc.com Page 54 of 56 February 2020...
- Page 55 www.switchdoc.com Page 55 of 56 February 2020...
-
Page 56: Troubleshooting Guide
Troubleshooting Guide Q: My wind direction and speed is not working. I am getting a lot of rain A: You have the RJ45 plugs on OurWeather Reversed Q: I can’t get my WiFi to connect on OurWeather A: Make sure your WiFi password has no special characters or quote marks. OurWeather does not like those.
Need help?
Do you have a question about the OUR WEATHER and is the answer not in the manual?
Questions and answers