Table of Contents
Advertisement
Quick Links
Positioning
Power
Set Tubing Drip Factor
Begin The Infusion
Alarm
Display Units Mode
mL/h
d/min
vol
DRIP
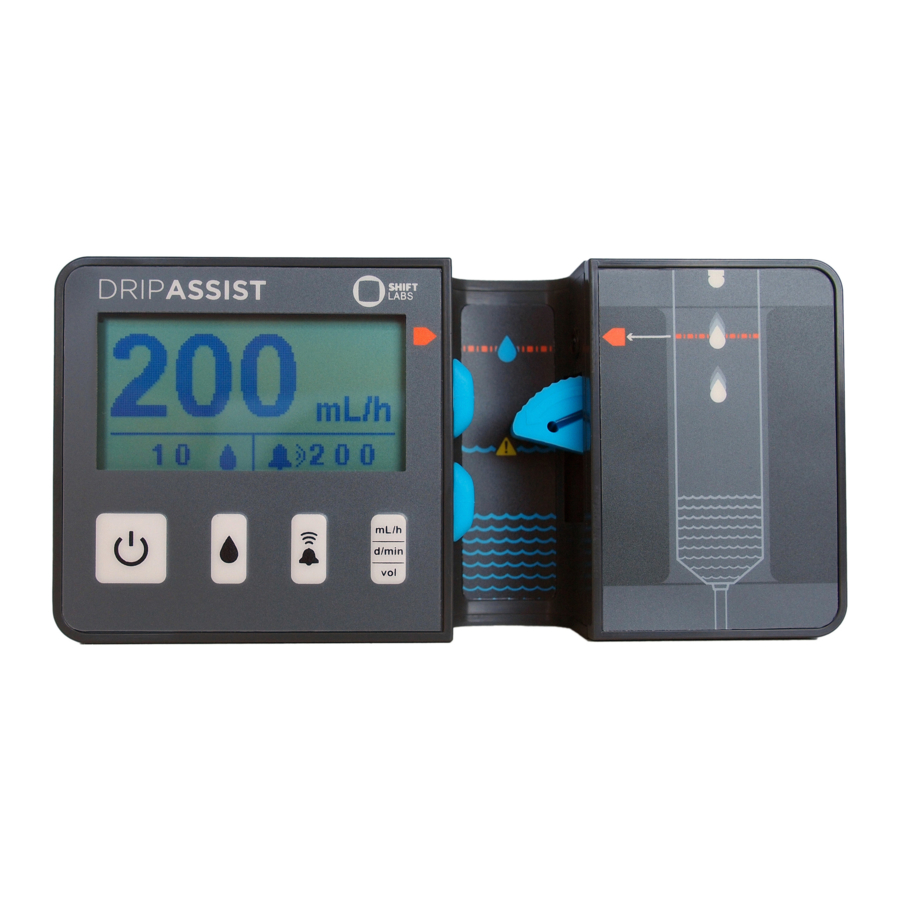
Place the DripAssist on the infusion chamber of the IV set by sliding it
upwards from tubing to chamber. Position it so that the drops cross the
indicator line, as shown to the left. Ensure the fluid level in the chamber is
low enough so that drops fall cleanly through the sensor pathway.
Avoid drop formation or splashing in the region of the indicator line.
Once the DripAssist is correctly positioned, turn it on.
Press the power button to turn the DripAssist on and off.
When first powered on, the device will display four gtt/mL sizes. See next
step.
The DripAssist supports IV sets with drip factors of 10, 15, 20, and 60
gtt/mL. The bottom left message on the LCD "Set [drop]" is displayed once
the unit is turned on, and the four tubing sizes are displayed. Press the
Drip Factor button to select a drip factor of 10, 15, 20, or 60 to match the
tubing set you are using. Pause for two seconds to select the desired
number.
Using the IV set's built-in roller clamp, begin the infusion process
following standard operating procedures.
Once you have set the flow rate to your desired target, you can activate
the alarm function by pressing the alarm button. We recommend waiting
about 30 seconds before activating the alarm, as this allows the flow
rate to stabilize. Whatever flow rate is registered when the alarm button
is activated becomes the alarm set-point. If the flow rate changes by
more than 13% from the set-point, the alarm will sound. Press the alarm
mode button again to disable it.
The DripAssist has three measurement modes. You can see the flow
rate as mL/hr or as drops/minute. You can also see the total volume
dispensed since the infusion began by using the vol display. Press the
display units button to toggle between these displays.
ASSIST
Quick Guide
Advertisement
Table of Contents

Related Manuals for Shift Labs DRIPASSIST

Summary of Contents for Shift Labs DRIPASSIST
- Page 1 Quick Guide Positioning Place the DripAssist on the infusion chamber of the IV set by sliding it upwards from tubing to chamber. Position it so that the drops cross the indicator line, as shown to the left. Ensure the fluid level in the chamber is low enough so that drops fall cleanly through the sensor pathway.
- Page 2 If within one (1) year from the original date of purchase this product fails due to defect in material or workmanship, Shift Labs Inc. will repair or replace any defective part at their option. The purchaser must contact Shift Labs Inc.
Need help?
Do you have a question about the DRIPASSIST and is the answer not in the manual?
Questions and answers