Table of Contents
Advertisement
Quick Links
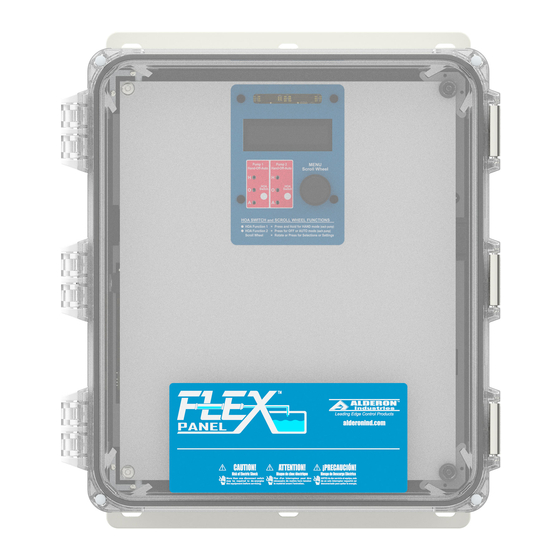
FLEX - Single Phase, Simplex
Model: FLXP1S | Power Pak
QSG00370_Rev01_FLEX Power Pak 1P Simplex FLXP1S Series.pdf | December 19th, 2022 4:47pm
Introduction
The Fle Po e Pak Sim le i a con ol anel ca able of con olling and moni o ing one
in
. I can be con g ed a a
m
eal fail en o in
con ol (hand mode, off mode, and a o mode) a e con olled ia b
anel. Fo con olling he
o e ela boa d. The Fle Po e Pak can al o be con g ed fo demand do e o ime do e con ol. An a ilia
d
con ac o
i al o incl ded fo in e facing o emo e ala m o o b ilding a oma ion
al o fea
e a men
he anel can be connec ed o Vi
Before Installation
Befo e
oceeding i h he in alla ion o o e a ion of he con ol anel ead all in
com l
i h all Fede al, S a e and Local Code , Reg la ion and P ac ice . The con ol anel m
ali ed e onnel familia
Elec ical Code (NFPA 70). Fail e o
e
i men malf nc ion. All cond i connec ed o he anel m
moi
e o ga e f om en e ing he anel. NEMA 1 enclo
enclo
e ma be
No e: If o ion a e o de ed ha affec he n mbe of oa , efe o he anel chema ic fo com le e info ma ion.
Safety Guidelines
1. DO NOT USE WITH FLAMMABLE OR EXPLOSIVE FLUIDS SUCH AS GASOLINE, FUEL OIL, KEROSENE,
ETC. DO NOT USE IN EXPLOSIVE ATMOSPHERES. CONTROL PANEL SHOULD ONLY BE USED IN
WATER AND WASTEWATER APPLICATIONS THAT ARE NOT RATED AS A HAZARDOUS LOCATION.
2. DO NOT WORK ON THE CONTROL PANEL WITH LIVE VOLTAGE APPLIED TO THE CONTROL PANEL
WITH WET HANDS OR WHEN STANDING ON A WET SURFACE.
3. DISCONNECT ALL ELECTRICAL SERVICE BEFORE WORKING ON OR HANDLING THE CONTROL PANEL
e oa
anel, o a a fo
, a ilia
c o
in
m , he anel can be e
em o enable ma im m eld con g a ion a
i e fo emo e acking, con ol, and con g a ion.
i h all a
licable local elec ical and mechanical code . Refe o he Na ional
o e l in all and e
ed indoo o o doo . Refe o anel model name la e on in ide of doo fo enclo
oa + one an d ce
, and an o ional c
en
on on he inne f on doo of he con ol
i
ed i h ei he con ac o
hi
od c can e
be ealed i h cond i
e a e fo indoo
m and
anel. Addi ionall , i fea
en o in
fo he
o
i h a co
ell a
ho o gh
a i ic
c ion
ho o ghl , a
l in e onal inj
ealan o
e onl
hile NEMA 4X anel
e en o
e a
m . P m mode
a ing e laceable
em . Thi
anel
acking. Finall ,
ell a
be in alled b
o
e en
e a ing.
Advertisement
Table of Contents

Related Manuals for Alderon Industries FLEX

Summary of Contents for Alderon Industries FLEX
- Page 1 FLEX - Single Phase, Simplex Model: FLXP1S | Power Pak QSG00370_Rev01_FLEX Power Pak 1P Simplex FLXP1S Series.pdf | December 19th, 2022 4:47pm Introduction The Fle Po e Pak Sim le i a con ol anel ca able of con olling and moni o ing one...
-
Page 2: Menu System
4. INCOMING VOLTAGE MUST MATCH THE CONTROL PANEL VOLTAGE. REFER TO THE PANEL SCHE- MATIC FOR COMPLETE INFORMATION. Menu System Interface e in e face of he Fle Po e Pak com i e a 16 2 OLED di la , h ee RGB indica o LED , and a o a knob ( c oll heel) ed o na iga e he men em. -
Page 3: Menu Conventions
Menu Conventions The e a e a e of a o indica o ill a ea on he bo om line of he di la o aid i h men na iga ion. Belo i a able mma i ing he e indica o : Indicator ... - Page 4 To Clear an Alarm To clea an ala m, im l c oll o i in he main c een ( e he e / ilence i ch o j m he e) and hen he o a knob. A con ma ion c een ill a ea and a k if he ala m ho ld be clea ed.
- Page 5 Step 2 (In Setup Wizard) Set Dosing Configuration. Thi con g e em fo Demand Do ing o Time Do ing. Note: this is the only way to change this setting. In Demand Do e Mode, if he igge n con in o n il he oa goe do n.
- Page 6 Step 4 (In Setup Wizard) Configure the Float Inputs. Thi ill con g e he oa in of he If he an d ce a enabled, he em ill a k he he o no a 2- oa back ho ld be ac i a ed. Thi ill e a Lo Ala m/Red ndan Off Floa and a High Ala m/Red ndan S a Floa a back in ca e he an d ce fail .
-
Page 7: Optional Configurations
Optional Configurations The e con g a ion a e no ab ol el c i ical fo each a lica ion, b can be ef l fo c omi ing he beha io of he anel. Step 6 (Optional) Set the Pump Exercise Timer fo he m . -
Page 8: Available Settings
Stats The Fle Po e Pak anel ack e e al a i ic fo he em. The e a e acce ed h o gh he men b follo ing he men a h em la e ho n belo . S eci c a h fo each e en ' a e de c ibed in he Vie able E en ec ion of he... - Page 9 Name Menu Path Range Description System MENU->SETTINGS- High, Med, Thi con ol ho b igh he Normal LED >PASSWORD->SYSTEM Lo , Off no mal indica o LED a e. Brightness SET UP->NORMAL LED MENU->SETTINGS- Password 0000 - Thi i em a o d.
- Page 10 Name Menu Path Range Description MENU->SETTINGS- Thi enable o di able m one. Pump One >PASSWORD->PUMP Di abled, If di abled, he HOA in ill be Enable SET UP->PUMP 1->P1 Enabled on i e and he ENABLE ne e n on. MENU->SETTINGS- No mall Pump One...
-
Page 11: Input Configurations
Name Menu Path Range Description MENU->SETTINGS- Thi i ho long he em ill Pump One >PASSWORD->PUMP 00:00:00 - m befo e igge ing an Extended Run SET UP->PUMP 1->P1 99:59:59 e ended n ime ala m. To di able Alarm EXT RUN ALARM hi , e he ime o e o. - Page 12 Name Menu Path Range Description ill ac i a e. 100K i he mo en i i e, and 10K i he lea en i i e Input Functions All of he en o in of he Fle Po e Pak a e con g able o a b e of he f nc ion ho n belo .
- Page 13 Belo a e he con g a ion fo he em in . Plea e efe ence he abo e able hen eading he ange col mn. Name Menu Path Range Description Input One MENU->SETTINGS->PASSWORD- Thi con ol he f nc ion 0, 1, 9 Function >INPUT SET UP->INPUT ONE...
- Page 14 Name Menu Path Range Description MENU->SETTINGS- Thi i he a ed de h of a 0 - 99' 11" Transducer >PASSWORD->INPUT SET an d ce . U ed o calc la e de h (30.45 Rated Depth UP->TRANSDUCER f om he 4 - 20 mA eading of he me e ) CONFIG->RATED DEPTH an d ce .
- Page 15 Name Menu Path Range Description MENU->SETTINGS- Transducer >PASSWORD->INPUT SET 0 - 99' 11" Thi i he high ala m le el i High Alarm UP->TRANSDUCER (30.45 of he an d ce . Se o e o o Level Depth CONFIG->HIGH ALARM me e ) di able.
Need help?
Do you have a question about the FLEX and is the answer not in the manual?
Questions and answers