Advertisement
Quick Links
Advertisement

Related Manuals for Skydroid H12


Summary of Contents for Skydroid H12
- Page 1 云卓-H12 V1.0 使用说明书...
- Page 2 TPYE-C安装高速USB接口, 拓展SIM插槽。 ③ 1920*1080分辨率高亮显示屏, 超大的屏占比, 在阳光环境下依然可以清晰查看实时显示信息。 ④ 天线信号互相补充, 超高灵敏度、 超远距离、 配合先进跳频算法, 大大增加了弱信号通讯能力。 ⑤ Skydroid Fly APP基于TOWER进行了大量优化, 更好的交互界面, 更大的地图视野可控制飞行 器实现智能航点规划, 自动执行, 一键回家, 大幅提高工作效率。 2、 主要用途及适用范围 H12适用于对直升机、 固定翼、 多旋翼、 车、 船等无人设备的视频图像传输 (需选配摄像头) 、 数据传输 和操控。 3、 品种、 规格 产品参数 遥控器参数 型号 通道数...
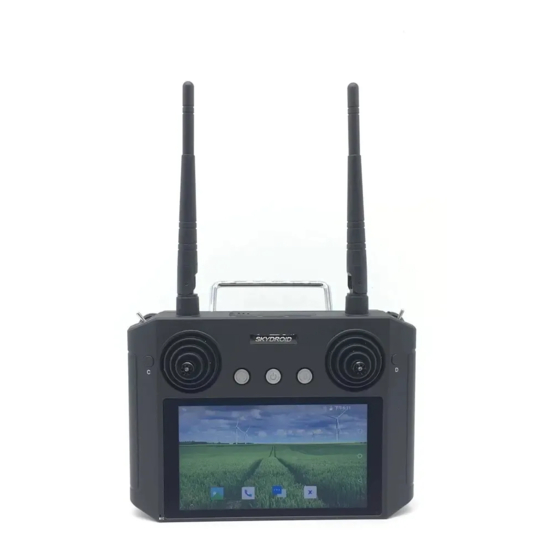
- Page 3 4、 型号的组成及其代表的意义 H12遥控器 序号 注解 注解 序号 2.4G 3dB天线 按键B 拨动三段开关E 右摇杆X2、 Y2 拨轮G 按键D 按键C 拨轮H 左摇杆X1、 Y1 拨动三段开关F 5.5寸屏 喇叭 MIC口 SIM卡槽 按键A 充电口 电源按键 PPM输出 备注: 触摸显示屏: 可点击屏幕进行操作, 使用时请注意为屏幕防水(如下雨天时避免雨水落到屏 幕), 以免进水导致屏幕损坏。...
- Page 4 接收机 名称 注解 名称 注解 RED LED 红灯 2.4 ANT 天线 GN LED 绿灯 MODE KEY 按键 相机接口 地线 USB 5V DM/CH9 USB升级接口 DP/CH10 数传接口/CBUS 扩展接口 SBUS SBUS 天线 2.4G ANT 接收机状态灯: 接收机状态指示灯 接收机状态 绿灯长亮 通讯正常 绿灯慢闪 与遥控器断连 绿灯快闪 对频模式 红灯长亮...
- Page 5 遥控器天线角度 (1)调整遥控器天线角度, 尽量正对飞行器飞行方向; (2)天线相互不要形成遮挡, 交叉。 正确操作 天线展开并呈45°向上 错误操作 天线不能交叉 天线不能与遥控器平行...
- Page 6 C) 相对湿度: Not exceed 85%。 D) 大气压力:86kPa~106kPao E) 使用地点不允许有爆炸危险的介质, 周围介质中不应含有腐蚀金属和破坏绝缘的气体及导电介 质 ,不允许充满水蒸气及有严重的霉菌存在。 F) 使用地点应具有防御雨、 雪、 风、 沙、 灰的设施。 6、 工作条件 供电方式和注意事项 H12系列地面端内置一体式可充电锂电池, 兼容市场标准TYPE-C接口, 9v-2A规格的电源适配器 (例如手机、 相机等数码产品USB充电器) 进行充电。 如在地面端充电时遇到冒烟、 有异味、 漏夜的情况下时, 请勿继续给地面端充电, 请移送至本公司 进行维修。 请勿在婴儿触碰区域给本产品进行充电, 以免发生触电危险。 请勿在超过60°C的环境下对本产品 进行充电。 7、 安全 警告...
- Page 7 二、 使用、 操作 1、 使用前的准备和检查 注意 ① 使用前务必先检查遥控器电量是否充足。 ② 使用前请检查天线是否按要求摆放, 已获得最佳效果。 ③ 首次使用请确保固件已经升级至最新版本。 ④ 用户应确保自己不在醉酒、 药物影响下操作使用。 2、 使用方法 语言设置 点击设置、 系统、 语言和输入法中可更改语言.
- Page 8 ⑦ ⑧ ① 蓝牙开启提示 ② 无线WIFI信号强度 ③ SIM卡提示窗 (图中未插入SIM卡状态) ④ 电量显示 (图中为充电状态) ⑤ 时间显示 ⑥ 后台进程查看 ⑦ 返回主页面 ⑧ 返回上一步操作 H12助手介绍 ④ ① ② ⑤ ③ ① 用于飞行手型切换。 ② 用于查看遥控器舵量值。 ③ 将遥控器与其他接收机进行对频 (对频方法在下方介绍) 。 ④ 用于查看摄像头传回来的图像。 ⑤ 高级选项里可以调整通道、 升级摇杆固件、 查看信号强度、 修改接收机串口波特率 (密码需向技术...
- Page 9 对频操作 ① 接收机通电状态下短接GNG和MODE KEY后绿灯快闪。 打开遥控器上的H12助手, 点击对频、 开始 对频。 对频成功后接收机绿灯常亮。 ② 给接收机快速上电5次, 第6次启动对频模式绿灯闪烁。 打开遥控器上的H12助手, 点击对频、 开 始对频。 对频成功后接收机绿灯常亮。 使用串口线共享数传 (需另外购买)...
- Page 10 以H12连接Mission Planner为例 ① 一头插H12遥控器音频口, 一头与电脑相连, 第一次使用需要用力插入, 确保其连接稳定。 ②打开Mission Planner地面站, 选择对应COM口, 波特率115200 , 即可连接。 Mission Planner 只适合PIX和APM飞控, 其他飞控需要用飞控适配的电脑地面站连接。...
- Page 11 常见问题与解决办法 1、 遥控器是否可以安装其他APP? 遥控器端权限完全开放, 没有任何专用软件和限制软件的安装与卸载。 支持QGC软件的使用,暂时无法 使用K3A软件。 2、 数传无法连接? 检查地面站是否是选对遥控器类型。 检查波特率是否与飞控一致 (H12助手, 高级999, 接收机设置波 特率) 。 检查RX TX是否反接 (正确接法RX接TX TX接RX) 。 3、 遥控器一直在响? 当遥控器没有与接收机连接成功, 遥控器会一直进行一个提示的报警。 4、 地面站声音太低, 无法听清? 可以在设置中找到声音选项, 在声音选项中调节声音。 5、 TYPE-C口除了充电还可以做什么? TYPE-C口除了充电, 还可以与电脑连接进行文件查看。 6、 遥控器有几种连接网络的方式? 可通过SIM卡、 连接WIFI连接网络。...
- Page 12 三、 保养、 维修 长期停放时的维护、 保养 将遥控器存放于干燥通风处, 减少阳光直射以防止电池过热。 若需存放超过三个月, 则推荐的存放温 度区间为22摄氏度至28摄氏度。 切勿将电池存在于低于零下20摄氏度或高于45摄氏度的场所。 四、 运输、 储存 警告 为避免可能的伤害和损失, 务必遵守以下各项: 由于线材和小零件可能对儿童造成危险, 所以务必让儿童远离遥控器的部件。 注意 1) 切勿让遥控器浸入水中, 若入水, 请及时用松软干布擦拭, 并立即关闭电源。 2) 禁止机械撞击、 碾压、 刺穿电池, 禁止将电池跌落。 五、 其他 QQ群 微信公众号 新浪微博 优酷平台 说明书如有更新, 恕不另行通知, 请持续关注官网www.skydroid.xin...
- Page 14 Skydroid H12 V1.0 User Manual...
- Page 15 ⑤ Skydroid Fly App has undergone a lot of optimization based on QGC, a better interactive interface, a larger controllable map field of viewing, the aircraft implements intelligent waypoint planning, automatic execution, automatic follow-up, and one-click home, highly provides working effectiveness in professional fields.
- Page 16 4.The composition of the model and its significance Number Annotation Number Annotation 2.4G 3dB antenna Button B Toggle 3 positions switcher E Stick X2、 Y2 Thumbwheel switch G Button D Button C Thumbwheel switch H Stick X1、 Y1 Toggle 3 positions switcher F 5.5inch screen Speaker MIC port...
- Page 17 Receiver Name Annotation Name Annotation RED LED Red light 2.4 ANT Antenna GN LED Green light MODE KEY Button Camera ports Ground USB 5V DM/CH9 USB for upgrading DP/CH10 Data transmission/CBUS Expansion ports SBUS SBUS Antenna 2.4G ANT Receiver Status light Receiver Status Receiver LED status Indication Connection Normal...
- Page 18 Remote control antenna angle (1) Adjust the angle of the remote control antenna to face the flight direction of the drone. (2)Antennas shall not form shielding or crossing with each other. Right operation Keep the antenna extended and 45 ° upwards Wrong operation Antenna cannot cross The antenna cannot be parallel...
- Page 19 6.Working conditions Power supply and attentions H12 series uses a built in Li-ion battery. Charging port is compatible with 9V -2A Type-C chargers (such as cell phone, digital cameras’ USB charger). In case of smoke, heat or unusual smell during charging, please stop charging immediately and return to our company for servicing as soon as possible.
- Page 20 B.Operation 1.Preparation and pre-checking before use Pay attention ① Check battery level. ② Check position of the antenna to get the best performance. ③ Make sure the firmware is the latest version. ④ DO NOT operate under the influence of alcohol or drugs. 2.Operation choose your language Enter setting, and then enter system, choose your language.
- Page 21 ③ SIM card status (without sim card in the picture) ④ Power lever (charging in the picture) ⑤ Time ⑥ Back ground management ⑦ Home ⑧ Return to last step H12 Helper ④ ① ⑤ ② ③ ① Mode change ②...
- Page 22 ② Quickly power on and off the receiver 5 times, and start the binding mode at the 6th time, on when, the green light flashing. Open the H12 Helper on the remote control, click “binding” t o start binding. The green light of the receiver is always on after the binding successfully.
- Page 23 Take H12 connecting Mission Planner as an example ① One end is plugged into the H12 remote control audio port, and the other end is connected to the computer. If it is the first time you use it, please firmly/tightly plug it in to ensure its stable connection.
- Page 24 Check whether the corresponding remote controller has been selected in the ground station App and whether the baud rate is consistent with the flight control (H12 helper, advanced setting, password is 999, receiver setting baud rate). Check whether RX TX is connected reversely (the right way is connect controller’...
- Page 25 Keep small parts or wire far away from children. DO NOT let children touch the small/spare parts of H12. Attention 1) DO NOT put H12 into water. If it does, please switch off the power and dry it at once! 2) DO NOT crash the H12 or break and DO NOT drop the battery.
Need help?
Do you have a question about the H12 and is the answer not in the manual?
Questions and answers