Table of Contents
Advertisement
Advertisement
Table of Contents

Subscribe to Our Youtube Channel
Summary of Contents for Roadmaster ENZO 8
- Page 1 U S E R M A N U A L S E R I A L N U M B E R P R O D U C T C O D E MS0 30 93...
-
Page 2: Table Of Contents
CONTENTS 1. PREFACE AND INTRODUCTION 2. SAFETY NOTICE 2.1 Before driving » 2.2 While driving » 2.3 Labelling » 3. PARTS INTRODUCTION Parts description » 4. OPERATION 4.1 Control panel » 4.2 How to operate your scooter » 5. BATTERY CHARGING AND CARE 5.1 Charging the battery »... -
Page 3: Preface And Introduction
1. PREFACE AND INTRODUCTION Please carefully read this owner’s manual before using the vehicle. Improper use of the vehicle could result in harm, injury or traffic accidents. For maximum safety while using the vehicle please read this owner’s manual. » This owner’s manual includes operation instructions for every aspect of the vehicle, assembly instructions, and instructions for how to deal with possible accidents. -
Page 4: Safety Notice
2. SAFETY NOTICE 2.1 BEFORE DRIVING The user needs to be familiar with the usage and operation of this vehicle before driving. Therefore, please always keep the following safety notices in mind. The same traffic rules apply to the use of this vehicle as apply to pedestrians For your safety, please therefore follow the rules that apply to pedestrians. -
Page 5: While Driving
2. SAFETY NOTICE 2.2 WHILE DRIVING Please carry out daily inspections. Refer to the section entitled INSPECTION AND MAINTENANCE. Do not move your body out of the vehicle while moving » Such action may cause you to lose balance and risk injury from falling. »... - Page 6 2. SAFETY NOTICE STARTING AND DRIVING » Make sure the seat is installed properly. » Make sure the tiller has been secured properly. » Fold down the armrests so you can rest your arms on them. » Turn the power switch to ON. If necessary, turn on the headlights. »...
- Page 7 2. SAFETY NOTICE STOPPING » Release the speed control lever completely. The vehicle will naturally brake and stop. » Turn the power switch to (OFF). Then pull out the key. DRIVING ON THE PAVEMENT » Ensure the 8mph (12.8kp/h) limit switch is set to the slowest setting when using the scooter on the pavement.
-
Page 8: Labelling
2. SAFETY NOTICE 2.3 LABELLING Please carefully read all labels on the scooter before driving it. For your future reference, do not remove them. WARNING Do not operate the scooter unless the handle bar is » in a lock position. Do not lean against or pull forward on the handle »... -
Page 9: Parts Introduction
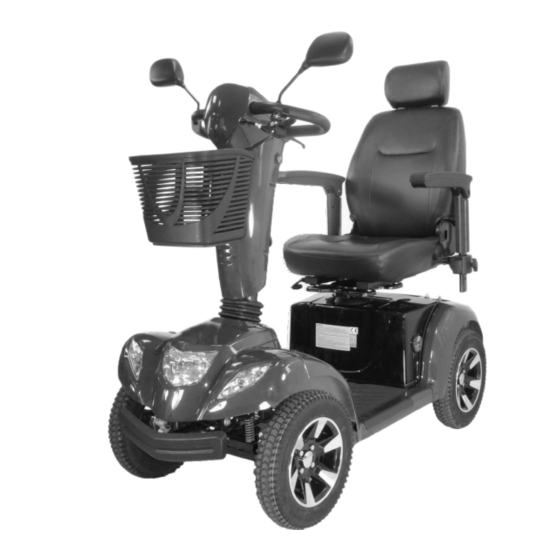
3. PARTS INTRODUCTION Control Panel Seat Rotation Lever Rear Mirror Hand Brake Lever Indicator Lamp Side Reflector Charger Socket Cover Rear Lamp Basket Freewheel Lever Tiller Anti-tip Wheel Tiller Adjust Lever Width Adjustable Armrests Knob Head Lamp Height Adjustable Armrests Knob Seat... -
Page 10: Operation
4. OPERATION 4.1 CONTROL PANEL » Put the ON/OFF key switch on. » The battery level indicator shows the current level of your batteries » Now turn the speed control to the desired driving speed. » Pull the drive lever with your fingers toward the handle bars (right lever for forward movement, left lever for backward movement). -
Page 11: How To Operate Your Scooter
4. OPERATION 4.2 HOW TO OPERATE YOUR SCOOTER Turn the key to power ON or OFF » (ON) : Power is turned on » (OFF) : Power is turned off SPEED DIAL Turn this dial to determine the speed range of the scooter. Turn the dial anti-clockwise to go slower and clockwise to go faster. - Page 12 4. OPERATION LIGHT BUTTON » Push the light button to switch the front and rear lights on. » Push the button again to turn the lights off BATTERY INDICATOR BATTERY INDICATOR » The remaining power indicated by the battery indicator will vary by the actual driving time incurred and how you drive.
- Page 13 4. OPERATION SEAT » The seat can be turned to 45 degrees or 90 degrees. » Pull the seat adjustment lever forward and swivel seat. » Release the lever, then continue swivelling the seat until it locks in position. ATTENTION Return the seat to the forward position before driving.
- Page 14 4. OPERATION MANUAL BRAKE As well as an electromagnetic brake, squeeze the brake lever to apply the brake and then release the lever to release the brake. The manual brake tightness can be adjusted by the brake cable adjuster near the left-hand side wheel. MAIN CIRCUIT BREAKER (RESET BUTTON) When the voltage in your scooter’s batteries becomes low or the scooter is heavily strained...
-
Page 15: Battery Charging And Care
5. BATTERY CHARGING AND CARE CHARGING THE BATTERY Follow the procedure below step by step: Turn the power switch to OFF. » Connect the charger’s power cord into the power outlet. » Open the charging socket cap on the scooter’s tiller. Then connect the »... -
Page 16: Battery
5 BATTERY CHARGING AND CARE ATTENTION Please follow the rules below to avoid accidents while charging. Please use the supplied charger only, and recharge the battery to its full capacity » every time. You may damage the battery and scooter if you use a charger which is not to the correct specification. - Page 17 5. BATTERY CHARGING AND CARE CLEANING THE BATTERY If the batteries are contaminated by water, battery acid, dust or other substances, they will discharge quickly. The batteries supplied with the scooter are sealed and as such are maintenance free with no risk of battery leakage.
-
Page 18: Inspection And Maintenance
6. INSPECTION AND MAINTENANCE 6.1 INSPECTION Clean the scooter with a damp cloth and dust down approximately once a week to preserve the » appearance of the scooter. Adjust the tiller height and return to the original position and swivel the seat once a week to »... -
Page 19: Battery, Fuse And Tire
6 INSPECTION AND MAINTENANCE 6.3 BATTERY, FUSE AND TYRE BATTERY Refer to the section entitled BATTERY on page 15. FUSE If the battery charger is turned on and no LEDs are lit, check the fuse. SUGGESTION Ask for help from your scooter dealer to inspect or replace the fuse, since the tiller shroud has to be removed first before you can replace the fuse. -
Page 20: Storage
6. INSPECTION AND MAINTENANCE SUGGESTIONS Do not splash water directly on your scooter to wash it. This could lead to » malfunction of the system electrics. Do not use petrol, solvents or vaporising solution as these may deform or damage »... -
Page 21: Trouble Shooting And Specification
7. TROUBLE SHOOTING AND SPECIFICATION SYMPTOM REMEDY The scooter will not switch on Try recharging the battery. » Check the fuse and circuit breaker in the scooter. » The scooter switches on, but Ensure there is enough power in the batteries. If not, re- »... -
Page 22: Warranty
8. WARRANTY WARRANTY There is a comprehensive twelve-month warranty from the date on which your new scooter is delivered. The warranty covers the scooter for repairs or replacement during this period. For more details, please see the warranty conditions below. Warranty conditions: »... - Page 24 CareCo UK Limited , Hubert Road, Brentwood, Essex, CM14 4JE...
Need help?
Do you have a question about the ENZO 8 and is the answer not in the manual?
Questions and answers
My light on charger never goes to green ever since the day it was delivered to me why is this?
If the charger light for the Roadmaster ENZO 8 never turns green, it could indicate a problem with the charger, battery, or connection. Possible reasons include:
1. Faulty Charger – If the fan inside the charger does not activate or the green light does not appear, the charger may be defective and should not be used.
2. Battery Issue – The battery may be unable to hold a full charge, possibly due to age or damage.
3. Poor Connection – The charger may not be properly connected to the scooter’s charging socket.
4. Extended Charging Time Needed – If the battery is deeply discharged, it may take longer than usual to reach full charge.
If the issue persists, replacing the charger or battery may be necessary.
This answer is automatically generated