Advertisement
Advertisement
Table of Contents

Related Manuals for Vivitar AEROVIEW DRC-446


Summary of Contents for Vivitar AEROVIEW DRC-446
- Page 1 DRC-446 USER’S MANUAL...
- Page 2 PRE-FLIGHT CHECKLIST Before attempting to fly your drone, make sure that you have done all of the following: Inserted 4 AA Batteries in Your Remote See page 7 of this manual for more information. Charged Your Drone’s Battery See page 8 of this manual for more information. Checked That the Propellers are Firmly Attached See page 21 of this manual for more information.
- Page 3 1. Introduction Thank you for purchasing the Vivitar AeroView GPS Video Drone, item DRC-446. The included remote controlled aircraft is designed specifically for outdoor flying. In order to get the best possible results, please read this user’s manual carefully before using. In addition, be sure to keep this manual in a safe place for future reference.
-
Page 4: Important Safety Precautions
3. Important Safety Precautions When using your Vivitar AeroView GPS Video Drone, basic safety precautions should always be followed, including the following: 1. Do not allow children or the infirm to operate your drone without adult supervision. For safety purposes, only allow experienced pilots aged 14 and up fly your drone. -
Page 5: Package Contents
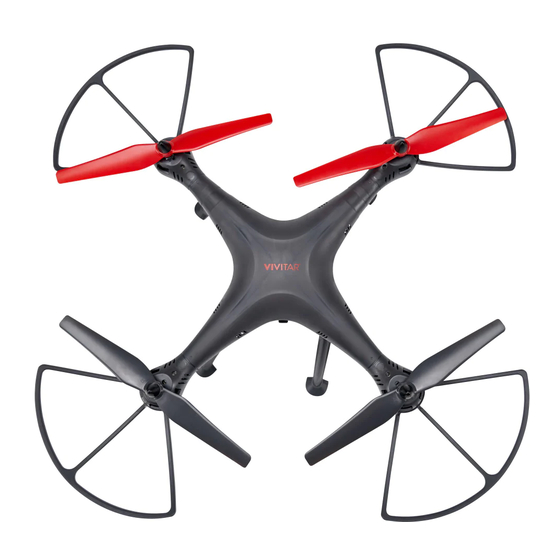
4. Package Contents -Mobile Phone Holder -Rechargeable Battery -Remote Control -Fisheye HD Camera -Replacement -Landing Gear -Protection Rings -Charging Adapter Propellers -Screwdriver 5. Specifications Weight: 650g Battery: 7.4V 2000mAh Lithium Polymer Battery Height: 185mm Diameter: ~350mm Charging Time: ~5 hours Flying Time Per Charge: ~12 minutes... - Page 6 6. A Quick Look at Your Drone Propeller Upper Shell Motor Protection Ring Landing Gear Lower Shell ON/OFF Switch Camera Lens...
- Page 7 7. A Quick Look at Your Remote Control One Key Take Off One Key Landing Speed Speed (60% : Medium) (100% : Fast) Speed Geomagnetic Calibration (30% : Slow) Throttle Stick Directional Control Stick (ascend, descend/turn left, turn right) (forward, back/shift left, shift right) Headless Mode ON/OFF Button One Key Return...
- Page 8 8. Inserting Batteries Into Your Remote Control Use a screwdriver to open up the battery compartment located on the rear of your remote control. Insert 4 AA 1.5V batteries, making sure that the batteries are inserted with the correct polarity (+,-) as displayed in the battery compartment.
- Page 9 9. Charging Your Drone’s Battery Use the included charging adapter to charge your drone’s battery. Charging Adapter Battery (red) = Charging Adapter Plugged In (blinking red) = Battery Charging (off) = Battery Fully Charged Charging takes about five hours to complete. -It is recommended to use a 5V, 1-2A charger (not included) to charge your battery.
- Page 10 10. Calibrating Your Drone (Preparing for Flight) To power on your drone, slide the ON/OFF switch on the bottom of your drone to the ON position. To power on your remote control, press the ON/OFF button. Once your drone and remote control are powered on, follow the calibration steps below in order to prepare your drone for flight.
- Page 11 -Rotate your drone horizontally, spinning it in a clockwise direction for 3 revolutions. The lights on the front legs of your drone will solidly shine red, while the lights on the back legs of your drone will solidly shine green. -Turn the head downwards and rotate your drone vertically, spinning it for 3 revolutions.
- Page 12 11. Locking and Unlocking Your Drone Unlocking Your Drone If your drone is locked, push the throttle stick all the way up and the pull it back to its mid-point and your drone will be unlocked. Locking Your Drone With your drone in a landed position, pull the throttle stick all the way down and hold it down for approximately 3 seconds.
-
Page 13: Flying Your Drone
12. Flying Your Drone Pre-Flight Preparation If you have never used a drone before and you are not an experienced pilot, make sure to read these instructions carefully before flying. Get familiar with all of the controls. If necessary, read through these instructions many times and practice handling the remote control until you feel completely comfortable and ready. -
Page 14: One Key Takeoff & Landing
13. One Key Takeoff & Landing Once your drone is unlocked, you can press the One Key Takeoff button and the drone will automatically hover 1.5 meters above the ground. One Key One Key Landing Takeoff By pressing the One Key Landing button, your drone will automatically land on the ground. - Page 15 2. You can use the Vivitar AeroView app to view your drone’s GPS status. 3. Make sure to fly your drone in clear areas with strong GPS signal in order to use the return to home functions successfully.
-
Page 16: Emergency Stop Function
16. Surround Flight Mode When your remote control and your drone receive GPS signal, press the Surround Flight button on the remote control, and your drone will automatically fly in circles around the remote. When in Surround Flight, push the directional control stick to the left and the drone will fly in counterclockwise circles. - Page 17 2. Download the Vivitar AeroView App Go to the Apple App Store or Google Play store and search for the Vivitar SkyEYEview app. Follow the instructions to proceed to download the app. You can also scan the applicable QR code below.
- Page 18 4. Control Interface Functions Flight Altitude Drone Battery Satelite Numbers Power Vertical Speed Return to Home Screen Settings Flight Horizontal Map Mode Distance Flight Mode Speed Show/Hide Joystick VR View Take Photos One Key Return One Key Unlock/Lock Take Videos One Key Takeoff/Land Photo &...
-
Page 19: Troubleshooting
Troubleshooting Problem: During calibration, the red lights on the front legs as well as green and blue lights on the rear legs flash slowly. Solution: The drone and remote control are not recognizing each other. Turn both units off, turn them back on and then try calibrating your drone and remote control again. - Page 20 Remote Control Light Indicators The green light is flashing slowly The remote control is still calibrating. The green light is flashing slowly while the remote is making repeated beeping sounds. The batteries are running low on power and need to be replaced.
- Page 21 Replacing Your Propeller Blades Remove the cap covering the propeller. Remove the propeller so that your current propeller can be removed and replaced with a new one. Screw the new propeller on and then place the cap back on the propeller.
-
Page 22: Fcc Compliance Statement
FCC Compliance Statement Changes or modifications not expressly approved by the party responsible for compliance could void the user’s authority to operate the equipment. This device complies with Part 15 of the FCC Rules. Operation is subject to the following two conditions: (1) this device may not cause harmful interference, and (2) this device must accept any interference received, including interference that may cause undesired operation. - Page 23 To Obtain Warranty Service and Troubleshooting Information: Call 1-800-592-9541 in the U.S. or visit our website at www.vivitar.com. To receive Warranty service along with the name and address of an authorized product service center, the original consumer purchaser must contact us for problem determination and service procedures.
Need help?
Do you have a question about the AEROVIEW DRC-446 and is the answer not in the manual?
Questions and answers
Do you have to download the app to fly it if so what is the app
Yes, the Vivitar AEROVIEW DRC-446 requires an app to fly. The name of the app is Vivitar AeroView.
This answer is automatically generated
Do you have to have the app to fly it
No, the Vivitar AeroView DRC-446 can be flown using the 2.4GHz remote control system without the app. However, the app is needed for certain features like Follow Me technology, GPS tracking, and real-time video transmission.
This answer is automatically generated