Table of Contents
Advertisement
Quick Links
Advertisement
Table of Contents

Related Manuals for Craig CLP281 Series

Summary of Contents for Craig CLP281 Series
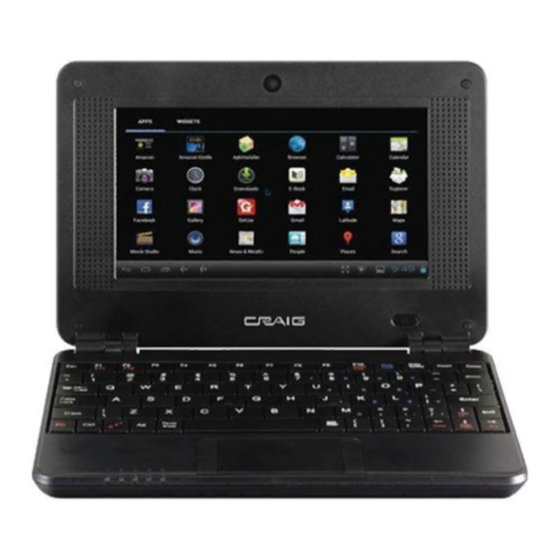
- Page 1 Model: CLP281x...
- Page 2 Please setup your gmail account into this Netbook at initial setup. If you are going to use a password or a pattern unlock you must have a valid gmail account setup in the event you forget either. Forgot lock pattern on android? Here's a way to reset it. Enter wrong pattern 5 times and wait for 30 seconds.
- Page 3 - - 2...
- Page 4 - - 3...
- Page 5 - - 4...
- Page 6 This manual contains important safety pr ecautions and information for correct usage. Please be sure to read this manual carefully before use to avoid any damages to the device. Please do not place the product in hot, wet or dusty environment. Please do not place the product in hot environment.
-
Page 7: First Use
FIRST USE: Battery Recharge The device has a built-in 2 pcs x DC 3.7 V, 1500 mAh rechargeable Lithium-ion Polymer battery. Recharge as follows: Insert the small plug from the supplied AC/DC Adaptor into the DC IN jack on the device. Plug the AC/DC Adaptor into the wall outlet having AC 100-240V~, 50/60 Hz. - Page 8 USB Ports (Full size USB port) This device supports USB device for extending the memory size, or USB Thumb Drive. If you have one of these devices, insert it into the USB Port on the sides of unit. Notes: A. Before replacing the USB drive, make sure the unit has been powered off. B.
-
Page 9: Location Of Controls
Microphone jack: For sound recording, connect an external microphone (Not included) to the microphone jack on the left side of cabinet. Earphone jack: For private listening, connect an Earphone/Headphone to the Earphone/Headphone jack on the left side of cabinet. The speaker will cut off automatically. (Earphone/Headphone not included). Ethernet Jack: For internet connection, connect Ethernet cable to the RJ45 data port on the rear of cabinet with your own ADSL modem or router. - Page 10 10. Mic (Microphone) Jack 11. RJ 45 LAN port 12. DC In Jack F (Function) Button’s assignment: Browser Music Video Gallery Calculator APK installer E-mail Clock Calendar F10- Explorer F11- Talk F12- Settings Notes: For F11 (F12), press the Fn and F1 (F2) buttons at the same time. - - 9...
- Page 11 Power Button Usage Turn On: Press the power button and hold for 3 seconds. Turn Off: Press the power button and hold for 3 seconds, →tap Power off→ tap OK. RESET: Press the Reset key to reset the device. Reset will make the device reboot, the effect is equivalent to force shutdown after boot, please use with caution.
- Page 12 DESKTOP Status Bar • The Status Bar lies at the bottom of the screen. -- At the left side there are which stand for Escape, Homepage, Current Plays and Voice – and Voice + -- At the right side there are which stand for WiFi Signal, WiFi Status, Battery Status, Clock, etc.
- Page 13 APPS: Click top right corner to see APPS page A list of application widget icons are available to select, you can select the icon which will appear in the home page as the shortcut. You will quickly get to the program. ☆...
- Page 14 APK Installer (Application Installer) This device supports third party applications on the basis of android platform. Most of the applications can be downloaded from the websites via the internet, and copied into the internal flash or SD card of this device. Click On the Apps page icon, and search for the Apkinstaller and the following screen will...
-
Page 15: Video Conferencing
→ Settings → Device→ Apps. Click Click the application you want to uninstall, → Uninstall. Click OK to confirm the Uninstall. Clock Click the Clock application icon. You can see the time and date. Alarm: ☆ You can use your device as an alarm clock by setting multiple alarms. This clock icon displayed at the bottom of screens indicates that one or more alarms have been set and are active. - Page 16 CALENDAR Click the Calendar application icon. For the first time using the Calendar, you need to add an Gmail account. Enter Gmail address and password. Click Next and follow the prompts to complete the account configuration. Then you can use the Calendar.( Note: we generally recommend that Gmail account, test server for: m.google.
- Page 17 Click to exit the Camera and back to the Desktop. Note: You can click to choose to save the files in the Local disk or the SD card. Email Inside the apps menu, Click the icon to enter the ‘Email’ client. It’s required to configure the account information for the first time.
- Page 18 MUSIC − Using the pre-loaded Music Player to play audio files: ☆ Audio file formats supported: MP1 , , , , , , , MP3, OGG FLAC, AC3 , , M4A. When no music files in the audio player playlist, the system will automatically load the music files from the card to the audio player playlist after turning on the audio player .The playlist as shown in the below figure: You can pass the audio files by the way of synchronous USB jump drive, or access to audio files by...
- Page 19 Video ☆ Video file formats supported: MKV ( ), ( ), , , , H.264 coding MPEG , , DAT. In the main menu or desktop, tap the icon to enter “Video” interface, on where it will list all the video files and image files.
- Page 20 SETTINGS Wireless & Wi-Fi Turn on Wi-Fi. networks Ethernet Ethernet connection setting / setting up IP address Date usage Display date usage info More Setting VPN / portable hotspot and mobile networks Device Sound Adjust Notification volumes & enable system sounds Display Adjust Brightness, choose wallpapers, setting up sleep time and front size...
- Page 21 Frequently Asked Questions Android Q: What Android OS version is on my Device? A: 4.0 Basic Device Functionary Q: Do I have to charge the battery before use? A: You should charge the battery for at least 4 hours, but you can use the device while it’s charging.
- Page 22 The main Applications on Home Page Apps Screen: Internet browser: Click to connect the internet Email,Gmail: Click into e-mail settings, after entering the email address and password, simply follow the on screen instructions for set up. This application supports IMAP mail (such as Hotmail, Gmail and Yahoo Mail, POP3 mail and Exchange).
-
Page 23: Amazon App Store
Gallery: Click into photo player to play photos. E-Book: Click into the book shelf to select/manage and/or read ebooks. To turn to next page, move the cursor to right hand side on the screen then click and hold Left button, then move to left hand side. To turn to previous page, move the cursor to left hand side on the screen then click and hold Left button, then move to right hand side. -
Page 24: Troubleshooting
Video: Click to turn on the video player. Click the desired file name to start playing. Social networking: This Device has pre-loaded with the most popular social applications for usage. Click the individual icon to login with pre-registered login name and passwords, otherwise, you may register online by following on screen instructions. - Page 25 Check your signal bar on the Device. It may not be connected due to weak signal. How to buy/download the applications from the internet Make sure your device is already hooked up to Wi-Fi/3G networks. Press SlideME or Amazon app store icon on the home page. Search, Buy, Download and Install the desired applications by following the on screen instruction.
- Page 26 Click “Erase everything” button to start reset. Wait until the device finishes resetting by itself. The device will turn off automatically. (It may need a few minutes). IMPORTANT: After Factory Data reset, all users’ data (users installed applications, passwords, e- mail accounts, g-mail accounts, media files etc...) will be deleted.
-
Page 27: Product Specifications
PRODUCT SPECIFICATIONS Hardware Configuration: CPU Processing Speed 1.3GHz Memory/ROM 4GB ( Internal 2.2GB flash memory has be assigned for Android operating system and pre-loaded Apps, existing 1.8 GB flash space is available for further operation needs.) Memory/RAM DDR III 1 GB Memory Card Slot SD card(up to 32GB), not included Color Display... - Page 28 Under no circumstance shall Craig be liable for any loss or consequential damage arising out of the use of this product. This warranty gives specific legal rights. However, you may have other rights which may vary from state to state.
Need help?
Do you have a question about the CLP281 Series and is the answer not in the manual?
Questions and answers