Table of Contents
Advertisement
Advertisement
Table of Contents

Subscribe to Our Youtube Channel
Related Manuals for PowerNet LAUNCH F-LITE 1194


Summary of Contents for PowerNet LAUNCH F-LITE 1194
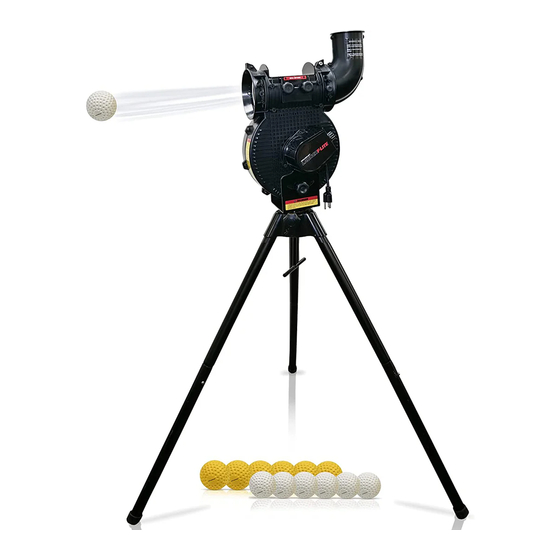
- Page 1 PITCHING MACHINE BASEBALL | SOFTBALL 1194 | LAUNCH F-LITE...
-
Page 3: Table Of Contents
Table of Contents Welcome to the Team Product Safety Labels Safety Instructions Electrical Safety & Battery Pack Recommendations Part Descriptions Baseball Setup 09-12 Softball Setup 13-16 Launch F-Lite Ultra Light Balls Pop-Fly Ball Setting Product Specifications & Product Warranty 7 Day Challenge Need More Gear? -
Page 4: Welcome To The Team
Our dedication to providing quality equipment at affordable prices has never wavered. Our driving force is to get PowerNet gear in the hands of the player. We trust in the process of training and hard work as it will lead to success on and off the field. Here at PowerNet, our hope is to play a role in building winners not only in sports, but in life as well. -
Page 5: Product Safety Labels
Locate the four examples shown below on your machine. If you are missing any labels or need to replace old/worn out labels, please contact the PowerNet Customer Service Department at the number located on the back of this manual. DANGER... -
Page 6: Safety Instructions
10) React to errant pitches the same way you would if batting off a live pitcher. The PowerNet Launch F-Lite Pitching Machine was designed for use by operators 18 years of age or older. Adult supervision is required for machine operation of anyone under 18 years of age. -
Page 7: Electrical Safety & Battery Pack Recommendations
Electrical Safety The Launch F-Lite Pitching Machine has a 120V motor and plugs into a standard 110-voltage outlet. IN ORDER TO POWER THE LAUNCH F-LITE PITCHING MACHINE YOU WILL NEED TO PLUG INTO A GROUNDED (3-PRONG) OUTLET BOX. WARNING • DO NOT OPERATE OR STORE YOUR LAUNCH F-LITE PITCHING MACHINE IN A WET ENVIRONMENT. -
Page 8: Part Descriptions
Part Descriptions S O F T B A L L C H U T E STEP 1: Connect chute at the center screw attachment point STEP 2: Raise the Ball Setting P. GRIP HANDLES to “Softball” on the Pinch Plate NOTE: There is only a single center attachment point when pitching softballs. -
Page 9: Baseball Setup
Baseball Setup KEY COMPONENTS FOR BASEBALL PINCH PAD(H) | BALL SETTING BASEBALL CHUTE(J) ADJUSTMENT KNOBS(I) B A S E B A L L C H U T E STEP 1: Connect chute at the center screw attachment point STEP 2: Screw in both side screws STEP 3: Change the Ball Setting to “Baseball”... - Page 10 Baseball Setup STEP 1 STEP 2 Insert Base Clamp(B) into Connect Base Legs(D) to Leg Extensions(E), x3. Base(A). Use T-Handle(C) to join the two but do not fully tighten. BASE ASSEMBLY STEP 3 Insert LEG ASSEMBLIES into BASE BASEBALL BASE/LEG ASSEMBLY ASSEMBLY.
- Page 11 Baseball Setup STEP 4 STEP 5 Place Body(G) onto full BASE and Insert Pinch Pad(H) into Body(G) (H is a tight fit LEG ASSEMBLY. Secure Body(G) with into G, gently push in). Set Pinch Pad(H) to the Baseball Setting. Secure Pinch Pad(H) with Ball Horizontal Adjustment Knob(F).
- Page 12 Baseball Setup NOTE: Initially, it may be ADJUSTING VERTICAL TILT difficult to adjust the tilt. Apply pressure on the Grip Handles(P) to tilt the machine. GRIP HANDLES(P) VERTICAL HEIGHT ADJUSTMENT KNOB(O) Loosen Vertical Height Adjustment Knob(O) and use Grip Handles(P) to tilt the machine to pitch height preference.
-
Page 13: Softball Setup
Softball Setup KEY COMPONENTS FOR SOFTBALL PINCH PAD(H) | BALL SETTING SOFTBALL CHUTE(M) ADJUSTMENT KNOBS(I) S O F T B A L L C H U T E STEP 1: Connect chute at the center screw attachment point STEP 2: Raise the Ball Setting to “Softball”... - Page 14 Softball Setup STEP 1 STEP 2 Insert Base Clamp(B) into Insert Base Legs(D) into BASE ASSEMBLY. Base(A). Use T-Handle(C) to Use T-Handle(C) to tighten. join the two but do not fully tighten. BASE ASSEMBLY STEP 3 SOFTBALL BASE/LEG ASSEMBLY Place Body(G) onto full BASE and LEG SHOULD LOOK LIKE THIS.
- Page 15 Softball Setup STEP 4 STEP 5 Insert Pinch Pad(H) into Body(G) (H is Secure Softball Chute(M) using a tight fit into G, gently push in). Set Center Screw(K). Sides of Softball Pinch Pad(H) to the Softball Setting. Chute(M) DO NOT NEED TO BE Secure Pinch Pad(H) with Ball Setting SECURED.
- Page 16 Softball Setup NOTE: ADJUSTING VERTICAL TILT Initially, it may be difficult to adjust the tilt. Apply pressure on the Grip Handles(P) to tilt the machine. GRIP HANDLES(P) VERTICAL HEIGHT ADJUSTMENT KNOB(O) Loosen Vertical Height Adjustment Knob(O) and use Grip Handles(P) to tilt the machine to pitch height preference.
-
Page 17: Launch F-Lite Ultra Light Balls
Need Extra Practice Balls? WARNING: THESE ARE THE ONLY BALLS COMPATIBLE WITH YOUR MACHINE DUE TO THEIR WEIGHT AND CONSTRUCTION ORDER NOW ON U L T R A L I G H T B A L L S WARNING N O T U S E A N Y O T H E R... -
Page 18: Pop-Fly Ball Setting
Pop-Fly Ball Settingm! Loosen Vertical Height Adjustment Knob(O) to adjust the tilt. Use the Grip Handles(P) to TILT the BODY UPWARD FOR POP-FLY Balls. VERTICAL HEIGHT ADJUSTMENT KNOB(0) GRIP HANDLES(P) NOTE: Initially, it may be difficult to adjust the tilt. Apply pressure on the Grip Handles(P) to tilt the machine. -
Page 19: Product Specifications & Product Warranty
VISIT US AT www.TrainingNets.com FOR MORE INFO! We at PowerNet are proud of the quality and durability of our products and offer a 1 year limited warranty on new, unused PowerNet products purchased through authorized dealers within the USA. PowerNet’s 1 year limited warranty coverage is as follows: The body, base, legs, motor, and misc. -
Page 20: Day Challenge
WHILE TRAINING AND POST TO SOCIAL MEDIA FOR FREE GEAR. SCAN THE QR CODE TO START YOUR CHALLENGE NOW! TRAINING ROOM GET THE LATEST TRAINING VIDEOS WITH TEAM POWERNET BY VISITING OUR POWERNET CHANNEL! Training Room with Coach Mike PLAY ALL 2:33 2:22... -
Page 21: Need More Gear
Need More Gear? Visit us on Amazon by scanning the QR CODE below... or head over to www.TrainingNets.com Explore TrainingNets.com to... • Find product video tutorials • Register your product • Download training programs • Get warranty information • Purchase your gear •... - Page 22 FOR SERVICE CALL POWERNET CUSTOMER SERVICE DEPARTMENT 909-203-5495 WWW.TRAININGNETS.COM POWERNETBASEBALLNET POWERNET_BASEBALL POWERNET...
Need help?
Do you have a question about the LAUNCH F-LITE 1194 and is the answer not in the manual?
Questions and answers