Advertisement
Advertisement
Table of Contents

Summary of Contents for DELTA DORE TYMOOV SET
- Page 1 TYMOOV SET Programming console for Tymoov motors...
- Page 2 Contents Recommendations 1/ Recommendations DANGER! Risk of death by electrocution in case of contact with the electrical components. 1/ Recommendations ..................3 - The connection of the tubular motor to the programming console, and also the final connection of the tubular motor to the electrical network, may only be performed by a certified professional electrician. 2/ Description ....................3 - Connection works may only be performed when the installation is disconnected from the power supply. 3/ Connection / Setting of the stops ............5 - Completely disconnect the electrical supply and secure it to prevent reconnection. - Check that the installation is not supplied with power. 4/ Troubleshooting..................10 5/ ...
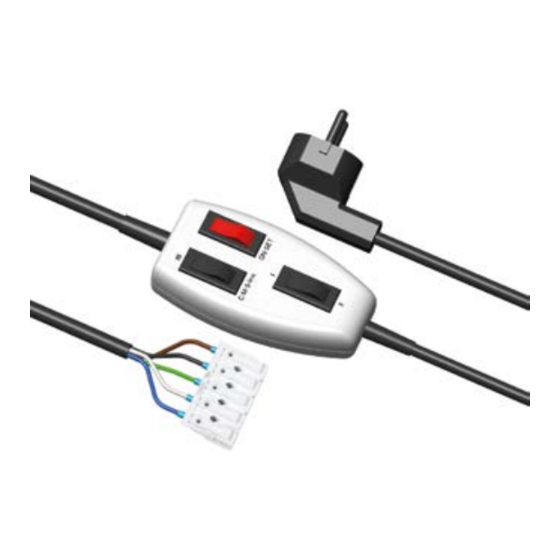
- Page 3 3/ Connection / Setting of the stops Tymoov FB Tymoov FE Yellow / Green Black Yellow / Green Black Grey Brown Grey Brown Blue Blue ❶ Only connect the motor cables to the console without a control point or intermediary ❷ Supply power to the console by connecting the plug to the mains outlet 1st stop: Set button A to position I or II, depending on the desired direction of rotation. Automatic Not accessible 2nd stop: Set button A to position I or II, applying the opposite setting to the 1st stop. 1st stop in automatic mode Set button A to position I or II, depending on the desired direction of rotation.
- Page 4 3/ Connection / Setting of the stops Tymoov F2 Yellow / Green Black Grey Brown Blue ❶ Only connect the motor cables to the console without a control point or intermediary ❷ Supply power to the console by connecting the plug to the mains outlet 1st stop: Set button A to position I or II, depending on the desired direction of rotation. Once the stop has been reached, the motor will briefly activate once. Automatic 2nd stop: Set button A to position I or II, applying the opposite setting to the 1st stop. Once the stop is reached, the motor will briefly activate twice. Depending on the installation of the motor and the shutter, determine whether buttons I and II control raising (^) or lowering (v). 1st stop: Set button A to position I or II, depending on the desired direction of rotation. Once the stop has been reached, the motor will briefly activate once. 2nd stop: Set button A to position I or II, applying the opposite setting to the 1st stop (*). Semi-automatic Once the stop is reached, position button A to STOP. For the top stop: perform the following sequence using short presses (<1 second) on button A: ^ - Stop - ^ - ❸ Setting stops Stop, then hold ^ until the motor activates twice.
- Page 5 3/ Connection / Setting of the stops Tymoov RE2/RP2 Yellow / Green Black Grey Brown Blue ❶ Only connect the motor cables to the console without a control point or intermediary Black Brown ❷ Supply power to the console by connecting the When switched on for the first time, with button A in position I: plug to the mains outlet the motor will a quick cycle to warn that no transmitter is paired. The motor is automatically set to pending pairing for 5 minutes. 1st stop: Button A at position I, press button B for 2 seconds to activate the motor. When the motor has detected its 1st stop (top or bottom), it activates once. 2nd stop: press button B for 2 seconds to activate the motor. When the motor has detected its 2nd stop, it Automatic activates twice. The stops are memorised. 1st stop in automatic mode: Button A at position I, press button B for 2 seconds so that the motor activates (if the direction of rotation does not correspond to the stop that you wish to set, briefly press button B, then press button B once again for 2 seconds so that the motor activates again, in the opposite direction). Once the stop has been reached,...
- Page 6 4/ Troubleshooting You wish to set the stops again. You must first erase the existing stops. Tymoov FE Press button B, then set button A to position I or II. After 5 seeconds, the motor briefly activates once. The stops have now been deleted. Tymoov F2 - Lower the shutter completely, - Set button A to STOP within 5 seconds of the shutter stopping, - Then, perform the following sequence of presses: v - Stop - v - Stop (<3 seconds between each press), then press and hold v. The motor briefly activates twice. The 2 stops are erased. - Set the shutter to the top position, - Set button A to STOP within 5 seconds of the shutter stopping, - Then, perform the following sequence of presses: ^ -Stop-^-Stop (<3 seconds between each press), then press and hold ^. The motor briefly activates twice. The 2 stops are erased. Tymoov RE2/RP2 Button A at position I, press briefly on button B to move the motor towards its top or bottom stop. In the 5 seconds following the stopping of the shutter, set button A to STOP and wait for 10 seconds. Then, while holding button B pressed down, toggle button A to I and only release button B when the motor activates twice. The stops are now erased. 5/ Technical specifications • Operating voltage: 230 V / 50 Hz •...
Need help?
Do you have a question about the TYMOOV SET and is the answer not in the manual?
Questions and answers