Table of Contents
Advertisement
Quick Links
Advertisement
Table of Contents

Subscribe to Our Youtube Channel
Related Manuals for E sky 150 V3 Series


Summary of Contents for E sky 150 V3 Series
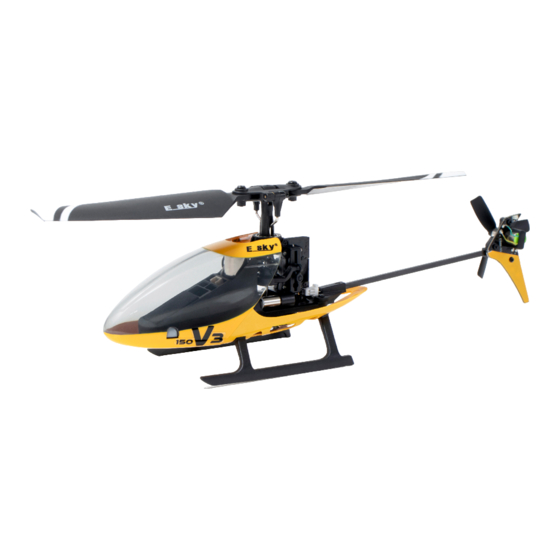
- Page 1 Series / 系列 User Manual / 用户手册...
- Page 2 Languages 语言 English ................................1 - 1 4 中文 .................................. 1 5 - 2 8...
-
Page 3: Table Of Contents
5. Do not touch the motor in case of damage or crash. 1. Keep away from crowds to prevent accidents. 2. Do not operate ESKY 150 V3 series in the shower room or in rain. Moisture can get inside the aircraft which may cause electronic parts to malfunction. - Page 4 Specifications (ESKY150EC) Length .............. 179mm Tail Rotor Diameter ..........38mm Height ..............68mm Flying Weight ............Main Rotor Diameter ........168mm Approx. Flight Time ......... 5 Minutes Specifications (ESKY150V3) Length .............. 179mm Tail Rotor Diameter ..........44mm Height ..............62mm Flying Weight ............
-
Page 5: Box Contents
Box Contents (ESKY150EC) 1 x ESKY 150 EC Helicopter 1 x MINI 6X 2.4Ghz Transmitter 1 x 150mAh 1S 3.7V Li-Po Battery 2 x Main Blade 1 x USB 1S Li-Po Charger 1 x Tail Blade Box Contents (ESKY150V3) 1 x ESKY 150 V3 Helicopter 1 x MINI 6X 2.4Ghz Transmitter 1 x 150mAh 1S 3.7V Li-Po Battery 2 x Main Blade... -
Page 6: Battery Charging
Battery Charging 1) Connect the 7.4 2S LiPo battery to the charger and connect the charger to the USB port. 2) The LED on the charger will glow solid red, indicating charging has begun. 3) The LED turns solid green when the LiPo battery is fully charged. Soild Red: Charging Soild Green: Charging completed / Power connected (Stand by) Flying Checklist... -
Page 7: Install And Remove The Flight Battery
Install and Remove the Flight Battery The canopy cover is mounted on the canopy support rod Gently pull the canopy cover forwards to remove Battery Cover Battery plug Power Port Align the battery plug on the flight battery with the power port on the helicopter and press down the battery cover to secure the battery Install the canopy cover back on the helicopter... - Page 8 Install and Remove the Flight Battery When removing the battery, please hold the left and right ends of the battery cover and pull out the battery vertically upward. Do not shake the battery or pull it out in any other direction to avoid damaging the battery power plug or the power port on the helicopter.
-
Page 9: Transmitter Control (Rtf Version) - Left Hand Throttle Mode 2
Transmitter Control (RTF Version) - Left hand throttle Mode 2 Power LED indicator Mode Switch Throttle Cut Switch Rudder (Left/Right) Aileron (Left/Right) Throttle (Up/Down) Elevator (Up/Down) Throttle Trim Elevator Trim Rudder Trim Aileron Trim Power Switch (Holding down for ON/OFF) Understanding the Primary Flight Controls Mode 2 When pushing the “Left Stick”... -
Page 10: Transmitter Control (Rtf Version) - Right Hand Throttle Mode 1
Transmitter Control (RTF Version) - Right hand throttle Mode 1 Power LED indicator Throttle Cut Switch Mode Switch Rudder (Left/Right) Aileron (Left/Right) Elevator (Up/Down) Throttle (Up/Down) Elevator Trim Throttle Trim Rudder Trim Aileron Trim Power Switch (Holding down for ON/OFF) Understanding the Primary Flight Controls Mode 1 When pushing the “Right Stick”... -
Page 11: Mode Switch And Altitude Hold With Barometer
Mode Switch and Altitude Hold with Barometer Switch to the LO mode that enables with the altitude hold feature This mode is recommended for beginners (indoor) 1. Set the THROTTLE CUT switch to the GREEN dot position and push the throttle stick, helicopter will lift and maintain a consistent altitude. -
Page 12: Throttle Cut
Throttle Cut Throttle cut is used to turn off the motor quickly if the helicopter is out of control. The motor will stop spinning and disable of throttle control when throttle cut is switched to RED dot position, the motor will continue to spin at low idle speed and control by throttle when throttle cut is switched to GREEN dot position and the throttle at the lowest position. -
Page 13: Common Parts Listing
Common Parts Listing ESKY008664 ESKY008665 ESKY008666 ESKY006311 ESKY005805 Main Rotor Housing Main Gear Bearing Set (5*8*2) Main Rotor Blade Grip Set Swashplate & Pushrod Set ESKY005439 ESKY008667 ESKY005435c ESKY006007 ESKY008668 Bearing Set (3*6*2) Linear Servo Set Li-Po Battery USB Charger Screws Set ESKY008083 ESKY008083a... -
Page 14: Dedicated Parts Listing
Dedicated Parts Listing (150EC) ESKY008880 ESKY008717 ESKY008900 ESKY008885 ESKY008674 Main Motor Main Blade Set Tail Blade Tail Motor Fuselage Set (with Tail Motor & LED) ESKY008662 Multi Control Unit (150EC) Dedicated Parts Listing (150V3) ESKY008717 ESKY008669 ESKY008882 ESKY008672 ESKY008880 Main Motor Main Blade Set Tail Blade Tail Motor... - Page 15 Dedicated Parts Listing (150BL) ESKY008881 ESKY008718 ESKY006851 ESKY008884 ESKY008883 Main Motor Main Blade Set Tail Blade Set Tail Motor Tail Motor (with LED) ESKY008675 ESKY008663 Fuselage Set Multi Control Unit (150BL) (without Tail Motor & LED)
-
Page 16: Troubleshooting Guide
*If you could not solve the problems by using the below methods* Troubleshooting Guide *Please contact our service support team* Problem: Battery bulges after several flight Possible Cause: Keep the helicopter spinning when it can no longer be raised or over discharge the battery or long time not in use (Solution: Replace with a new battery) Problem: Green LED in the helicopter flashes slowly in flight Possible Cause: LiPo battery low voltage (Solution: Recharge the LiPo battery) - Page 17 安全注意事项和警告 直 升 机 模 型 是 通 过 无 线 电 信 号 控 制 的 , 在 操 作 时 可 能 会 受 到 其 他 无 线 电 信 号 干 扰 , 此 干 扰 可 能 会 影 响 直...
- Page 18 产品参数 (ESKY 150EC - 蜂鸟) 3 8 m m 长 度 ......... . . 1 7 9 m m 宽...
- Page 19 包装内容 (ESKY 150EC - 蜂鸟) 1 x 蜂 鸟 直 升 机 1 x M I N I 6 X 2 . 4 G h z 发 射 机 1 x 1 5 0 m A h 1 S 3 . 7 V 锂 电 池 2 x 主...
- Page 20 飞行电池充电方法 1 ) 将 3 . 7 V 1 S 锂 电 池 插 入 充 电 器 , 然 后 将 充 电 器 插 入 U S B 端 口 或 U S B 电 源 。 2 ) 充 电 器 上 的 红 色 灯 常 亮 , 表 明 充 电 已 开 始 。 3 ) 电...
- Page 21 飞行电池安装与取下 注 意 ! 机 头 罩 是 安 装 在 机 壳 支 撑 杆 上 向 外 轻 抠 机 头 罩 即 可 取 出 , 无 需 拆 卸 固 定 螺 丝 电 池 保 护 壳 电...
- Page 22 飞行电池安装与取下 注 意 ! 取 下 电 池 时 请 握 住 电 池 保 护 壳 左 右 两 端 并 垂 直 向 上 拔 出 电 池 请 勿 摇 晃 电 池 或 从 其 他 方 向 施 力 拔 出 电 池 , 以 免 损 坏 电 池 电 源 插 头 或 直 升 机 上 的 电 源 端 口...
- Page 23 左手发射机介绍 - Mode 2 电 源 指 示 灯 模 式 开 关 油 门 熄 火 开 关 航 向 ( 左 / 右 ) 侧 滚 ( 左 / 右 ) 油 门 ( 上 / 下 ) 俯...
- Page 24 右手发射机介绍 - Mode 1 电 源 指 示 灯 油 门 熄 火 开 关 模 式 开 关 航 向 ( 左 / 右 ) 侧 滚 ( 左 / 右 ) 俯 仰 ( 上 / 下 ) 油...
- Page 25 模式开关与油门辅助控制 模 式 开 关 在 L O 位 置 时 有 油 门 辅 助 控 制 , 适 合 室 内 入 门 练 习 1 ) 模 式 开 关 在 L O 位 置 时 , 拨 动 ” 油 门 熄 火 开 关 ” 到 绿 点 位 置 后 推 动 油 门 摇 杆 , 直 升 机 将 自 动 上 升 至 固 定 高...
- Page 26 油门熄火开关 当 直 升 机 失 去 控 制 时 油 门 熄 火 开 关 可 用 于 快 速 关 闭 电 机 。 油 门 熄 火 开 关 拨 至 红 点 位 置 时 电 机 将 停 止 转 动...
- Page 27 通用配件表 (150EC - 蜂鸟 / 150V3 - 教一 / 150BL - 小飞狼) E S K Y 0 0 8 6 6 4 E S K Y 0 0 8 6 6 5 E S K Y 0 0 8 6 6 6 E S K Y 0 0 6 3 1 1 E S K Y 0 0 5 8 0 5 倾...
- Page 28 专用配件表 (150EC - 蜂鸟) E S K Y 0 0 8 8 8 0 E S K Y 0 0 8 7 1 7 E S K Y 0 0 8 9 0 0 E S K Y 0 0 8 8 8 5 E S K Y 0 0 8 6 7 4 主...
- Page 29 专用配件表 (150BL - 小飞狼) E S K Y 0 0 8 8 8 1 E S K Y 0 0 8 7 1 8 E S K Y 0 0 6 8 5 1 E S K Y 0 0 8 8 8 4 E S K Y 0 0 8 8 8 3 主...
- Page 30 飞行中的异常排除 (如果以下方法未能解决问题,请与售后支持联系) 情 况 : 为 什 么 几 次 飞 行 后 电 池 会 膨 胀 ? 原 因 : 直 升 机 己 经 不 能 升 起 时 继 续 让 直 升 机 保 持 转 动 或 其 他 原 因 导 致 电 池 过 放 或 长 时 间 不 使 用 未 做 维 护 ( 解...
- Page 32 All instructions are subject to change at the sole discretion of Zonda Hobby. For up-to-date product literature, visit esky-rc.com and click on the support tab for this product. 忠 达 模 型 保 留 更 改 所 有 说 明 的 权 利 , 说 明 及 其 它 附 属 资 料 的 变 更 将 不 另 行 通 知 。 如...
Need help?
Do you have a question about the 150 V3 Series and is the answer not in the manual?
Questions and answers