Advertisement
Quick Links
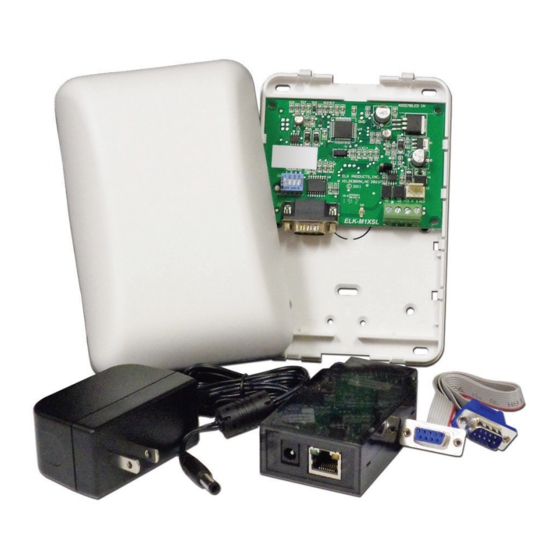
ELK-M1XSLC
M1 Interface kit for Lutron
Homeworks QS or Caséta Line
APPLICATION:
The ELK-M1XSLC Interface Kit has been enhanced
to support Lutron's Homeworks and Caséta products.
Interfacing M1 Control to Lutron allows intelligent control
of devices in response to security system actions or
conditions. The most typical integration devices supported
are:Lights, Shades, and Keypad controllers. The level
of integration is dependent on which type and model of
Lutron devices being implemented. Some models of
Thermostats are also supported.
ELK-M1XSLU SPECIFICATIONS:
•
Connects to the ELK-M1 Keypad Databus
•
Addressable as a TYPE 5 Databus (ID 1-7)
•
Operating Voltage: 12 Volts DC Supplied from M1
•
Current Draw: 31mA
•
Activity/Status LED (Orange)
•
Auto-Reset Hardware Watchdog Circuit
•
Housing Dimensions: 4.25" x 6.375" x 2.125"
•
Circuit Board: 2.75" x 3.95"
•
Connects to IP232 via RS232 and null modem (Incl.)
•
Connects to M1 via 4 screw terminals
ELK-IP232 SPECIFICATIONS:
• Converts RS232 Serial to IP for connection to the IP
port on Lutron's QS or Smartbridge Pro Interfaces
• LED Indicators for Power, Link, and Data
• Operating Voltage: 12 Volts D.C.
Supplied from ELK-P1216 Power Supply (Incl)
• Current Draw: 135 mA
• Dimensions: 3.85" L x 1.7" W x 0.93" D
2017 Elk Products Inc. All rights reserved.
Lutron, Homeworks, QS, Caséta Wireless, and Smartbridge Pro are
registered trademarks of Lutron Electronics Co., Inc.
828-397-4200 828-397-4415 Fax
L669 Rev. A 1/25/2016
PO Box 100
3266 US Hwy 70 West
Hildebran, NC 28637
http://www.elkproducts.com
HOMEWORKS
INSTRUCTIONS
To support integration with Homeworks
!
QS, a firmware update to the M1XSLU is
required. See page 4 for details.
Specifications are Subject to Change without notice.
NOTICE: Drawings, illustrations, diagrams, part numbers, etc. are provid-
ed as reference only and are based on equipment available at the time
the information was created. All information contained in this document
are subject to change without notice.
The extent of integration between Elk Products and Partner Mfgs varies,
and there may be situations or limitations beyond Elk's control that make
certain desirable features unavailable or unusable. Partner products and/
or protocols, including Elk's may not contain the capabilities or data defi-
nitions to permit additional integration beyond what is currently available.
Partners may also, at their option, add, modify, or discontinue features or
support without notification.
For reasons stated herein, Elk Products makes no warranty that it will
be able to integrate all available features or operations, nor does it make
any express or implied warranties of fitness for a particular purpose or of
merchantability. Refer to Elk's Limited Warranty.
QS
®
Printed in USA
Advertisement

Subscribe to Our Youtube Channel
Related Manuals for Elk ELK-M1XSLC


Summary of Contents for Elk ELK-M1XSLC
- Page 1 The extent of integration between Elk Products and Partner Mfgs varies, Supplied from ELK-P1216 Power Supply (Incl) and there may be situations or limitations beyond Elk's control that make certain desirable features unavailable or unusable. Partner products and/ • Current Draw: 135 mA or protocols, including Elk's may not contain the capabilities or data defi- •...
- Page 2 Please refer to the following pages for the steps and requirements of interfacing. *** The ELK-IP232 contained in this kit is pre-loaded with the most recent firmware version (v1.0.18 or later). If you already own an older IP232 and attempt to use it instead of the one supplied In this kit, the older unit will most likely need to be firmware update to the most recent version (v1.0.18 or later) prior to use.
-
Page 3: Equipment Setup
2 homerun cables directly to the M1 Control! The preferred way to connect multiple bus devices to M1 is to either daisy chain connect them along each homerun wire, or add a data bus hub device (Elk M1DBH or M1DBHR) in the panel that will support connection of mulitple homerun cables. - Page 4 LUTRON HOMEWORKS QS 2.10 IMPORTANT! THE ELK-M1XSLU MUST BE UPDATED TO SPECIAL FIRMWARE VERSION 80.0.6 FOR COMPATIBILITY WITH LUTRON HOMEWORKS QS. This special firmware version can be downloaded from the support section of our website, www.elkproducts.com. Procedures for Updating the M1XSLU firmware Connect a 9 pin serial cable or USB to serial adapter from the Computer to the 9 Pin RS232 Connector on the M1 Control.
- Page 5 3 - Configuring the IP232 IP Interface Download and install the IP232 Configuration PC software utility from the ELK website (www.elkproducts.com). A copy of the IP232 instructions is packed with the M1XSLC kit with steps for defaulting, resetting, or updating the IP232 firmware if needed.
- Page 6 Processor and keep that connection open at all times. If the connection should ever drop the IP232 will automatically reconnect. TOPOLOGY: ELK-M1 < M1 Databus > ELK-M1XSLU < RS-232 > ELK-IP232 < IP > Lutron Homeworks QS Processor In the Outgoing Connection box click Add New to start the rule wizard.
- Page 7 The completed configuration should look similar to the above with the exception of the actual IP addresses. Click Send Settings (To IP232) to program all of these settings into the ELK-IP232. 3.10 We suggest saving the configuration to hard disk or a thumbdrive for later retrieval. Click Save Settings (To Disk).
- Page 8 LUTRON HOMEWORKS QS Adding Lutron Homeworks QS Lighting Devices to M1 Each Lutron Homeworks QS device must have a unique Device ID. Integrating Homeworks QS lighting devices into M1 involves mapping their Lutron Device IDs to corresponding M1 Light Device numbered locations. Any M1 Light Device locations that do not have a corresponding Lutron Device ID should be left blank (unprogrammed).
- Page 9 LUTRON HOMEWORKS QS Controlling Homeworks QS Lights and Devices using Rules 4.13 Select ElkRP > Automation > Rules. 4.14 Click New to start a new Rule. E.G. Turn ON a Flood Light when the System is Armed Away. 4.15 Click WHENEVER > Security/Alarms > Is Armed > Armed Away. A pop-up box appears to pick the Area (par- tition).
- Page 10 LUTRON HOMEWORKS QS Adding Lutron TouchPro Wireless Thermostats to M1 Lutron's TouchPro Wireless HVAC Thermostats are compatible with the Lutron Homeworks QS system. The M1XSLU can interface with up to sixteen (16) of these thermostats, but special steps are needed due to the architecture of the equipment. 1.
- Page 11 (the one it replaced). IMPORTANT! We strongly recommend that each HVAC Thermostat be tested after any changes are made to Elk-M1 or the Lutron Homeworks QS network. Verify that each is communicating and responding properly. Test all ElkRP Rules that involve a Thermostat.
- Page 12 LUTRON HOMEWORKS QS Controlling TouchPro Wireless HVAC Thermostats using Rules Select ElkRP > Automation > Rules. Click New to start a new Rule. Example: Lower the Heat and Raise the Cool Setpoints when Armed. 5.10 Click WHENEVER > Security/Alarms > Is Armed > Armed Away. A pop-up box appears to pick the Area (partition). Use the drop down to pick the area or Click OK to accept "Area 1".
- Page 13 Buttons on Homeworks QS Wall or Tabletop Keypads, and Visor Ctrl Receivers may be programmed to activate Groups of lights (Scenes) with a single press. To permit M1 to activate these buttons, Elk reserved the use of "Set to Level" and Fade Rate 7 to activate special commands to the M1XSLU.
- Page 14 LUTRON HOMEWORKS QS Phantom Keypads The Homeworks QS Designer PC Software allows for the configuration of Phantom Keypads. "Buttons" on these phantom keypads can be programmed to active groups of lights (scenes). M1 can activate these "buttons" through rules, using set to levels 1 to 99 with Fade Rate 7.
Need help?
Do you have a question about the ELK-M1XSLC and is the answer not in the manual?
Questions and answers