Advertisement
Quick Links
Go-Mini User Manual
Table of Contents
1.
2.
3.
4.
5.
6.
7.
8.
9.
Config................4
Water................14
Create Model.........26
Edit Model...........30
Create Disable.......32
Edit Disable.........35
Sensors..............38
Logs.................39
Alarms...............41
1
Advertisement

Summary of Contents for GTI Go-Mini
- Page 1 Go-Mini User Manual Table of Contents Config....4 Water....14 Create Model..26 Edit Model...30 Create Disable..32 Edit Disable..35 Sensors....38 Logs....39 Alarms....41...
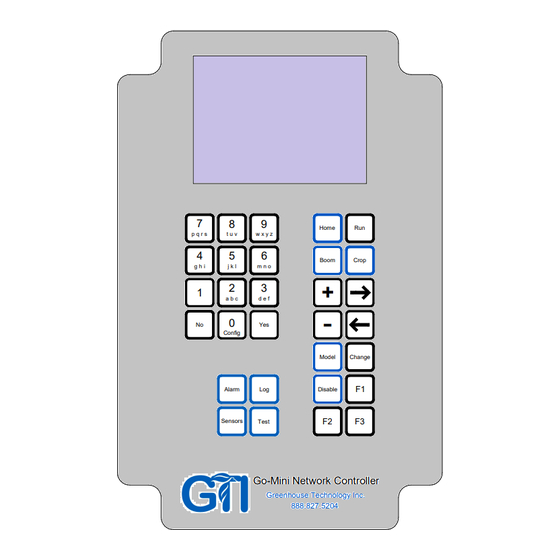
- Page 2 Boom Crop g h i j k l m n o a b c d e f Config Model Change Alarm Disable Sensors Test Go-Mini Network Controller Greenhouse Technology Inc. 888.827.5204...
- Page 3 Scenario Joe has (4) booms that he wants to run using VPD. He purchased a GTI Mini-GO-1 and has physically installed it, but hasn't configured anything software-wise. 1. Joe Configures his Network First, Joe Sets the time and date. Starting at the Home Screen:...
- Page 4 Joe presses to open the screen up for changes Change Clock 05:37 (24hr) 10/20/17 (MM/DD/YY) g h i Config Config Clock 10:40 (24hr) 10/20/17 (MM/DD/YY) t u v p q r s Clock 10:40 (24hr) 11/18/17 (MM/DD/YY) Clock 10:40 (24hr) 11/18/17 (MM/DD/YY) He presses...
- Page 5 Now it's time to set up the network units: Config Clock Network Units Sensors Utilities a b c About Network Units 1 Boom 1 2 Boom 2 3 Boom 3 4 Boom 4 Network Unit 1 Name: Boom 1 Address: Type: Boom Status:...
- Page 6 Name 4oom 01 He presses g h i (up to 12 characters) Name Boom 01 then g h i (up to 12 characters) Name Hoom 01 then again g h i (up to 12 characters) Name Hoom 1 to move to the next space (up to 12 characters) He fills out the rest of the name, moving the cursor with the arrow keys and cycling to the desired letter using multiple key presses on number...
- Page 7 He presses to save the new name Name House3south (up to 12 characters) Network Unit 1 Name: House3south Address: Type: Boom Status: Inactive Network Unit 1 Name: House3south Address: Type: Boom Status: Inactive Network Unit 1 Name: House3south Address: Type: Boom Status: Inactive...
- Page 8 Network Unit 1 Name: House3south Address: Type: Boom Status: Active The screen looks good. Joe presses to save it. Network Unit 1 Name: House3south Address: Type: Boom Status: Active < > Network Unit 2 Name: Unit 02 Address: Type: Boom Joe presses to add another Network Unit Status:...
- Page 9 Network Unit 2 Name: House3north Address: Type: Boom And saves it Status: Active < > Joe adds and saves the remaining two booms: Network Unit 3 Network Unit 4 Name: House2south Name: House2north Address: Address: Type: Boom Type: Boom Status: Active Status: Active...
- Page 10 Clock Network Units Sensors Utilities d e f About Sensors AT Sensor Unit: Fahrenheit Type: Temp GTI Calibrate: + 00 Status: Inactive Joe notices that it only needs to be active. He presses AT Sensor Unit: Fahrenheit Type: Temp GTI...
- Page 11 Note: 'Unit' field values are: {Fahrenheit, Celsius} Note: 'Type' field values are: {Temp GTI, RH GTI}. Sensors Joe wants to program the RH sensor. He presses d e f RH Sensor Type: RH GTI Calibrate: + 00 Status: Inactive RH Sensor...
- Page 12 RH Sensor RH Sensor Type: RH GTI Type: RH GTI Calibrate: - 00 Calibrate: - 00 Status: Active Status: Inactive RH Sensor RH Sensor RH Sensor RH Sensor RH Sensor Type: RH GTI Type: Type: Type: Type: RH GTI RH GTI...
- Page 13 2. Joe Waters His Plants Scenario A: Manual Joe wants Boom 1 to water crop 1 right now. Starting from the Home Screen: Status 10:41 Sensors Normal Boom Booms Normal And picks Boom 1 from the list of booms: Boom House3South House3North House2South...
- Page 14 Crop Status 10:42 House3South Poinse-10-15 He presses manual < > House3South Crop01 A confirmation screen appears: Run? Yes / No Crop Status 10:42 Boom is idle House3South Poinsett-10-15 Crop is pending Joe presses manual < > Within a few seconds, the screen should read: Crop Status 10:42 Boom is running Crop 01...
- Page 15 Note: Boom Status Values: {A = alarm - boom is in comm alarm E = error - boom has an error (e.g. no motion error) R = boom is in remote, ready to go B = a command has been sent to the boom ("busy")}...
- Page 16 Scenario B: Timed Crop Status 10:42 House3South Poinse-10-15 He presses Change manual < > Crop Status 10:42 House3South Crop01 To open the screen for changes : manual For this parameter, there are 4 values: {manual, timed, target, model} Crop Status 10:42 House3South Crop01...
- Page 17 Crop Status 10:42 House3South Poinse-10-15 He presses to save. timed 08:00 < > Boom 1 is now scheduled to water Crop 01 every day at 8am.
- Page 18 Scenario C: VPD (No model) Crop Status 10:42 House3South Poinse-10-15 He presses Change manual < > Crop Status 10:42 House3South Crop01 To open the screen for changes : manual Again, for this parameter, there are 4 values: {manual, timed, target, model} Crop Status 10:42 House3South...
- Page 19 Crop Status 10:42 House3South Crop01 Then he presses to save: Idle target 00000 / 00385 vpd Crop Status 10:42 House3South Boom 1 is now scheduled to water Crop 01 Crop01 every time the accumulated VPD hits 00385 target 00000 / 00385 vpd <...
- Page 20 Scenario D: VPD (with model) Crop Status 10:42 House3South Poinse-10-15 He presses Change manual < > Crop Status 10:42 House3South Crop01 To open the screen for changes : manual Again, for this parameter, there are 4 values: {manual, timed, target, model} Joe presses three times to cycle to "model".
- Page 21 Config Poinsettia OrnamentalPepper < > Immediately the days screen for the model appears. The Go-Mini is "assuming" that if you had to pick a model, you probably have to pick a day. Fuschia 54 Days 01000 g h i...
- Page 22 Picking a disable model works exactly the same way. Crop Status 10:42 House3South Crop01 model 00000 / 00970 M03 Fuschia E01 GeraniumEnab Crop Status 10:42 House3South Crop01 Change model 00000 / 00970 M03 Fuschia E01 GeraniumEnab Enables GeraniumEnab TuberBegonia FuschiaEnab PoinsettiaEn d e f Config...
- Page 23 Note - If Joe doesn't want to see the Models / Enables / Days, he can just type digits instead: Crop Status 10:42 B1 House3South C01 Crop01 model g h i d e f Config Config 00000 / 00080 M01 GeraniumProp D01 GeraniumEnab Crop Status 10:42...
- Page 24 Joe has decided that he wants to name Boom 1's Crop 01 something more memorable. He goes back to the Crop Status Screen for this crop: Crop Status 10:42 Crop Status 10:42 House3South House3South Crop01 Crop01 Change model model 00000 / 00970 00000 / 00970 M03 Fuschia M03 Fuschia...
- Page 25 After a few key presses, he has created the crop's new name. Name Fuschia-11-26 He presses to save it Crop Status 10:42 House3South Fuschia-11-26 again model 00000 / 00970 M03 Fuschia E03 FuschiaEnab to save his changes to the boom status screen. Crop Status 10:42 House3South...
- Page 26 3. Joe Creates a Model We start by time-travelling to a time before Joe created his first Model, when the only Model in the Go-Mini was the Dummy Model (The Model01 factory installed on the Go-Mini. The Go-Mini is displaying its Status Screen...
- Page 27 He uses the number and arrow keys to rename the Model, and confirms the name: Name GeraniumProp GeraniumProp 10 Days 01000 01000 Yes = Create then he moves the cursor to the number of days and changes it to 30, then moves to the data points GeraniumProp GeraniumProp...
- Page 28 Now his second data point, a 920 vpd target on Day 22 GeraniumProp 30 Days 00080 a b c a b c 01000 Yes = Create GeraniumProp GeraniumProp 30 Days 30 Days 00080 00080 00920 00920 a b c w x y z Config Config Config...
- Page 29 GeraniumProp 30 Days 00080 00120 00160 00200 00240 > Joe pages through the rest o f Crop Model 02's Day screens using the arrow keys: GeraniumProp GeraniumProp GeraniumProp 30 Days 30 Days 30 Days 00480 00680 00280 00520 00720 00320 00560 00760 00360...
- Page 30 4. Joe Edits a Model Joe's not quite satisfied with his GeraniumProp model yet. He wants to edit a couple of the vpd targets. He wants to change the first day's target, and add 2 more days. From the first page of the Model's Day screen (where he left off), GeraniumProp 30 Days 00080...
- Page 31 GeraniumProp 32 Days 00100 00120 00160 00200 00240 > Joe presses (or, alternately, x6 for the scenic route) d e f GeraniumProp GeraniumProp 32 Days 32 Days 01000 01000 Change 01000 01000 < < When Joe added the two days, the Mini-Go populated them with data from the model's last day (then day 30).
- Page 32 5. Joe Creates an Enable Just after creating his first Model, Joe decides to create an "Enable". The process is very similar. From the home screen: Enable Enable01 < > Name EnableName Off x5.00 EnableName 10 Days 20:00 - 08:00 Change 20:00 - 08:00 >...
- Page 33 He presses to move the cursor to the multipler, and GeraniumEnab Off x8.25 10 Days 20:00 - 05:00 t u v 20:00 - 05:00 a b c j k l > to change the off multiplier to 8.25. The off multiplier is applied to the VPD target during off hours.
- Page 34 Here's the finished Enable. GeraniumEnab GeraniumEnab GeraniumEnab Off x8.25 Off x8.25 Off x8.25 30 Days 30 Days 30 Days 18:58 - 06:04 18:48 - 06:24 18:38 - 07:44 18:56 - 06:08 18:46 - 06:28 18:36 - 06:48 18:54 - 06:12 18:44 - 06:32 18:34 - 06:52 18:52 - 06:16...
- Page 35 6. Joe Edits an Enable Joe wants to edit some start and end times in the enable that he just created. Starting at the Home screen: Enable Status 10:41 Enable01 Sensors Normal GeraniumEnab Disable a b c Config Booms Normal <...
- Page 36 The additional 2 days were automatically populated with Day 30's data, as that was previously the last day. Joe wants to go ahead and tweak it: While you're in view mode on this screen, pressing the day number (2 digits) brings you to the page where that day is shown.
- Page 37 GeraniumEnab GeraniumEnab Off x8.25 Off x8.25 32 Days 32 Days 17:58 - 08:04 17:58 - 08:04 t u v t u v Config Config 17:56 - 08:08 17:56 - 08:08 < <...
- Page 38 7. Sensors Occasionally Joe might want to check his sensors to see their values.Starting at the Home Screen: Status 10:40 Sensors 10:40 Sensors Normal 74.7 88.4 93.2 Sensors Booms Normal +0.42 / 10s This is just a view screen to show Joe his sensor values. Note: If Joe had selected 'Celsius' for his temperature units, the screen should look like this: Sensors...
- Page 39 8. Logs / Alarms A: Network Logs Occasionally Joe might want to check his logs to see what his booms have been doing. Starting at the Home Screen: Status 10:40 Sensors Normal Alarm Booms Normal Network Log Network Log B1 C08 10:18 B2 C04 10:40...
- Page 40 B: Log Status Indicators right column: c = complete i = incomplete (ongoing) e = error...
- Page 41 10. Test The Home screen doesn't give all of the info that Joe might want to see about his network and the GoMini controller. To see detailed info, GOMINI QUICK TEST Board Temp: 76.4F Air ADC: 1023 -107.8F Leaf ADC: 1023 -107.8F Humidity ADC:0000 0.0 Joe presses...