Advertisement
Available languages
Available languages
Quick Links
EN
INSTRUCTION
RPW
IN20022 REV. E, 2022-12-16
C C a a u u t t i i o o n n ! ! Read and understand the instruction before using the product.
C C a a u u t t i i o o n n ! ! Ensure that the installation complies with local safety
regulations.
W W a a r r n n i i n n g g ! ! Before installation or maintenance, the power supply must first
be disconnected in order to prevent potentially lethal electric shocks! In-
stallation or maintenance of this unit should only be carried out by quali-
fied personnel. The manufacturer is not responsible for any eventual
damage or injury caused by inadequate skills during installation, or through
removal of or deactivation of any security devices.
Function
The repeater is designed to increase the effectiveness and versatility of
the wireless system. It makes your system more powerful by increasing
the maximum possible distance between the receiver and the sensor or
transmitter.
Technical Data
Supply voltage
230 V ~ (100...240 V ~ 50/60 Hz)
Power adapter
12 V DC, 1 A
Power consumption
0.5 A
Battery backup
yes
Frequency
868 MHz
Protection class
IP30
Mounting
Wall
Material, housing
Polycarbonate (PC)
Colour, housing
RAL9010
Dimensions
185 x 130 x 30 mm
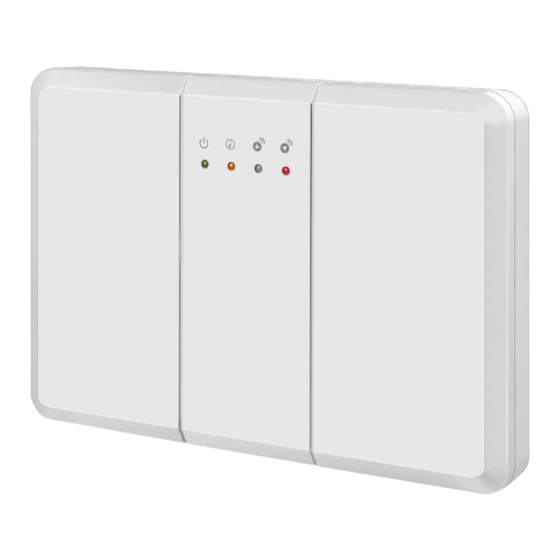
Product overview
1 2
3 4
10
1
Power LED (green)
On: Powered by a power adapter or internal re-
chargeable battery
Flash: Internal rechargeable battery is low on
power
2
Mode LED (yellow)
On: The repeater is in pairing mode (RCW-
M32) or clear mode
Flash (1 flash every 1 s): the repeater is in walk
test mode
Slow flash (1 flash every 2 s): the repeater is in
pairing mode
3
Transmission: Receive
The blue LED lights up when the repeater re-
LED (blue)
ceives a signal transmission
4
Transmission: Trans-
The red LED lights up when the repeater trans-
mit LED (red)
mits a signal
5
DIP-switches
Determines the mode for the repeater
6
Function button
After activating DIP-switch 3, pressing the but-
ton will clear the previously programmed mem-
ory and resets the repeater to factory settings
7
Power switch
Recharging of the internal battery
8
Tamper switch
Tamper violation function
9
Mounting hole
For wall mounting (in combination with the
mounting bracket)
10
Power connection
Power adapter input for supply voltage
(DC)
11
Mounting bracket
For wall mounting
RPW
Installation
Mounting
The repeater can be placed on a wall or ceiling, vertically or horizontally.
It is mounted the following way:
1. Using the holes of the mounting bracket as a template, drill holes
into the mounting surface.
2. Insert the wall plugs, if fixing into plaster or brick.
3. Screw the mounting bracket to the surface.
5
6
7
4. Hook the repeater onto the mounting bracket (with the mounting
holes of the repeater).
Wiring
8
9
A power adapter is required to connect to a wall power outlet.
N N o o t t e e ! ! Only use the included adapter, or an equivalent.
After connecting the repeater to the supply voltage with the adapter, a
long beep will sound and the green LED will light up. The repeater will
11
send a failure signal to the receiver when the repeater is unplugged from
the supply voltage for 30-60 s. When the repeater is connected to the
supply voltage again for 30-60 s, the repeater will send a restore signal to
the receiver.
In addition to the adapter, there is a rechargeable battery inside the
repeater, which serves as a back-up power in case of a power failure. To
activate, slide the power switch to the ON position when the supply
voltage is connected. Power is now supplied to both the repeater and the
battery. It takes approximately 72 hours to fully charge the battery. The
repeater can detect the battery charge. When the battery charge is low,
the green LED will flash.
Settings
The DIP-switches determine which mode the repeater is in. A switch in
the up position indicates the ON mode, else it is in OFF mode.
N N o o t t e e ! ! The unit must be powered for the DIP-switch settings to take
effect.
Example: DIP switch 3 is slid to the ON position when the repeater is
turned off. When the repeater is turned on, it will not enter clear mode.
However, if the DIP switch 3 is slid to the OFF position first, followed
by sliding to the ON position, then the repeater will enter clear mode.
ON
1
2
3
4
5
6
7
8
1 (13)
Advertisement

Related Manuals for Regin RPW


Summary of Contents for Regin RPW
- Page 1 INSTRUCTION Installation Protection class IP30 Mounting Wall Mounting Material, housing Polycarbonate (PC) The repeater can be placed on a wall or ceiling, vertically or horizontally. Colour, housing RAL9010 It is mounted the following way: Dimensions 185 x 130 x 30 mm 1.
-
Page 2: Tamper Protection
N N o o t t e e ! ! The receiver can use a maximum of 32 channels. Each connected Walk test mode. The repeater will emit 1 long beep and the yellow device, including the RPW, will use one channel in the receiver. Therefore, Pairing with sensor... - Page 3 Pairing a repeater with another repeater In some circumstances, multiple repeaters must be used to get the desired signal range. The repeaters must be paired with each other first, and then paired with the receiver. Always start pairing the repeaters from the furthest repeater from the receiver to the one closest to the receiver, see example 1 below.
- Page 4 2. Sätt i pluggarna om den fästs i gips eller tegel. Contact 3. Skruva fast fästanordningen på ytan. AB Regin, Box 116, 428 22 Kållered, Sweden 4. Haka fast repeatern på fästanordningen (med monteringshålen på Tel: +46 31 720 02 00, Fax: +46 31 720 02 50 repeatern).
- Page 5 N N o o t t e e r r a a ! ! Mottagaren kan använda högst 32 kanaler. Varje uppkopplad en- 1. I normalt driftläge, sätt DIP-switch 2 i läget PÅ för att placera den i het, inklusive RPW, använder en kanal i mottagaren. Därför är det totala DIP-switch Funktion PÅ...
- Page 6 Flera repeaters Parkoppling av flera repeaters För att utöka signalräckvidden som blir med en repeater, kan man använda flera repeaters. De måste då parkopplas med varandra såväl som med mottagaren och givarna/transmittrarna. RCW-... För att lyckas med parkopplingen måste man börja med repeatern som är längst bort från mottagaren.
- Page 7 Der Verstärker kann vertikal oder horizontal an einer Wand oder Decke befestigt werden. Er wird wie folgt montiert: AB Regin, Box 116, 428 22 Kållered, Sverige Tel: +46 31 720 02 00, Fax: +46 31 720 02 50 1. Verwenden Sie die Löcher der Montagehalterung als Schablone und www.regincontrols.com, info@regincontrols.com...
- Page 8 Funktionstest H H i i n n w w e e i i s s ! ! Der Empfänger kann maximal 32 Kanäle nutzen. Jedes ange- ler (oder Sender) schlossene Gerät, einschließlich RPW, verwendet einen Kanal im Empfän- Funktionstest Funktionstestmo- Normalmodus Um die Signalreichweite des Verstärkers mit den Fühlern oder dem...
- Page 9 2. Halten Sie die Funktionstaste 5 Sekunden lang gedrückt. Der 1. Schieben Sie im Normalmodusden DIP-Schalter 1 am Verstärker B 1. Beginnen Sie mit dem Verstärker, der am weitesten vom Empfänger Verstärker sendet einen langen Piepton aus, um anzuzeigen, dass alle in die Position ON, um ihn in den Kopplungsmodus zu versetzen.
-
Page 10: Caractéristiques Techniques
Montage Mural Matière du boîtier Polycarbonate (PC) Kontakt Couleur, boîtier RAL9010 Regin Controls Deutschland GmbH, Haynauer Str. 49, 12249 Berlin, Dimensions 185 x 130 x 30 mm Deutschland Tel.: +49 30 77994-0, Fax: +49 30 77994-79 www.regincontrols.de, info@regincontrols.de 10 (13) -
Page 11: Vue D'ensemble Des Produits
Vue d’ensemble des produits Installation Montage Le répéteur peut être placé sur un mur ou un plafond, verticalement ou horizontalement. Il est monté de la manière suivante: Interrupteur DIP Fonction 1. Utilisez les trous du support de montage comme gabarit, percez des Appairage avec Mode appairage Mode normal... - Page 12 Mode test de fonctionnement. Le répéteur émettra 1 long bip Pour appairer plusieurs répéteurs, commencez par le répéteur le plus reil connecté, y compris RPW, utilisera un canal du récepteur. Ainsi, le et la LED jaune clignotera (1 flash par seconde).
- Page 13 – Le capteur D n’est pas appairé avec les répéteurs A et B. Contact 5. Appairez tous les capteurs, qui sont appairés à un répéteur, avec le Regin France, 32 rue Delizy, Hall 3, 93500 Pantin récepteur : Tél. : +33(0)1 41 83 02 02, Fax : +33(0)1 57 14 95 91 www.regin.fr, info@regin.fr...
Need help?
Do you have a question about the RPW and is the answer not in the manual?
Questions and answers