
Summary of Contents for GLOBAL DIAGNOSTICS MICRO SHAKE 1200
- Page 1 F12, User Manual, V2 12.2020 MICRO SHAKE 1200 ELISA Plate Shaker/Incubator MICRO SHAKE 1200 USER MANUAL Page 1 of 25...
-
Page 2: Table Of Contents
F12, User Manual, V2 12.2020 MICRO SHAKE 1200 TABLE OF CONTENTS 1. GENERAL INFORMATION...................... 1.1. W ......................4 ARRANTY NFORMATION 1.2. T ........................4 ECHNICAL ERVICE 1.3. D ........................4 ISPOSAL NSTRUCTION 1.4. C ............................4 ONTACTS 2. GENERAL SAFETY WARNINGS.................... - Page 3 F12, User Manual, V2 12.2020 MICRO SHAKE 1200 8.1.9. E ..........................18 NTER KEY .......................18 8.2. EFAULT ETTING 9. SAVING THE TEST......................... 10. DELETING THE TEST......................11. RECALLING THE TEST......................12. ERROR MESSAGES......................13. DECONTAMINATION......................13.1. D ..................23 ECONTAMINATION ROCEDURE 13.2.
-
Page 4: General Information
F12, User Manual, V2 12.2020 MICRO SHAKE 1200 1. GENERAL INFORMATION 1.1. WARRANTY INFORMATION Each Instrument is completely tested and guaranteed for twelve months from delivery. The warranty applies to all the mechanical and electrical parts. It is valid only for proper installation, use, and maintenance in compliance with the instructions given in this manual. -
Page 5: General Safety Warnings
F12, User Manual, V2 12.2020 MICRO SHAKE 1200 2. GENERAL SAFETY WARNINGS 2.1. DANGER – WARNING SYMBOLS The following symbols are used to inform the user of the safety rules. This symbol indicates generic danger. It means that, serious damage can occur to the operator if described precautions are not observed. -
Page 6: Use Of The Instrument
Alterations to the instrument are strictly prohibited. The user is liable and solely responsible for any improper modification to the instrument, and for the consequences derived as a result. Should the instrument need extraordinary maintenance, contact GLOBAL DIAGNOSTICS B service or an authorized service center. Specialized technicians, who will be able to repair the instrument using original spare parts, will carry out the maintenance. -
Page 7: Introduction
F12, User Manual, V2 12.2020 MICRO SHAKE 1200 3. INTRODUCTION 3.1. SPECIAL FEATURES: • Simultaneous shaking & incubation operation. • Buzzer indication on completion of incubation • Indication of Remaining time • Current temperature of incubation on display, on pressing TEMP Key. -
Page 8: Packing, Transport And Storage
F12, User Manual, V2 12.2020 MICRO SHAKE 1200 4. PACKING, TRANSPORT AND STORAGE 4.1. GENERAL WARNINGS Instrument has to be decontaminated before packing for transportation. 4.2. PACKING Packaging is needed whenever it is to be transported or shipped by courier or other means. -
Page 9: Instrument Description
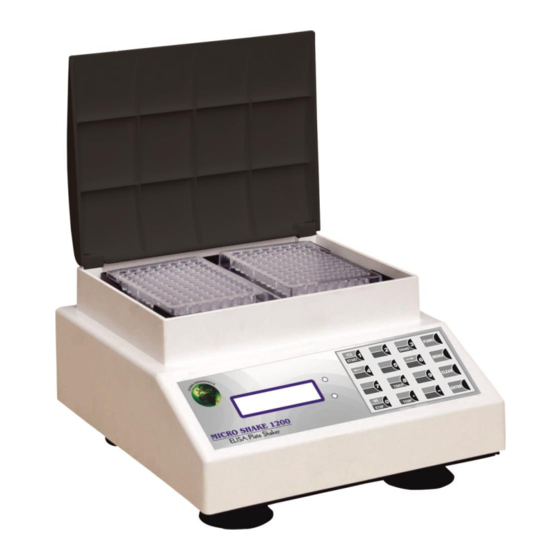
F12, User Manual, V2 12.2020 MICRO SHAKE 1200 5. INSTRUMENT DESCRIPTION Components of different views of the below pictured instrument: 5.1. PERSPECTIVE VIEW: (A) Front View PLATES INCUBATOR / SHAKER PLATE HOLDER NUMERIC KEYPAD DISPLAY (B) Rear View COOLING FAN... -
Page 10: Installation Procedure & Verification Criteria
F12, User Manual, V2 12.2020 MICRO SHAKE 1200 6. INSTALLATION PROCEDURE & VERIFICATION CRITERIA 6.1. UNPACKING INSTRUCTIONS Check accessories as per packing list. Kindly store all packing materials so as to use it to repack and ship for maintenance or servicing. -
Page 11: Precautions
F12, User Manual, V2 12.2020 MICRO SHAKE 1200 7. PRECAUTIONS PRECAUTIONS: • Keep the place dry and clean. • Check all the grounding wires properly. • Use original packaging for transportation. Page 11 of 25... -
Page 12: General Key And Operation
F12, User Manual, V2 12.2020 MICRO SHAKE 1200 8. GENERAL KEY AND OPERATION 8.1. KEYPAD 8.1.1. START / YES KEY This option helps the user to START the process of Shaking. Similarly, “YES” key is used when the instrument asks certain questions as follows - f.e:... -
Page 13: Shake Key
F12, User Manual, V2 12.2020 MICRO SHAKE 1200 8.1.3. SHAKE KEY User can directly start the process of Shaking just by selecting “SHAKE” key present on the keypad. SHAKE START SHAKE Y/ N ? SET RPM = 400 Enter the RPM between 400 to 700 and press Enter key. -
Page 14: Func Key
F12, User Manual, V2 12.2020 MICRO SHAKE 1200 8.1.4. FUNC KEY: FUNC Press FUNC button present on the keypad CREATE TEST Y/ N ? SET RPM = 400 Enter the RPM between 400 to 700 and press Enter key. Its default value is 500 RPM Set TIMER1 &... -
Page 15: Menu Key
F12, User Manual, V2 12.2020 MICRO SHAKE 1200 8.1.5. MENU KEY: This option helps the user to recall the saved test by entering its test no. MENU Enter the Test No. and select ENTER key ENTER TEST NO = ___ TEST RECALLED Enter the Valid Test No. -
Page 16: Timer Key
F12, User Manual, V2 12.2020 MICRO SHAKE 1200 8.1.6. TIMER KEY: This option is used to set the timer for the respective plates. TIMER TIMER 1 Y/ N ? START TIMER Y/ N ? Enter TIMER1 between 1 – 999 min and SET TIMER 1 = 30 press Enter key. -
Page 17: Clear Key
F12, User Manual, V2 12.2020 MICRO SHAKE 1200 TIMER 2 Select “NO” option, in order to continue TIME : 10 STOP Y/ N the TIMER 8.1.7. CLEAR KEY This key is used to select the Language option and also to clear the test entry. -
Page 18: Temp Key
F12, User Manual, V2 12.2020 MICRO SHAKE 1200 8.1.8. TEMP KEY TEMP Press TEMP button present on the keypad INITIAL SCREEN ROOM TEMP. Y/N ? Incubator Heating OFF (Room Temperature) 37ºC SET TEMP Y/N It will set to room temperature Set value and press ENTER Key SET TEMP = 37ºC... -
Page 19: Saving The Test
F12, User Manual, V2 12.2020 MICRO SHAKE 1200 9. SAVING THE TEST Saving the Test itself means creating new test with new parameters. FUNC Press FUNC button present on the keypad CREATE TEST Y/ N ? Enter the RPM between 400 to 700 and press SET RPM = 400 Enter key. -
Page 20: Deleting The Test
F12, User Manual, V2 12.2020 MICRO SHAKE 1200 10. DELETING THE TEST One can delete the saved test by following the procedure mentioned below- FUNC CREATE TEST Y/ N ? INITIAL SCREEN DELETE TEST Y/ N ? ENTER TEST NO = ___... -
Page 21: Recalling The Test
F12, User Manual, V2 12.2020 MICRO SHAKE 1200 11. RECALLING THE TEST MENU ENTER TEST NO = ___ Enter the Test No. and select ENTER key TEST RECALLED After Recalling the test it will flash following Test parameters and finally ask the user to Load the Plate and press Enter key. -
Page 22: Error Messages
F12, User Manual, V2 12.2020 MICRO SHAKE 1200 12. ERROR MESSAGES MESSAGES CAUSE /CORRECTIVE ACTION This message appears only when the test no. is recalled Test Not Exist which does not exist. Test Present When test is already present. Invalid RPM This message appears when the entered RPM Value is out of the given range. -
Page 23: Decontamination
F12, User Manual, V2 12.2020 MICRO SHAKE 1200 13. DECONTAMINATION Check whether all the tubing is properly connected. Switch on the instrument. 13.1. DECONTAMINATION PROCEDURE If the instrument is to be shipped after being exposed to potentially hazardous material, it should be decontaminated. -
Page 24: Safety Clearance Certificate
F12, User Manual, V2 12.2020 MICRO SHAKE 1200 14. SAFETY CLEARANCE CERTIFICATE Please complete all information requests on this form prior to returning the instrument to the manufacturer or your local distributor for servicing, repairs or return. Thank you for your co-operation. -
Page 25: Spare Parts
F12, User Manual, V2 12.2020 MICRO SHAKE 1200 15. SPARE PARTS 15.1. ORDERING SPARE PARTS Parts subject to deterioration, or defectives which need to be replaced, have to be ordered by giving following details. Ordering the spare parts, the following data are to be mentioned: •...
Need help?
Do you have a question about the MICRO SHAKE 1200 and is the answer not in the manual?
Questions and answers